
Photo Tips for Isolation: Week 6
Every week for the month of April (and into May!) we have shared 5 new photo ideas you can try at home to challenge yourself and keep your image-making fresh while we wait for COVID-19 to pass. You can see the first week of challenges here, as well as week two, week three, week four and week five here.
All these tips just require the bare minimum of gear – a camera and a tripod, although a stack of books or a stool can work in a pinch if you don't have one.
Day 26 - Exploring Colour Temperature
Colour temperature is a wonderful quirk of light that most people never notice, and few truly appreciate.
Unlike the colour of objects, colour temperature refers to the colour bias of a light source, such as the halogen downlight in your kitchen, a fluorescent tube in your office, the flash on your camera or simply some sunlight.
All these light sources produce what one would assume is white light, but if you look a little deeper you will discover these light sources have their own colour signature: some light is warmer, others cooler, some light has a green cast and others have a magenta cast.
While we might not easily notice colour temperature, our cameras can and they will usually correct any variations in colour thanks to the camera’s Auto White Balance (AWB) control.
Most of the time, auto white balance does a good job of getting colour right, but it can also get it wrong, particularly if you are photographing a scene with a limited colour palette or a sunrise or sunset, because often the camera wants to cool down all those lovely warm tones.
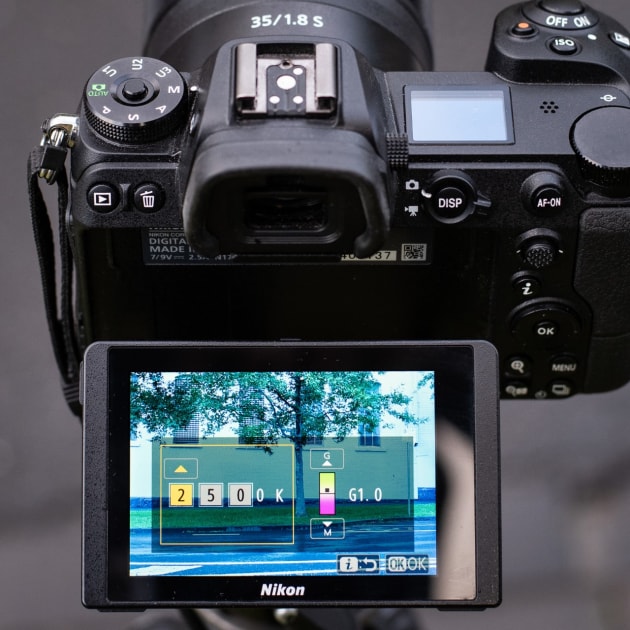
If you want to though, you can override the Auto White Balance on your camera and instead, manually select a white balance setting to suit the environment you are working in.
Most cameras have white balance presets for sunny conditions, shade, overcast, tungsten and fluorescent lighting along with the option to manually dial in a colour temperature of your choice, from about 2500 to 10,000 Kelvin (Kelvin is a unit of temperature).
Normally you would adjust the white balance on your camera to match the light conditions you are working in. For example, if it is sunny you manually select the sunny setting, if you’re working indoors under tungsten you dial up the tungsten setting. If you want though, you can also use these controls to deliberately warm up or cool down a scene.
So, if you get a chance this week, try making some photos using the manual White Balance options on your camera. See how blue you can make a night scape look outside your house, or try warming up a sunset. Go on and explore!
Day 27 - Backyard Wildlife
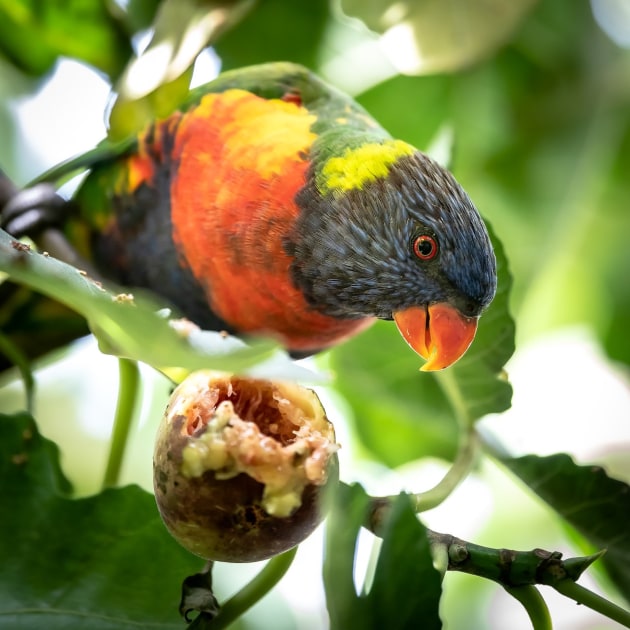
Wherever you happen to wander in Australia, be it the outback or even your local CBD, you can usually find some amazing wildlife to enjoy. About 15 minutes from our house we can often find possums wandering around Flagstaff Gardens in Melbourne’s CBD, and in our backyard, a fig tree attracts lorikeets by day and bats by night (along with the occasional rat or two)!
With this thought in mind, we figured we might challenge you to make some photos of your local wildlife. (A quick heads up, I know it has been a long few weeks but your family does not qualify as wildlife… yet).
Anyway, dust off your telephoto lenses (or micro lenses) and start exploring your backyard for birds or other creatures to photograph. Of course, as they say in Kiwiland there is always more than one way to skin a possum, and so since you might have time on your hands, consider some of the more clever techniques you can apply to this challenge.
While the usual tact when making a photograph is to stand behind the camera, this can actually discourage birds and animals from coming close to you and so as another option, try mounting your camera on a tripod and pointing it at a piece of fence or a branch you know birds or other creatures might land on, then try triggering the camera remotely to capture the photo.
Some of you might have remote releases (either wired or radio) for your camera, but some of you might have a WIFI enabled camera that connects remotely to your smartphone or tablet. Pair up the camera to your smart device and then head off inside and wait to see what happens,
If you are using your camera remotely, just remember to put a dark plastic bag or something similar over the top of your camera so that birds and other animals don’t take the opportunity to land on your camera, and more importantly, leave a deposit!
Day 28 - Layer Mask Adventures

About twenty years ago, back when Photoshop was still a relatively new tool for most of us, I spent hours (or days rather) trying to blend two photographs together. I had made a photograph of a Westpac helicopter flying low across a landscape, and as often is the case, one photograph of the helicopter looked good, but a landscape from another frame offered a better background.
I knew enough to copy and paste the helicopter photograph onto my preferred landscape image but from there I made the tedious mistake trying to delete away the background from the helicopter image to reveal the landscape beneath it.
A few days later I was talking to a colleague, John Doogan, and told him about this Photoshop experience and his first comment was “why did you not use a Layer Mask”?
As I now know, a layer mask is an exceptionally clever and easy to use tool, and had I used it back then to clear cut that helicopter I could have turned my two-day grind into a half hour job.
As you might guess by now, a layer mask can reveal or hide different portions of a layer, be it an actual image or an adjustment layer. To use a mask, simply select the layer you want to work on and then click the mask icon at the bottom of the layers window.
Then, with the mask selected, use the brush tool to paint over any part of the image you want to hide or reveal. Using black paint will hide any part of the layer you paint over, while using white paint will reveal the image.
A helpful small tip: when using masks many smart operators work with a finger hovering over the X key because a tap will quickly swap between white and black paint, allowing you to reveal or hide elements of the image in the blink of an eye.
If you want to give yourself a challenge, find a photograph that you like of yourself and then find a landscape scene or a famous vista that you might like to drop yourself into.
In Photoshop copy and paste the photo of you onto the landscape and then use the layer mask tool to put yourself in this new locale. Remember, the trick with this idea is to ensure the lighting on you is going to match your chosen background!
Day 29 - Autumn Leaves

Chances are you will have noticed the colours changing in the trees around town, and so perhaps you might like to try capturing some of that autumn gold.
Again, there are dozens if not hundreds of different ways you can approach this subject. Some of you might walk up to the tree and confront it directly as nature slowly strips it bare.
Others might opt to pull out a drone and capture the view from above, particularly if those leaves have formed a carpet of colour at the base of a tree.
Then there are those photographers who might prefer to stand back and look at how one particular tree can add colour to the neighbourhood.
For those of you who are not too keen about standing outside on a cold May day, you could consider grabbing a few interesting leaves from the street and bringing them inside to make some photographs on a table top studio.
Again, there are dozens of ways you can work this idea, from photographing just a few leaves on a flat lay, through to making a multiple exposure of one leaf (or multiple leaves).
If you have access to a micro lens you can even try exploring a weathered leaf in close detail. As an idea, make a very close photo of all the leaf detail and then perhaps overlay that image with a few leaves shot as part of a wider image. You might even overlay that close-up of a leaf with a landscape image. We will leaf it to your imagination!
Day 30 - Pet Portraiture
Over the past few weeks our cats and dogs have been wondering what on earth is going on! We used to be out the door every day as regular as clockwork, and now we are spending all day at home. As a guess, we are interrupting their usual daily routines: the long naps, chewing on socks, clawing at furniture and daytime television.
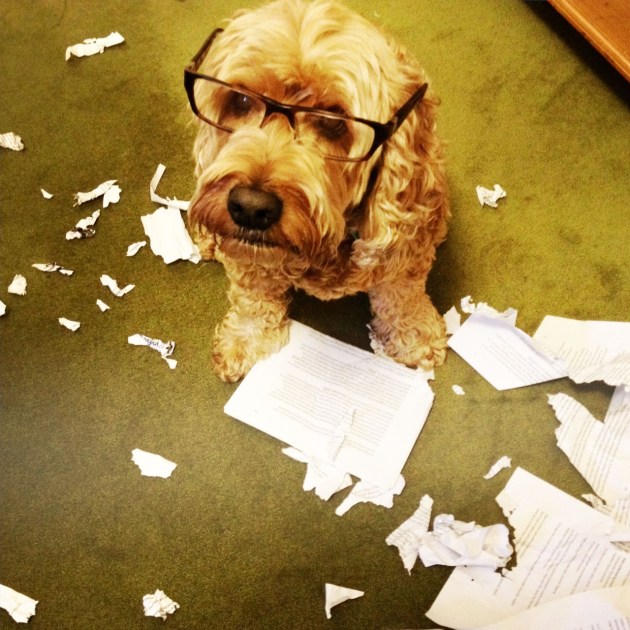
That said, while we are spending more time with our pets, how about making a few photos of your furry friend. You could make the typical pet portrait of pooch or puss sitting nicely for the camera but I think most of us are too familiar with these sorts of photos. So how about going for the documentary approach, showing how our cat or dog is now turning into part of your at-home workforce?
As is often the case, trying to get an animal to do what you want is never that easy, so instead, just pull out the camera and keep it ready to go for whenever you might happen to see a good moment about the house. Just make sure you keep that camera and its lead away from the edges of furniture; we don’t want them destroying a camera for the sake of a shot!