
Tutorial: How to make precise selections in Photoshop
Have you ever photographed the perfect subject, but wanted to tweak just one colour in the image? Or have you ever wanted to edit just the out of focus areas in one of your images, leaving the in-focus parts alone?
In Photoshop, there’s a selection of tools that can perform these actions, along with all sorts of others, quickly and easily. Better yet, once you’ve learned them, they will become a useful tool in your editing toolkit, especially so as they are incredibly accurate. So, let’s dive right in, with the first, making a Colour Range based selection.
Color Range Based Selection
Color Range is a selection tool that allows you to select parts of an image based on its colour. This makes it easy to select a specific colour and then change its hue, saturation and/or brightness.
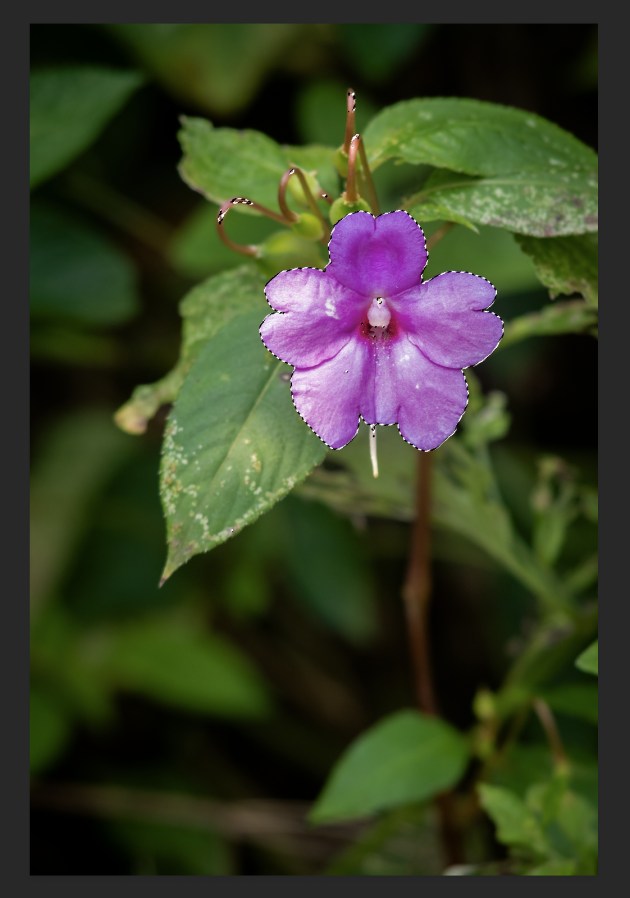
Let’s start with an example. In this image of an Impatiens flower below, I wanted to make adjustments to the saturation of the petals, but I didn’t want to adjust the leaves or other parts of the image. A Color Range Based selection will allow me to do this.

1) Create a layer
First, I create a Background Copy Layer by Selecting the background layer and dragging it over the Create New Layer icon (It has a + symbol). This means I will only make changes to my copy if I need to start again at any time.
Now, let’s set up our colour range. With the Background copy layer selected, click Select > Color Range. The Color Range Window will pop-up.

2) Setting the color range
I first select “Sampled Colors”. With this option selected, the tool selects pixels that share the same or similar colour with a click on an area of that colour in the image. Photoshop “samples” the colour and selects all of the pixels that are the same as, or within a certain range of, that colour (hence the name “Color Range”).
If you click on the words “Sampled Colors”, you’ll see a list of different selection options. For example, you can instantly select all the pixels of a specific colour (reds, yellows, blues, etc.) or select the brightest pixels in the image by choosing Highlights, or the darkest pixels by choosing Shadows. These additional options can come in handy in certain situations, but we’ll stick to ‘Sampled Colors’ for this tutorial.
Next, you’ll see three Eyedropper tools on the right. The main Eyedropper is selected by default, and that’s what you’ll use to select a colour from your image. From there, you can add to your selection with the middle Eyedropper, and subtract from your selection with the Eyedropper on the right. Doing this builds the colour range for the image.
3) Refining your selection
At the bottom of the window, you’ll notice the preview window displays the selections as a grayscale image. Like with a layer mask, areas in the image that are fully selected appear white in the preview window, while areas that are not selected appear black.
Now, I uncheck the option ‘Detect Faces’ and check the option ‘Localised Color Clusters’, as this is the most appropriate for this style of image – if you’re editing a portrait for example, you could keep it selected.
Fuzziness controls the selection area outside of your initial selection. The higher we set the Fuzziness value, the more brightness levels we include in the acceptable range.
I recommend adjusting Fuzziness by previewing the image. For more precise colour selection, try to keep Fuzziness to lower values. A Fuzziness value of 40, for example, will select all pixels that are the exact same colour as the pixel we clicked on, plus all pixels that are within 40 brightness values lighter or darker, while excluding anything outside this range.
With the Range slider, you can adjust the range of the selection. Here, I’ve kept it to the default of 100%.
4) Now make your edits
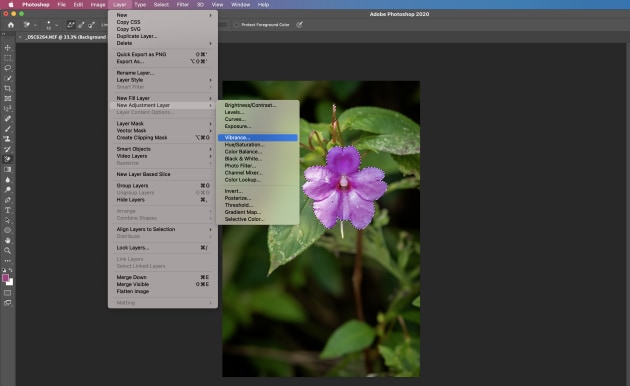
Finally, click Ok. You will see the marching ants around your selection. This is the area you can now make finite adjustments to. (To make these, first click on Layer > New Adjustment Layer, and then select the adjustment layer you want to apply, such as Vibrance, Brightness/Contrast, Hue/Saturation, etc.)
Focus Area-based Selection
Now, let’s learn how to make selections based on the area in or out of focus. Focus area-based selection is useful when you have a perfectly focussed object and an out of focus background, but you want to just focus your adjustments (such as Sharpening, Brightness/Contrast etc) to one or the other. Generally speaking, it works best with images which have a clear distinction between the main object and the background.
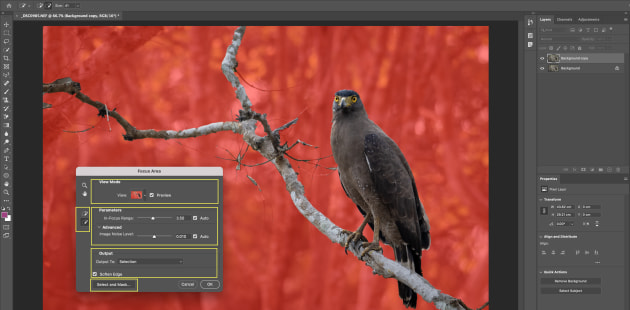
For this, I’m editing a shot of a Serpent Eagle that was perched on a dried tree. The eagle is in focus, and the background is out of focus. The first step, like with the Colour Range tool, is to create a Background Copy Layer by Selecting the background layer and dragging it to the Create New Layer icon ( + symbol).

1) Open the focus area window
With the Background copy Layer selected, click > Select > Focus Area. The Focus Area Window will pop-up. Select the View Mode and choose which is convenient for you. I generally prefer the Marching Ants or Overlay View Mode Options.
2) Refine the selection
Under the ‘Parameters’ option there are two options, In-Focus Range and Image Noise Level (found under Advanced). If you move the slider to 0, the entire image gets selected, and if you move the slider to the extreme right, only the parts of the image in clearest focus remain selected. By checking the Auto box, Photoshop will make an automatic selection, and in most instances, you’ll probably find the default does a good job of selecting the out of focus areas. However, if required you can manually adjust the In-Focus Range with the slider to clean up some of the stray selection areas. If your image has noticeable noise in the out of focus areas, you can use the Image Noise Level slider to adjust this, or just leave it at auto.
On the left side of the Pop-up window, there are two options to add to the focus area and subtract from the focus area. Like with the selection tool, you can use these to fine-tune your Selection. A quick tip – by tapping the Left ([) and Right (]) Bracket keys you can adjust the size of the tool’s tip.
With the selection made, there is an option under the Output tab to ‘Output To.’ There are multiple options here such as Selection, Layer Mask, New Layer, etc. I generally choose Output to Selection or New Layer with Layer Mask.

3) Soften edges
Underneath the Output section, you can also check the Soften Edge check box, which runs additional processing to make for a cleaner edge. Depending on your chosen output, there will be an option to either choose the ‘Select and Mask’ button, or simply click Ok.

4) refine even more...
If you do choose the select and mask option, you’ll see a window allowing you to refine your selections further, just like with all masking in Photoshop.

5) ...and make your adjustments
Finally, with the selection ready you can now make Targeted Colour and Tonality adjustments using the Adjustment Layer option, just like we did with Color Range selection above.
Subject-based Selection
Updated most recently in Photoshop CC 2020, Select Subject automatically finds the main subject in your image and ‘selects it’ by drawing a selection outline around it.
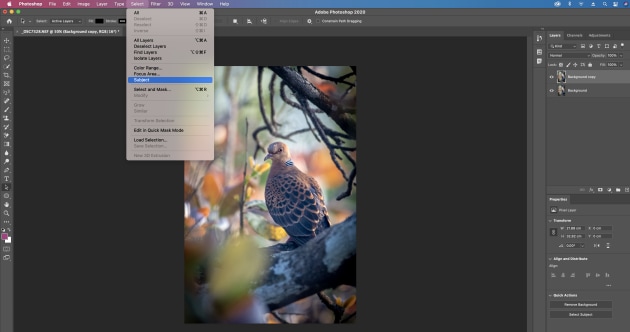
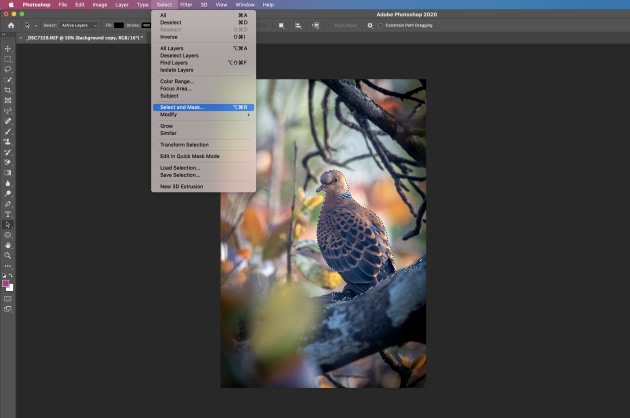
However, before you get too excited, results do depend on the image - if there are many out of focus areas on your chosen photo, then Subject-based selection may struggle to make its selections accurately. Where it shines is if there is a decent distinction between the main subject and its surroundings like with my chosen photo of an Oriental Turtle Dove. Let’s take a look.
1) Create a layer
Firstly, like with Colour Range and Focus-Area based selections, first create a Background Copy Layer. With it selected, click > Select > Subject. You’ll see a selection made automatically that will either be quite accurate or need some tweaking.

2) Use the quick selection tool
With the initial Selection made, you may need to use the Quick Selection Tool to make adjustments to the masked layer. You can select it on the left and then choose to either add or subtract areas as necessary. When you’re happy with the selection, Click on Select > Select and Mask.
3) The select and mask window
Now, the Select and Mask window will pop-up – Here you can refine your selections, making adjustments for smoothness, feather, etc.

4) Choose your output
We’re nearly there. Under the Output Settings, > Select options from the Drop Down, and then select either ‘Selection’ if you’d like to keep the changes on the original layer, or ‘New Layer with Layer Mask’, if you’d like a new layer generated.
5) Make adjustments
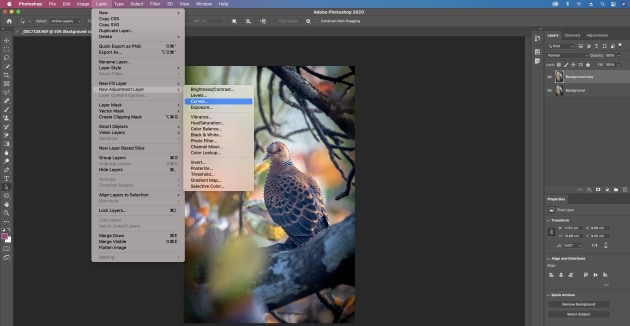
Finally, with the selection made, you can now make targeted colour and tonality adjustments to it using the Adjustment Layer option, as with Colour Range above.
About the author: Shreyas is an Adventure explorer, Nature and Wildlife Photographer. After photographing in different parts of India for more than a decade, he has focussed on what he is most passionate about: Digital Post Processing and Photography Mentoring. You can see more of his work and tutorials at shreyas-yadav.com.