
3 more quick tips for using Lightroom's Adjustment Brush
You can start with part one from last week here, or just dive straight into this tutorial now. As a reminder, the Adjustment Brush icon can be found in the Develop module below the Histogram, and above the Basic panel on the far right. Let’s get started.
1) Different strokes for different folks
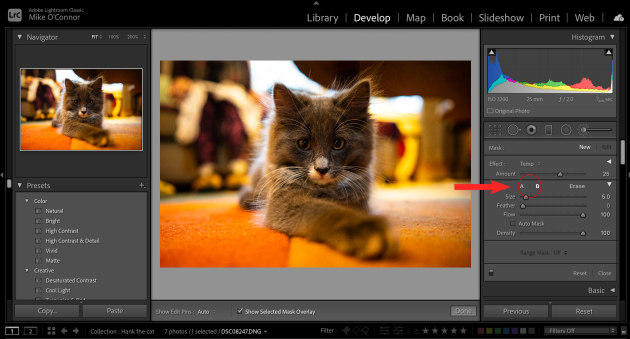
A feature many people aren’t aware of is that Lightroom gives you the option to use two separate brushes with different settings. You can see these indicated by the “A” and “B” near the bottom of the brush effects panel.
Much like there are separate sizes and types of paintbrushes for different kinds of painting jobs, there may be times when you may want a large, softer brush and times when you want a brush that is smaller or has a harder edge. You can set these to your liking, and switch between the two brushes by using the “/” key.
One last thing. In the settings for the brush you’ll see options to adjust the size and feather, but if you’re wondering what the difference is between Density and Flow, Density is a constant control that doesn’t ebb or flow as you’re painting, while Flow is more akin to using a can of spray paint - the longer your hold the brush pressed down over an area, the more heavily the effect will be applied.
2) Adjust the intensity of a brush
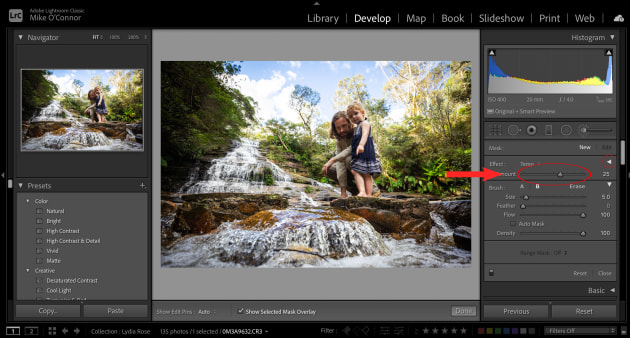
This one is a great time saving trick. Let’s say you’ve created a custom brush preset and applied it to your image, but after doing so realise you want to make the effect more intense. You could manually adjust all the individual sliders, but who has time for that? Luckily, Lightroom has a tool to help.
On the right of the word Effect at the top of the panel is a small triangle. Click it and it will collapse the box, revealing a single slider that says ‘Amount’. You can then use this to adjust the intensity of your chosen preset. This also works on any of the other Layer Mask adjustments too, such as the Radial tool – genius!

3) Auto Mask helps you work fast
Auto Masking lets you ‘paint in’ large parts of an image quickly, and the Adjustment Brush has a few built-in features that will help you use it efficiently. Firstly, you can find the Auto Mask feature at the bottom of the Brush section. When it’s on, adjustments will be limited to an automatically selected area –usually the edges/areas of contrast in an image.
You could leave it on all the time, however results can look a little strange if the algorithm that decides what to mask and what not to mask gets confused. A good technique is to paint the ‘body’ of the subject with Auto Mask off, and then once you’re done, hold down Command (Mac) or Control (PC), which will turn on the Auto Mask feature. Doing this means the only area affected by the brush as you paint is the colour beneath the little crosshair in the centre of the brush.
With Auto Mask enabled you will then be able to paint the edges nice and tidily – don’t forget you can also hold down Alt (PC) or Opt (Mac) to erase strokes if you miss. ❂