
The air up there: Basics of aerial photography (Part one)
In 2017 I wrote my first article for Australian Photography, discussing the lessons I had learnt on my first experience chartering a twilight, doors-off helicopter flight over New York City.
Since then, I’ve been fortunate to photograph a variety of locations, at different times of day, from up above. These different locations and lighting conditions have proven to greatly influence everything from my camera settings to lens selection.
With a bit more experience under my belt, it’s time I revisited the topic of aerial photography. Expanding upon some of my previous tips, as well as sharing some new ones that I’ve learnt along the way.

Shoot Wide Open…. Sometimes
Unlike landscape photography where you may require an aperture of f/8 – f/13 to achieve a wide enough Depth of Field (DoF), in aerial photography, we can often shoot wide open at apertures of f/2.8 and even f/1.4. This is possible thanks to our nearest focal point being so far away.
Even if your subject was just 50m away, with a 24mm lens set to f/1.4, everything from 39m to infinity would be considered acceptably sharp. This area further increases at f/2.8, from 6m to infinity. Being able to set your aperture wide open without any effective sacrifice to DoF means that you can shoot with a faster shutter speed whilst maintaining a low ISO.

Whilst this is useful in low light situations, when you are shooting during the day when natural light is abundant, setting your aperture wide open may not be the best option. In the daytime, I suggest stopping down your lens’ aperture by a few stops to f/4 or f/5.6. Not for the increase in DoF but because it will improve the overall image quality.
Whilst modern lenses have come a long way, they still rarely perform at their best wide open. Stopping down the aperture of your lens will help to ensure it’s performing at or near its best, improving overall image sharpness and reducing vignetting.
So long as you can maintain fast shutter speeds with low ISO levels, the extra stops of light we sacrifice by reducing the lens’ aperture are well worth the trade-off to extract the maximum amount of detail from the scene.
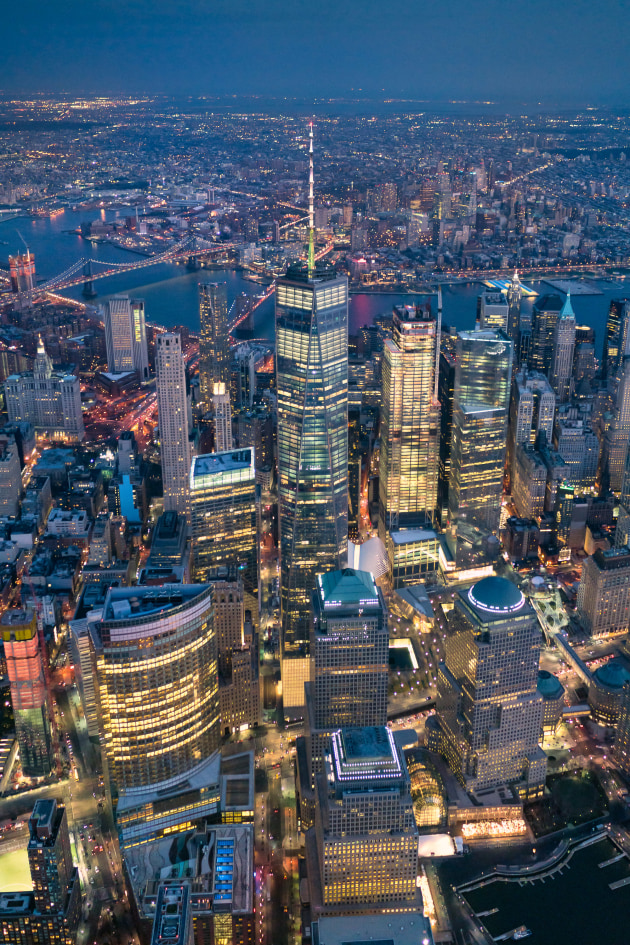
Camera orientation can be a great way to isolate your subject and remove distracting elements from your image. I photographed the One World Trade Centre vertically to accentuate it as my focal point and to remove other surrounding buildings that would have become a distraction. Sony A7R Mark II, FE 35mm F1.4 ZA lens. 1/250s @ f1.4, ISO 2500. Image: Dylan Giannakopoulos/Supplied
Should you take the doors off or leave them on?
I’m still a strong believer that given the choice and budget, shooting with the doors off is the way to go. However, it’s not to say that photographing from a helicopter with the doors on isn’t going to be a rewarding experience.
Having the doors off enables greater compositional freedom without the worry of glare and reflections getting in your photos. As most doors off flights are chartered, you’re able to plan your route and direct the pilot where you want to go. Bear in mind, that these charted flights are not cheap. Even with a helicopter full of photographers to split the expense, these flights can be cost-prohibitive.
Whilst it has its drawbacks, shooting through the window of an aircraft whether it be a helicopter or even a plane, is still a great experience with some upsides. Apart from them being typically cheaper, scenic flights are readily available in most popular locations.

No matter what the genre of photography is, I always try to find ways of adding leading lines to my images. I was able to utilise the gridded streets of New York City to create converging lines, drawing the viewer’s eye from central park on the left through to the empire state building and beyond on the right. Sony A7R Mark II, FE 24-70mm F2.8 GM lens @ 30mm. 1/250s @ f2.8, ISO 2000. Image: Dylan Giannakopoulos/Supplied
Not all helicopters have removable doors and therefore, in some locations, you may have no other option. In cold conditions, having the doors on also makes for a warm, comfortable flight. To reduce glare and reflections, it’s a good idea to shoot with the lens as close to the window as possible with the lens hood on.
Whether the doors are on or off, aerial photography is an experience I suggest all photographers try!
One Lens to rule them all
Mid-range zooms such as a full-frame 24-70mm f/2.8 (16-55mm APSC equivalent) are the ideal lens for aerial photography. Prime lenses are an excellent option when shooting in low light conditions for their faster apertures, but zoom lenses provide you with greater flexibility when composing your shot.
In terms of focal length, the midrange zoom is the goldilocks of lenses for aerial photography. It’s not too wide and it’s not too telephoto, it’s just right! Finding a composition with a focal length wider than 24mm without parts of the helicopter in your frame is a real challenge.

On the other end of the spectrum, telephoto focal lengths e.g 200mm, present their own unique set of challenges.
Atmospheric haze can dramatically reduce the contrast of a scene, producing flat, grey looking results. Its effects tend to be more noticeable the longer the focal length and when photographing objects in the distance. Whilst you can try correcting for these using tools such as the Dehaze slider in Lightroom, it can be difficult to produce natural-looking results in overly hazy conditions.
Telephoto lenses also tend to have limited use cases, particularly when you are chartering a helicopter as you can usually get close to your subject. Personally, if I could only take one lens on an aerial photography flight, it would be a 24-70mm f/2.8.
How slow can you go?
In aerial photography, you can’t take a one size fits all approach when it comes to selecting your shutter speed. Differences in focal length aside, environmental factors such as wind speed and direction can dramatically change how fast your shutter speed needs to be from one flight to the next.
In New York, I was able to shoot at 1/250s quite comfortably. In comparison, along the Great Ocean Road, I was shooting at speeds of 1/1000s to 1/4000s. Rather than trying to determine the ‘correct’ shutter speed, I prefer to think of it as, what is the minimum shutter speed that will result in most of my images being free of motion blur? The best way to answer this question is by taking test images during the flight.

The amount of available light will also determine how conservative you need to be with your shutter speed. On my Great Ocean Road flight, I could have used a slower shutter speed of 1/250s, but fewer images would have been sharp due to motion blur.
There would also be no advantage to shooting with such a slow shutter speed when my ISO levels were already low. When I was in NYC shooting well into the blue hour, I needed every stop of light I could get to keep my ISO from going over 6400. The fewer number of sharp images was well worth the trade-off to avoid shooting at ISO 25600 and higher.
Utilise Continuous Shooting Modes
When shooting aerial photography continuous ‘burst’ shooting modes can be used as a composition tool. Unlike when you’re on land with a tripod, in a helicopter, it can be quite challenging to compose and keep your horizon line straight. The effects of parallax error also add to this challenge.
If you aren’t familiar with parallax error, it is the apparent change of position of an object relative to another further away when viewed from two different locations. As you fly past your focal point you will see that the objects closest to you will shift position quicker than those further away.

This can make it very difficult to align subjects with precision. Thankfully there is a workaround.
By shooting with a high frame rate, continuous shooting mode, you can take a series of images as you fly past your subject. This will leave you with a group of photos capturing the slight variances from one frame to the next. So, when you are back in front of your editing software of choice, you will be able to select the image with the best framing.
Two is better than one
For safety reasons, when the helicopter's doors are off, you can’t have any loose objects on you. This means once you are onboard, you cannot change your camera battery, SD card, or lens. The rules aren’t quite as stringent when the doors are left on, but there are still some restrictions. This is the reason why I like to bring a second camera body with me on my aerial photography flights.
Look out for part two next week.