
Photoshop tutorial: How to shoot and composite a surreal self portrait
Frame yourself!
In this fun step-by-step tutorial Charli Savage shows you how to shoot and edit your own surreal self-portrait, harnessing the power of Photoshop.
Back in 2018, my imagination was swimming in an ocean of ideas I had for photos, however, I neither had the skill or the knowledge to convert these magical and strange worlds in my imagination to a physical storytelling image. That is, until
I discovered the world of conceptual photography – an illustrative style of photography portraying your ideas and stories in a creative way.
After teaching myself how to use a camera and Photoshop, I started photographing other people to portray my ideas and stories. And while there is absolutely nothing wrong with this, I began to realise that when you photograph someone else, it also becomes their story.
Using yourself as your subject brings a personal element to your work that you cannot get when photographing another person. It’s because of this that I am now mainly a self-portrait photographer and I hope to inspire you to experiment, by putting yourself in front of the camera as well.
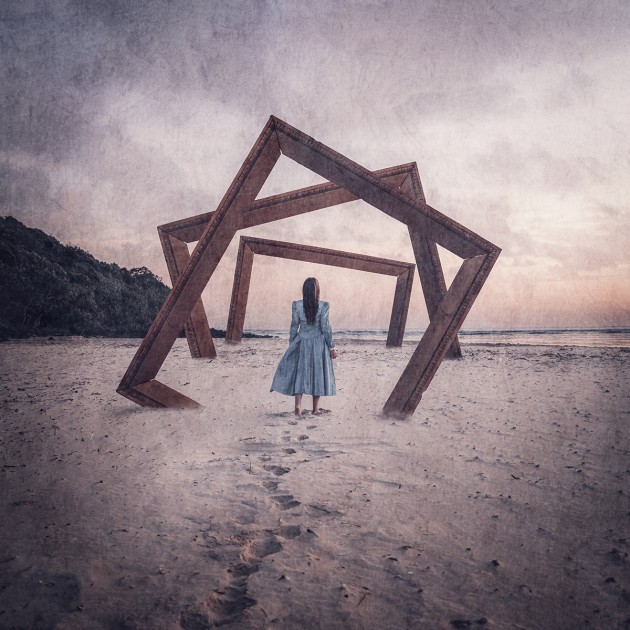
Today, I’m going to show you how to create your own version of my self-portrait image ‘Empty Memories’. You’ll be photographing this concept as a self-portrait and compositing it together in Photoshop.
PREPARING YOUR SHOOT
Preparing ahead of time will help make the whole process less stressful. Let’s look at what you’ll need.
EQUIPMENT
You’ll of course need a camera and lens. I use a Canon 80D with a Sigma 35mm 1.2 Art Lens. My camera has built in WiFi which connects to my phone. I then have the Canon App which I use to take my photos.
If your camera doesn’t have WIFI, you can use a remote or set an interval timer (most cameras have these). You’ll also need a tripod.
LIGHTING
Lighting is incredibly important. When you composite images together, lighting needs to match so the images blend together. For this reason, I always photograph everything in the same location at the same time. I use natural light and my ideal lighting is overcast weather or during blue hour (just before sunrise and just after sunset).
LOCATION
Suggested locations are a beach / park / field. The flatter the area, the better. When the background is busy (with buildings, trees, etc.) it can distract from your subject, so I always search for negative space – it’s like having a blank canvas with endless possibilities. Keep it simple.
COSTUME
Think about what you’ll wear. I go for clothing that doesn’t appear to be from one specific time-period and I’m usually choosing vintage over modern, however, the choice is yours. You can scour op-shops for clothing or just use something already in your cupboard.
PROPS
For this specific image you’ll only need one prop – a frame. I chose a square wooden one, but you can use any frame you like. I do recommend using a square / rectangular one (rather than circular one). The size doesn’t matter, you’ll be able to adjust this in Photoshop.
SHOT LIST
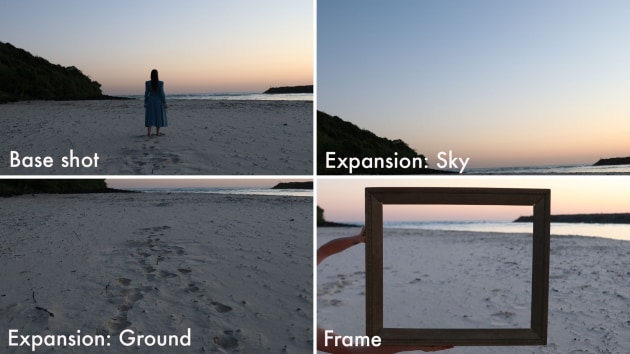
A shot list helps you remember what you need to photograph. For this image you’ll need a total of four shots – A base shot, which is an image of you walking away from the camera, two ‘expansion’ shots – an image above and below your base shot so you can expand your image to a square, and a shot of the frame – a straight on shot of the frame you’ll be using.
THE SHOOT
Once on location, set your camera on your tripod. I tend to adjust the height to around waist height and I position my camera in landscape orientation. Then, adjust your settings to suit your lighting and environment. I have my camera set to autofocus and I always shoot in RAW.
Let’s start with a test shot. Depending on what you’re using to shoot (timer, remote, phone app), take a shot of you in front of the camera. You can opt to physically be walking away from the camera and shooting several images, or you can just stand, back to the camera, and have one leg slightly backwards, like you’re in the middle of taking a step (this is what
I did). I find the camera focuses better when I’m not actually moving. Once you’re in a position you’re happy with, shoot your base image.
Next, we’ll take our first ‘expansion’ shot. you’ll go back to your camera, switch the focus to manual and slightly tilt your camera up towards the top of your base frame and take a photo of the sky. Then, while remaining in manual focus, slightly tilt your camera down to take a photo of the ground just
below your base frame. These images will allow you to expand your frame into a square orientation once in Photoshop.
Now it’s time to shoot the frame. Shift back into auto focus. Try to hold the frame without covering too much of it with your hands and hold the frame so it’s front on to the camera. Try to shoot your frame against a contrasting background (such as the sky if the frame is dark, or the grass if the frame is light). This will make it much easier to cut out in the editing phase.
Finally, before leaving the shoot, make sure your images are in focus and have similar lighting / angles. There’s nothing worse than getting home and realising you need to reshoot because one or more of the photos isn’t suitable.
THE EDIT
Before I jump into my edit, I sort through which photos I’ll use in Adobe Bridge. I five-star which ones I like best and then filter by five-star, so I don’t have to go searching for them. You may prefer to do this in Lightroom or by other means.
Typically, in Photoshop, there is more than one way to do a certain action. For the purposes of this tutorial, I’ll be using tools that are easy to explain in writing, and easy to use!
01 EXPANDING YOUR CANVAS
Start by opening your base image. Because this image will be created in a square format, you need to expand your frame. To expand, click image > canvas size and change the size to 20x20in, or a size you want to create in, so long as it’s square.
Next, open the expansion images (above and below your base frame). Usually these will open in separate tabs, so you’ll need to move them into the tab with the base image. To do this, use the Move tool to drag and drop them into the tab with your base image.

02 BLEND THE IMAGES
Now use the Move tool to align the sky image with the horizon in your base image. Don’t worry about making it perfectly aligned, close enough is good enough. You can lower the opacity of the sky layer to assist with aligning if needed.
Then, create a mask on the sky layer, choose a soft, round Brush at 100% opacity/flow and put your Swatch colour on black. Slowly erase the bottom of the sky image up to where your base image ends. Your aim is to blend the two images together seamlessly so as to look like they are one.
Repeat with the ground image. Your image should now be framed as a square.

03 COMPOSITING THE FRAME
Next, open the image of your frame. You need to cut the frame out of the background so you can move it into place in your main image.
First, place a mask on the frame layer. Use the Pen tool to create pinpoints in the corners of the inside of the frame. Connect the last point with the first point. Right click > Fill Path (Contents: Black / Mode: Normal / Opacity: 100). Press OK. Now the middle of your frame should be empty. Right click inside the frame and choose Delete Path (see below).
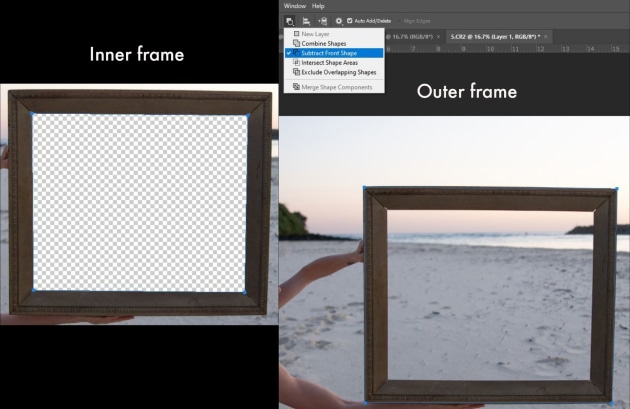
Repeat the pinpoints around the outside of the frame, connecting the first and last points and then change the path operations to Subtract Front Shape and then right click > Fill Path. You should be left with just the frame. Right Click > Delete Path.
Using the Move tool, drag the frame into your main image. Making sure the frame layer is selected, press CTRL J twice to create two copies of the frame layer. If you want more frames, create more copies. It’s easiest to work on one frame at a time, so turn off the other frame layers so they’re out of the way for now. You can turn these off by clicking the eye icon next to the layer.
Press CTRL T to select the frame you’re working on and move it into the position you want. You can slightly rotate the frames as well if you wish (see below).
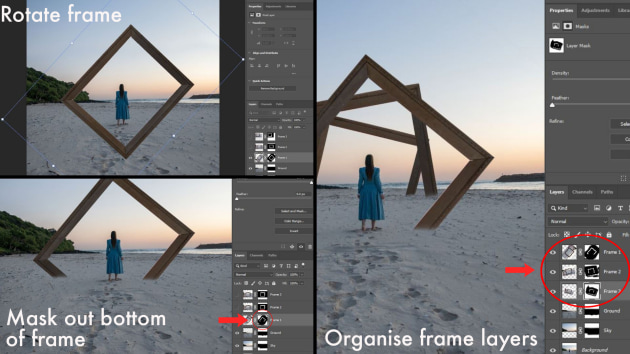
Once in a position you like, hit Enter. Now, select the mask on the layer and using the Brush tool on a soft, round setting you’re going to slowly erase the bottom of the frame to blend into the sand.
Finally, turn the next frame layer back on and move it below the first frame layer. Then repeat the above process. And then do the same for the third frame layer (remember to move the layer under the first and second frames so it appears at the back).
NOTE: As the frames are placed further into the distance, you’ll need to make them smaller by using the CTRL T function. Use your eye to make sure the perspective looks correct.
04 LIGHTING & COLOUR
Now that all your frames are placed how you want them it’s time to make sure everything looks blended and clean before moving onto the colour grade. Here’s a couple of things to check:
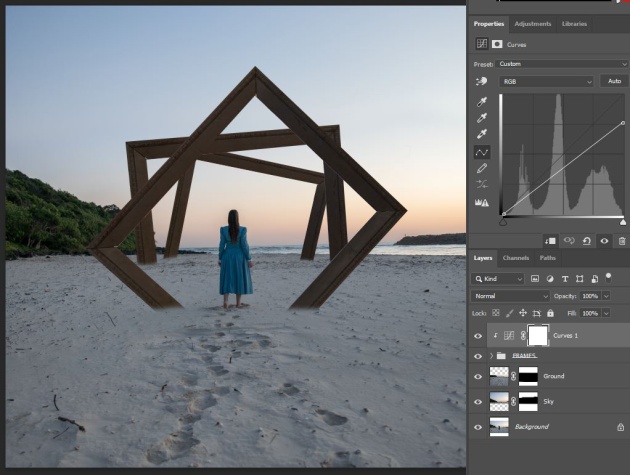
- Is the lighting on the frames consistent with the rest of the image? If not, group together the frames (Highlight all the frame layers and press CTRL G). Create a Curves Adjustment Layer, right click on Layer > Create Clipping Mask. This clips the mask to the group of frames and therefore will only affect the frames. Lower the highlights or raise the mid tones, depending on the lighting of your frames. For my image, I lowered the highlights (see below).
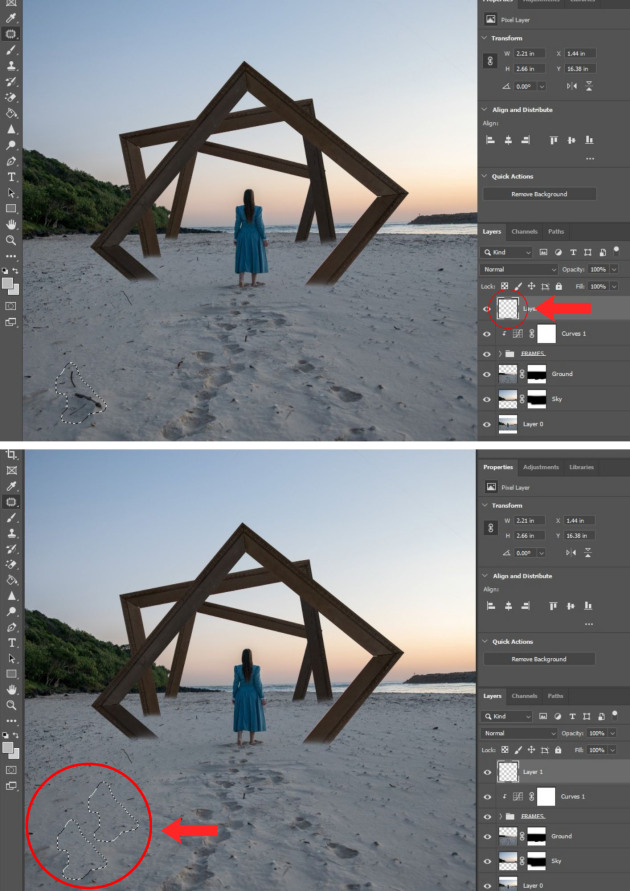
- Does anything need to be cleaned up? For my image, I cleaned up the sand to remove some of the twigs and I also straightened out the footprints. I did this by creating a new empty layer and using the Patch tool. To use it, circle the area you want to get rid of and drag it to a spot that it can copy from (see below).
05 COLOUR GRADING
Once everything looks blended and you’re happy with how it looks, you can move onto colour grading your image. If you prefer to use Lightroom, then now is the time to shift your image from Photoshop to Lightroom. I prefer to colour grade in Photoshop using a mixture of Camera Raw, Curves and Selective Colour.

COLOUR
Once everything looks blended and you’re happy with how it looks, you can move onto colour grading your image. If you prefer to use Lightroom, then now is the time to shift your image from Photoshop to Lightroom. I prefer to colour grade in Photoshop using a mixture of Camera Raw, Curves and Selective Colour.
TIP: The viewer’s eye will naturally go straight to the brightest part of the image, so make sure your brightest part is on your subject.
FINAL WORDS
Congratulations! You created your first self-portrait. I hope you found true enjoyment in this process and will continue to experiment with self-portraiture and conceptual photography. When you first start, I know it can feel overwhelming and difficult, but please do not let this deter you. I promise it gets easier. Keep following your curiosity and adventure into the unknown because that is where the magic happens. The possibilities are endless, so let your imagination run wild. ❂