Photo tip of the week: Take control of landscape lighting
Want to take your landscapes to the next level? It’s all about the light, says award-winning shooter Dylan Fox. He explains the finer points and shows you how you can take control of light to make your landscapes sing.
Talk to any experienced landscape photographer and most will tell you the same thing: it’s all about the light. In it’s most stripped back form, photography is just light. With it we have photography, without it we don’t. At a more nuanced level, the way a scene is lit can completely change the way we see and respond to it.
Unlike studio photographers who can control light to the nth degree, landscape photographers can’t just move the sun and clouds around to get the lighting the way we want it. But we do have choices: To shoot into the light, or away from it; to change our position relative to the scene; or to wait a few hours, days or months for the perfect lighting and weather conditions.
In this article I want to look at some of those choices in more detail, to explore the different types of light and the ways you can take control of light to help you shoot better landscapes.
01 Front lighting
In my own photography, this is the type of lighting that I use least. Front lighting puts the sun directly behind you, so it shines onto the subject at the same angle at which you are viewing it. This often creates a flat and undesirable lighting situation, though there are some exceptions.
Shortly before sunrise and shortly after sunset, you will often get some beautiful hues in a clear sky in the opposing direction of the sun. These can be perfect for softer, more intimate scenes. Direct light on any particular part of your composition may not be necessary so this colourful backdrop may work perfectly.
Front lighting may work in an early morning scene where the top of a mountain peak catches the first light of day with the rest of the scene still in shadow. Even then, I’d suggest it could be even better with some degree of lighting angle to create shadows and contrast.

02 Side lighting
In most cases, side lighting (as you’ve probably guessed with the sun coming from the side of the scene!) is almost always more interesting than front lighting. In the same example we just used of the first rays of light striking a mountain, imagine that same peak catching those early morning rays from side on. This creates greater interest and a sense of depth to those peaks by introducing contrast and areas of shadow. Side lighting adds depth and turns an otherwise flat scene into one of colour and contrast by introducing shadow elements that can become significant parts of your photograph.
A side-lit scene is also very manageable and often doesn’t have any significant capture or processing hurdles.

03 Back lighting
Back lighting is where the photographer shoots towards the sun. This type of photography can be very dramatic and has been helped greatly by exposure-blending software and the incredible dynamic range offered by today’s digital cameras.
I have been shooting directly into the rising or setting sun for a long time now and the results can be stunning. This style lends itself to the use of wide-angle lenses, dramatic compositions and leading lines. It is also is a great way to lead the viewers eye through the frame from somewhat darker foreground elements out to a much brighter and often more colourful setting sun. This is very useful with coastal photographs with no background element, just a flat horizon. The sun not only helps draw the eye in, but also creates a feeling of depth in the frame.
Back lighting also opens up the possibility of introducing a sun star effect into your scene. Although the quality of this comes down to each individual lens, most will do it to some extent, improving in clarity as you close your aperture down.
This can create a scene not seen by most people in places like forests. Most visitors to a forest will be there during the middle of the day during the harsh light of midday. Your photograph could capture something entirely different. The first light of day as it bursts through the dark cold forest floor, beginning to warm the scene again at the start of another day.
While shooting directly into the sun can produce some amazing results, it’s also one of the most challenging options. You may need to blend several exposures in software to manage the contrast, particularly if the sun is visible in the frame.
Shoot in Raw to maximize the tonal range of your camera and use a sturdy tripod and shutter release to ensure there is no movement between exposures.
If the sun is still above the horizon you also need to be wary of lens flare. If the flare is too intense you may have to wait until it disappears or becomes more manageable.
If the light is too harsh always consider waiting until the sun is below the horizon. This is still backlighting but a softer version of it. It’s technically easier to handle, but still intense and often the time at which the most intense sunset colours will occur.

04 Soft light
Soft or diffused lighting is something that can be very desirable for some scenes. It occurs when the skies are overcast so the light is less intense, and can work really well in forest scenes.
Going one step further, a forest is also well suited to being photographed in foggy conditions. Not only does fog diffuse the light, it also introduces a new element and completely transforms the scene. It becomes even more peaceful.
A forest scene is least suited to and most difficult to shoot in harsh midday light. That’s because it is already a chaotic place and you end up with patches of bright light and dark shadows as the light creates pierces through the treetop canopies.

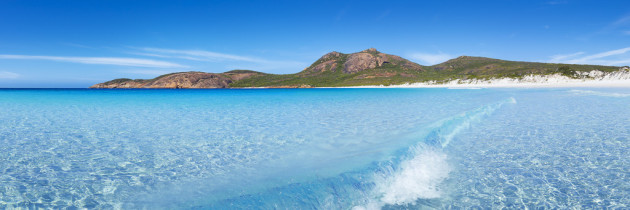
05 Midday light
Now you may be thinking at this stage harsh midday sun is never good. There are exceptions. Blue water and white sand beaches are two that spring to mind. No the light isn’t dramatic, but it does seem to work for those blue paradise scenes. You need to avoid glare and get maximum clarity. A bit of light direction is also ideal so any land is well lit and has some contrast within it. You also have time up your sleeve compared to that small window of great light you may be used to at sunrise or sunset.
To make a compelling daytime image of a beach scene you do have to be very precise because you cannot rely on an intense sunset to add interest. Your composition needs to be compelling and so does your subject matter.
Harsher light that may occur mid-morning and early afternoon can also be well suited to black and white photography. The high contrast can work well. A good excuse to keep shooting well into the day!
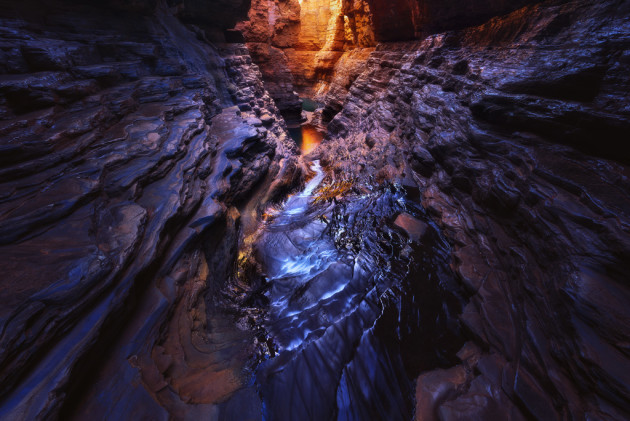
06 Reflected light
Reflected light is often the kind of light you will be searching for in the deep gorges at places like Karijini National Park. This is when the sunlight is bouncing off a big gorge wall and reflecting onto your subject. It is soft and often drapes the scene in colour and warmth. It is subtle, but will take your image up a notch.
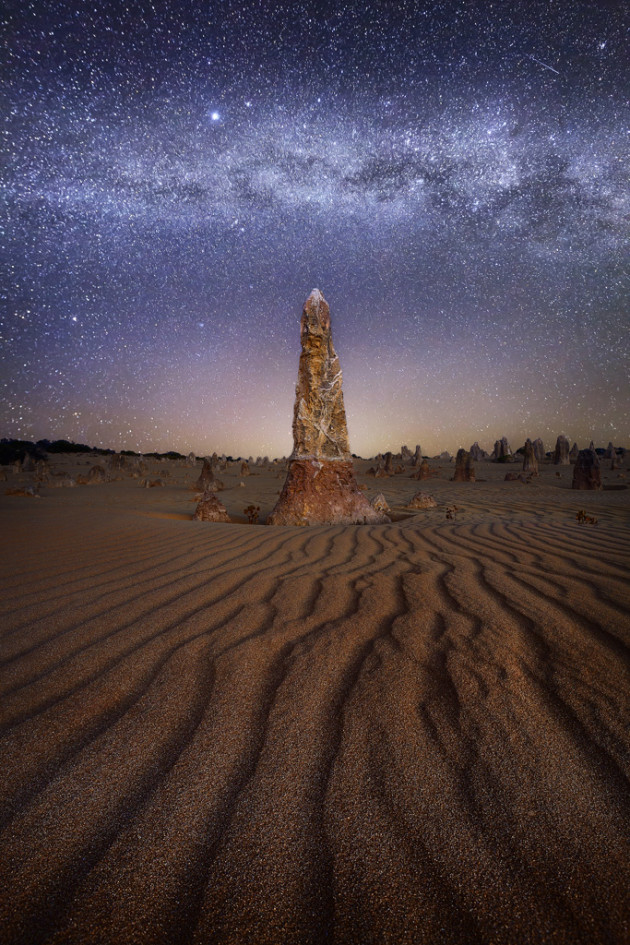
07 In the dark
As cameras have become more capable of capturing light when there appears to be none, the popularity of astrophotography has soared.
If you want foreground features in your image, settle on your composition before the sun goes down. Apps like ‘Stellarium’ can give you a good idea of where the Milky Way will appear after dark.
There are some technical hurdles too. If you want the Milky Way to appear sharp, you need to limit your exposure time to 30 seconds or less. This means high ISO’s and wide apertures. The ISO will introduce noise so be aware of your camera’s capabilities. A wide-open aperture means next to no depth-of-field. You will either have to utilise focus-stacking or an exposure blend.
Use light to your advantage and really consider how you want it to impact your image. Don’t expect it to play ball just because you are at the location. Patience and persistence are key. It may take many return trips to see a location in the light you are chasing, but when you do, the reward will make it all worthwhile! ❂