
Photo tip of the week: How to shoot infrared
Have an old digital camera sitting in the cupboard gathering cobwebs? Landscape photographer Luke Tscharke explains why you should consider converting it to infrared to give it a new lease on life.

Infrared 101
If you’ve ever felt like you would like to try something completely different in your photography, then the world of infrared (IR) photography may be something to consider. But what exactly is infrared and how do you capture infrared images?
Infrared photography involves the capture of an image using a special filter or a film or digital camera sensor that is sensitive to infrared light.
Your eyes can only see wavelengths of light between about 400nm and 700nm, referred to as ‘visible light’. Infrared photography uses wavelengths between 700nm and 900nm. This means that when you take pictures in infrared you are literally capturing them in a different light, wavelengths that the human eye cannot see.
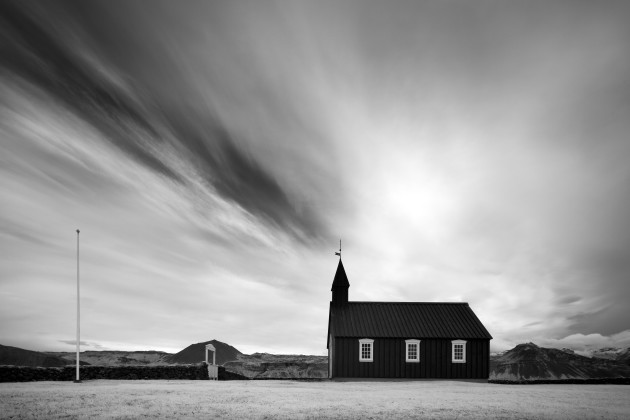
The result is that infrared images have a very surreal and ‘other-worldly’ feel to them. Clouds appear a stunning white against a dark black sky, haze and smoke become transparent to reveal what is behind, and foliage glows white.
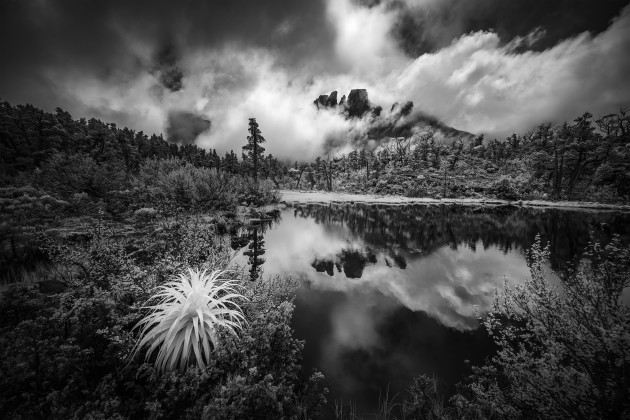
The first infrared photographs were published way back in 1910 in papers by Robert Wood, who discovered that green foliage, like trees and grass, appeared white under infrared light. This phenomenon is now referred to as the “Wood effect”, and results from the reflectiveness of chlorophyll, the photosynthetic pigments present in the leaves of plants.
Infrared photography began commercially in the 1930s when Kodak developed infrared sensitive emulsions for films, and by the end of the decade there were IR films available from five different manufacturers.
Nowadays with film well on the decline, infrared photography has moved into the digital age, although you may be able to still find some IR film. There are two ways you can capture infrared images using your digital camera: with a special external infrared filter or by converting your camera – replacing the existing filter that sits in front of the camera’s sensor with a dedicated infrared filter.

External IR filters
The first method involves the purchase of an infrared filter for your lens, such as the Hoya R72. These filters work by blocking light with wavelengths less than 720nm from entering the lens, simply by screwing them onto the end of the lens like a regular filter. The advantage of these types of filters is that if you no longer want to shoot in IR, you can simply remove the filter and recommence shooting in visible light.
The disadvantage is that these filters are completely black like an ND filter, meaning that you can’t hand-hold the camera when you use them, requiring the use of a tripod. You will also have to compose and focus the scene before you put on the filter as it will be too dark once the filter is screwed on.

Infrared camera conversion
The second way to capture IR with your digital camera is to convert to a dedicated IR camera by changing the filter directly in front of the camera’s image sensor. In digital cameras the image sensor has a small filter placed in front of it called a ‘hot mirror’ filter, which acts to reflect infrared light. If this infrared light was to be passed onto the camera’s sensor it would cause inaccurate colours in the resultant image.
To be able to capture infrared images natively the camera requires conversion. In this process the hot mirror filter is removed from the front of the sensor and replaced with a specific infrared filter which blocks visible light. This infrared conversion can be done as a DIY project, however as the job involves the camera sensor it is much safer to send the camera off to a professional camera conversion company such as Lifepixel in the USA.
The main disadvantage to infrared camera conversion is that the camera can no longer shoot in visible light. There are also economic considerations as the cost of conversion is usually more than the cost of an IR screw-on filter. Lastly the piezoelectric sensor cleaning element used for automated in-camera sensor cleaning is sometimes attached to the hot mirror filter, which will be removed during conversion. Therefore, this feature may be disabled during conversion. This means that a rocket blower may need to be used more frequently with IR converted cameras to keep the sensor dust free!
Internal filter options
Once you have decided to get your camera converted to full-time infrared there is still the choice of which internal infrared filter to convert your camera with. Most conversion companies have several filter options to choose from, which essentially vary based upon the wavelengths of light they let onto your camera’s sensor.
A standard internal filter will block visible light to about 720nm. These filters still let in a small amount of visible deep red light into the image which allows for techniques such as colour channel swapping to be applied to the images in order to produce ‘false colour’ images. There is also often a ‘black and white’ internal filter option which will block all visible light, only allowing infrared light to pass from 830nm onwards. These filters are denser and do not allow as much light to pass
through, requiring an extra two stops or so for correct exposure. These filters are popular with black and white photographers.
There also are some other options for internal filters that can produce very interesting effects such as the super colour filters which allow a mix of visible and infrared light. Which option you pick depends upon what kind of images you want to make, however if you want the traditional infrared look it may be best to go with the standard filter.
Lens considerations
Most lenses are designed to produce images in visible colour, and therefore when they are used in infrared light they may perform differently. This is particularly true with focusing because IR light has longer wavelengths than visible light, so it focuses at a different point. In some cases the camera will need to be calibrated to a particular lens in order for autofocus to work, however the better solution is to have the camera calibrated to live-view. This does mean that you will only be able to focus with live-view activated, but the advantage being it will work across all of your lenses rather than one particular lens.
Hotspots can also be another issue with using certain lenses in infrared. Here, a small central part of the image appears lighter or a different colour than the rest of the image. You can check if your lenses are prone to hotspots via online lens hotspot lists. If your lens does have a hotspot it is often less prevalent shooting with a wide aperture, and may be imperceptible after converting the image to black and white.
Lens flare is also often more prevalent in infrared as the coatings applied to the glass elements are not optimised for infrared light. In the same way some lenses may not be as sharp in infrared light as they are in visible light.
As you can see lens selection in infrared photography is important so it’s a good idea to do your research and ensure your lenses will be good performers before you take the plunge and do a conversion.
Why shoot in infrared?
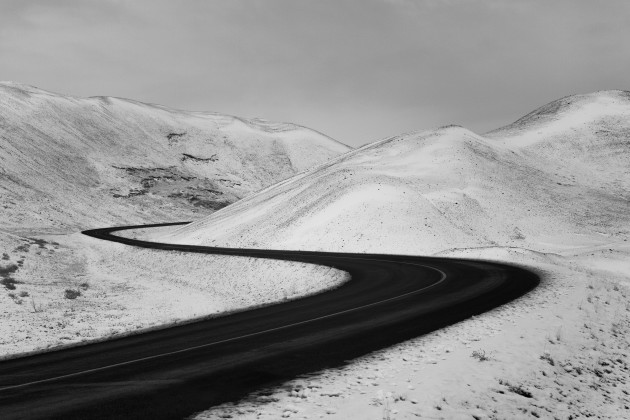
Converting an unused camera to infrared is a great way to give it a new purpose. If you take your IR camera or filter with you as part of your regular kit then you can always switch to shooting in infrared if the conditions are not favourable in visible light. Often in landscape photography the ‘magic hours’ at sunrise and sunset are favoured, however excellent images can be made during the middle of the day with infrared, even in sunny conditions. Clouds look spectacular in infrared, making the skies come alive, and foliage renders a brilliant white.
The ability to photograph an environment and display it like it has not been shown before is a remarkable possibility in this day and age, where we are saturated with images. Infrared is a wonderful way for your work to stand apart, and most of all it’s a lot of fun to see the world in a new way.
