
Photo tip of the week: How to read light
Understanding how to read and interpret the different types of light is an important skill for any photographer. Here’s what you should look for.
How important is light in photography? More than any other part of photography, light is what gives our images drama, and light is what makes our audience feel something when they view our images. Light is the fundamental element for every great photograph, and should be the first thing you assess before you press the shutter.
Just as a painter uses paint to brush onto a canvas, photographers paint their images with the use of light. Technically speaking, this is achieved by capturing light particles on light-sensitive mediums such as film or on a digital sensor. The camera captures numerous photons of light reflected from different areas of a scene. Darker objects absorb greater light, while brighter objects reflect more light.
Observing how light is falling on your subject and where it’s coming from are key to improving your lighting techniques, and will allow you to create different moods that complement your subject of choice.
In this article I touch on the topics that are important for understanding and taking full control of natural light out in the field.
Identifying ‘good’ light
Firstly, there is no such thing as universally ‘good’ light, as every scene is different. However, it can be useful to think of good light as something that complements your scene and subject, making all the elements come to life. It should emphasise the feeling and emotion of your subjects, and will give your scene character, hopefully teleporting the viewer to a moment in time where they can feel what it was like to be there in the flesh.
In order to find this kind of light, start by thinking about the message different lighting can portray. If you want to create bold and contrasty images, perhaps shooting on a bright sunny day will give you the desired effect. If you’re looking for more emotive images, try shooting on an overcast day when the clouds diffuse the lighting and leave a softer, gentler light.
Once you’ve figured out the mood, experiment with different types of light until you are satisfied. It will take time before you will be familiar with the different qualities of light, but the more you dabble, the greater your chances will be of nailing the perfect shot.
The different lighting angles
Understanding what good light looks like is one thing, but if you can combine it with different lighting angles then you have a much better chance of creating something special.
The position of your light source relative to the scene will determine the light falloff, shadows and effects created by it. There are five main angles of light to get familiar with. These are back lighting, front lighting, side lighting, overhead, and lowlight or under-lighting.
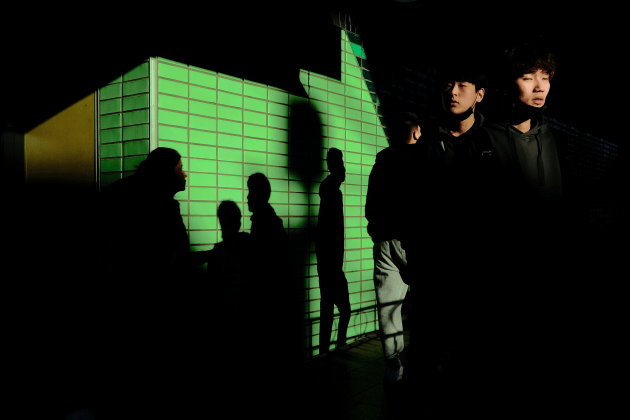
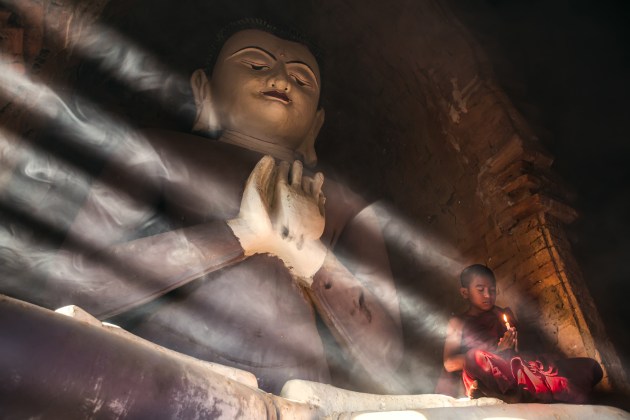
Backlighting
Back lighting occurs when the light source is behind your subject shining towards you and the camera. Back lighting is easier to find when the light is low, like during sunrise or sunset, depending on which way you are facing.
Back lighting can create a beautiful rim light or halo effect around your subject, and if your subject obscures the light source, the result will be a silhouette.
Silhouettes can be flat and boring if the subject lacks any interest, form or shape so think about this before framing your shot – sometimes just a step to the left or right can change the frame for the better.
Front lighting
Front lighting is when the light is directed front on to your subject. It’s rare to find this light naturally, which is why when you try to replicate it, say with a pop-up flash, the results can look a little flat.
This is because front lighting hides the shadows behind your subject, and a lack of shadows often means a lack of drama. That said, front lighting is useful for subjects where you want to leave a sense of ambiguity, such as a straight documentary style image.
Side lighting
Side lighting is when the light is cast across your subject from either side, creating more depth in your frame which will create an illusion of space. I like to take advantage of side lighting in portraiture, especially when I can get my subject to stand in the light, and then make the background fade off into the darkness.
You can also look for side lighting when photographing landscapes during sunrise or sunset. In the right conditions it will fall unevenly, emphasising different elements and giving more depth and contrast.
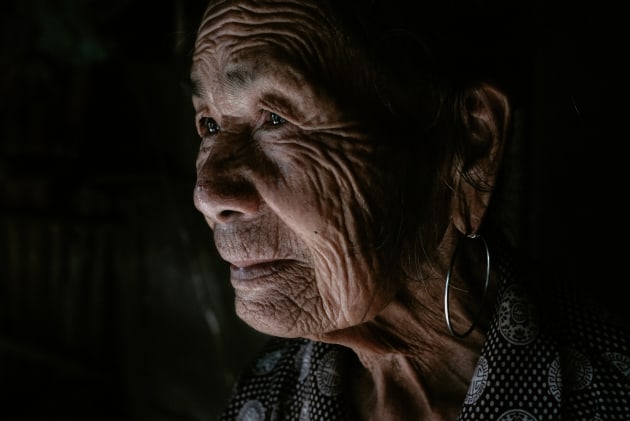
Overhead lighting
The most common natural light source is overhead light, typically sunlight or moonlight. Overhead light can give all sorts of effects depending on the intensity of light. On an overcast day the light will be diffused, creating a softer effect – perfect for photographing moody portraits.
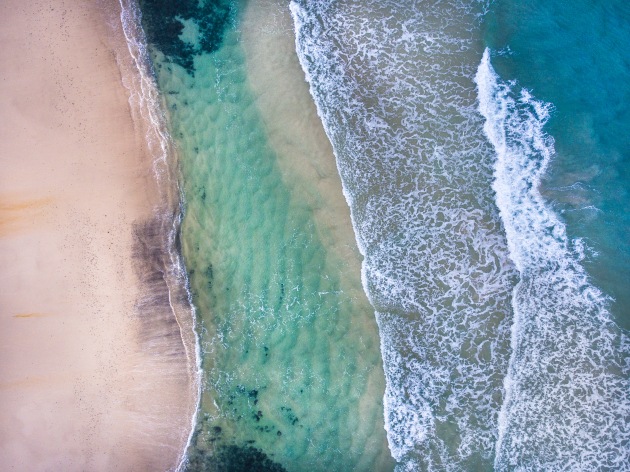
Sunny days can be a little unflattering for portraits, but will work great for aerial photography, bringing out the clarity in subjects when photographed from above.
Underlighting
Finally, under-light is the opposite of overhead light, meaning the light source illuminates from below your subject, casting unflattering shadows. It’s a popular technique in horror films and can be effective if you want to bring a sense of menace to a portrait. Since under-lighting isn’t as common as the other light angles, it can aid in capturing more unique and unusual images.

Whatever angle of light you have to work with, there is a creative way to use it. Before you shoot, pre-visualise the final image and think about what effect works best with the available light. It will make you a more conscious and efficient shooter.
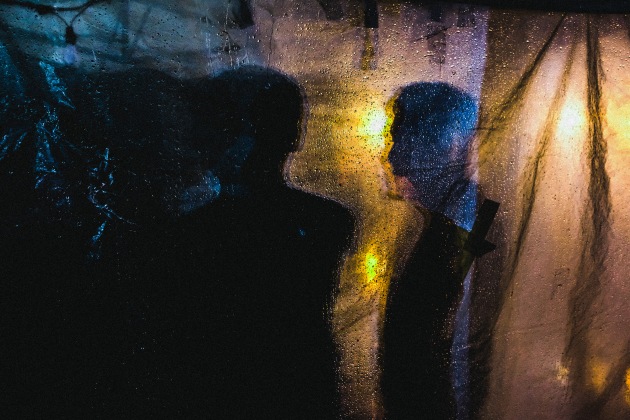
Light intensity
Just as there are different angles of light, there are different intensities of light, some harsher and others softer.
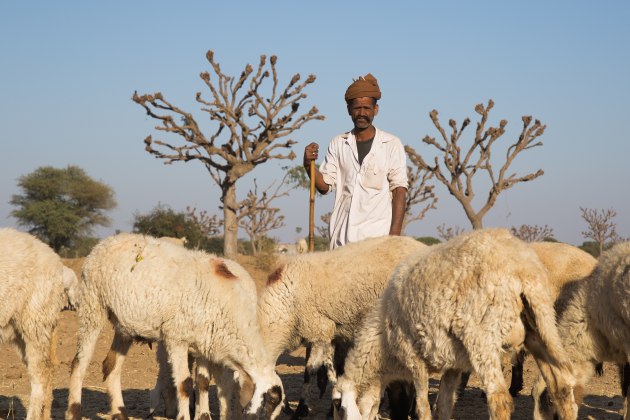
Although many photographers will actively try to avoid shooting in harsh light, sometimes you have no choice. Harsh lighting is very bright, directional light, typically found on clear days at midday. You will find it casts strong shadows with very defined lines onto your subjects.
For portraiture, you can work around this by positioning your subject with the light behind them, so they are not forced to squint into the light and produce unflattering expressions, or position them in the shade to diffuse the light.

Where harsh light can be useful is shooting in urban spaces like cities. The dynamic shadows of buildings casting onto other buildings and the street can help create angular images with otherworldly lines.
Diffused lighting is my favourite type of light because it is flat and even. Consider that same midday light in the example above, but imagine there are now clouds in the sky. The clouds will naturally diffuse the light, softening and brightening the shadows just like a softbox. This can make places like rainforests really pop, as soft light (and moisture) brings out all the details in the foliage.
For landscape photography, a polarising filter is also useful when working with diffused light to increase contrast further.
Compose around the light
Your composition is just as important as getting the lighting right. When combined with good lighting, good composition can be the difference between an ordinary photograph and an extraordinary one. And, when the two work together in harmony, your images will become more dynamic and your compositions will be even stronger as a result.
Some basic pointers on composition: the cleaner the composition, the more dynamic the image will be. Move around to exclude anything that distracts from your subject, and try to place your main subject in a balanced part of the frame.
A simple technique to try is to look for interesting light, frame it, and then wait for your subject to enter into the lit area. Take time to think about your surrounds and where you need to stand (or where you need to move) to get the shot.
Finally, be careful not to fall into the habit of focusing too much on your composition, or you may miss the light entirely. I’ve been shooting seascapes, oblivious to the epic sunset clouds kicking off behind me. I find it helps when shooting to remind myself to constantly spend a second or two to reassess how the light is changing with my subjects.
Timing is everything
One of the biggest challenges of relying on available light, rather than artificial light like flash, is timing. Perhaps that wall you planned to photograph has an interesting shadow that only casts across it for a short period at midday, or you can only shoot a sunstar through a window when the sun is setting at a particular time.
So much of photography is observation, and reading the light is no different. Know when your subject will be best lit and make sure you’re ready to capture the moment when it happens.
Of course, your definition of good light may be different to mine, and it is also affected by your creative style, your subject, and even your mood. But knowing when and where to be, and having a sense of the result you desire, is just as important as remembering your camera batteries or memory card.
Finally, if there’s thing to remember, it’s to try and think of light as the moody ingredient in your photography. It can do so much, from showing the whole scene or just revealing the faintest glimpse. True, there’s really no wrong or right way to use it, but if you want to take your photos to the next level, you must understand light to really push your photography. ❂
About the photographer: Drew Hopper is an Australian based professional photographer specialising in travel, documentary and editorial photography throughout Australia and the Asia-