
Photo tip of the week: Getting started with underwater photography
Underwater photography is a diverse and rewarding field of photography. While there are challenges — there are also a wealth of subjects, and ideas to explore.
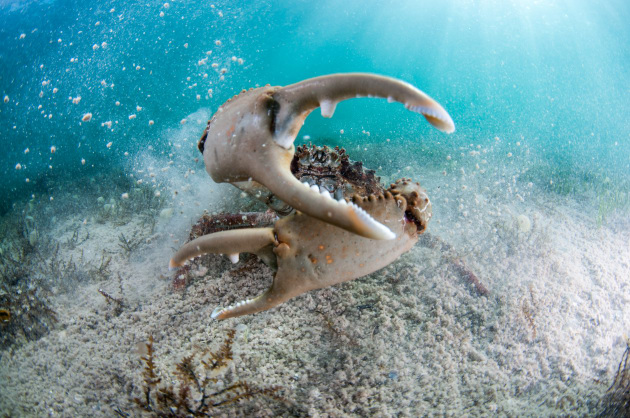
One of the main draw cards of underwater photography is the potential for close-up encounters with wildlife. It’s hard to imagine walking up to a wild elephant to take a photo, yet large animal encounters underwater often occur within arm’s reach.
Cameras and housings
Underwater photography can be expensive but you don’t have to spend a fortune to get started. It’s more about being in the water, experiencing the incredible underwater wildlife, and experimenting with whatever photographic tools you can lay your hands on.
If you’re on a budget, a good choice is a point-of-view camera like GoPro’s Hero 5 or a compact underwater camera like Panasonic’s DMC-FT6. As long as you shoot in shallow water where there’s plenty of light you’ll be surprised at the images you can get out of these little cameras.
If you think you’d like to take your underwater photography to another level an underwater housing for a mirrorless or DSLR camera will give you more flexibility and control. Thankfully, camera manufacturers and dedicated housing makers produce underwater housings for most interchangeable-lens cameras.
I suggest you choose a housing from a third-party manufacturer (popular brands include Aquatech, Nauticam, Subal, Seacam, Sea & Sea and Ikelite) rather than a camera manufacturer. A big positive with third-party housings is the wide choice of accessories including lens ports, spacer rings, strobes, cables etc. And as you upgrade your camera and housing, as long as you choose the same housing brand, you can still use all of these accessories. Even if you switch between camera brands, say from Canon to Sony, your housing parts will still work.

Let there be light
Artificial lighting becomes more important underwater, as the amount of ambient light drops dramatically as you get deeper. Similarly, colour loses its saturation as you descend – the first to go is red, then orange, then yellow. And this all occurs within the first five or 10 meters. Beyond that, images start to become a muddling of blue, brown and green hues. Images shot in ambient light at these depths generally only work if you convert them to black and white.
While you can get by with ambient light, it does limit you to photographing larger subjects in clear water close to the surface. With one or more artificial lights, you can produce colourful images of smaller subjects, at deeper depths.
If you are in the market for underwater lights there are two types to choose from: continuous (usually LED and widely used for video); and strobe (or flash) for still images.
Continuous lights have the advantage of allowing you to see in real time how changes to the output and position of the lights will affect your images. On the downside most require large batteries and that adds significant bulk and cost.
Underwater strobes are smaller and they also put out more light. And while you can’t see the light before and while you shoot, you can always review your images on screen and make changes as required.

Most underwater still photographers choose strobes over video lights, as they give you the power to fully light a scene, and dial back the power output if you need to selectively light a subject, or balance ambient and artificial light. If you have the budget, a second strobe will give you more light, more options and help you avoid heavy shadows.
The biggest pain of underwater photography is “backscatter”, which occurs when there are lots of particles in the water. Light from the strobes bounces off the particles and bounces back into the camera creating a kind of ‘snowstorm’ effect. You can reduce backscatter by positioning the strobes as far away from the camera as possible and having long strobe arms helps a lot. Most systems comprise two arms that allow greater flexibility and articulation to position the strobes.

Sweet settings
It pays to think about your camera settings before you get into the water. Because everything takes longer in the water I always set a standard combination of shutter speed, aperture and ISO first. From there I make changes depending on the conditions and what I’m shooting.
I shoot with strobes so my shutter speed is limited to the camera’s maximum sync speed of 1/300s. I generally start with a shutter speed of 1/200s. Next is aperture, which I set to f/8, which I find works best with the strobes.

Because the strobes are quite powerful, it’s easy to overexpose the subject and surrounding scene if you get too close. An aperture of f/8 helps me keep the highlights in check. For ISO, I start with a setting of 200, which is generally sensitive enough given that I’m using relatively powerful strobes. For the strobes themselves, I dial them back to three-quarter power.
I always shoot Raw underwater so I can easily adjust white balance in post-production. For focusing, I use selective autofocus either in groups or individual zones. From there, depending on the subject I will either use focus tracking, or not. If there is a lot of water motion from waves, then I use focus tracking to help increase my chances of making a sharp image on the subject I’ve targeted.

Patience is key
As well as learning some new photography techniques, new underwater photographers soon realise there are other skills they need to master as well. Like how to take photos when everything is moving – including you. There’s a knack to composing images and get your settings right while floating in 3D space – up, down, left, right, forward and back – while tracking a subject that may not be all that keen on being tracked by you at all. Oh, and it’s important not to touch anything, because there are sharp spines and things that sting and bite down there.
There are a few tricks you can use to improve your chances of getting a good shot despite these added challenges. First and foremost, review your surroundings. Whether you are free diving or scuba diving, it’s important to look around before you start taking photos. You never know where a moray eel might be hiding, or some delicate coral you might kick with your fin, or an overhead obstacle that can easily make a nasty cut. Once you know you’re in the clear you can focus your energy on shooting.

Second, to capture good images of animals underwater, observe the animal’s body language and approach slowly. One of the key ‘tells’ you’re looking for is any sign the animal is about to scoot off. Each time you pull back at the moment the animal hints, “I’m out of here” the closer you will get with each successive try. Patience is the key.
As far as making eye-catching images goes, it’s best to get close, and that goes for the background too. For wide-angle photography, capturing an alluring subject in the foreground, but also having enough light to illuminate the immediate background will add depth and colour to the image. Unless the animal is big, avoid shooting downwards; its best to try and shoot up. This adds depth, and will help the subject’s character show through.

Which lens?
Since you don’t have the option to change lenses underwater, you have to commit to a lens before you get into the water. When you’re starting out, it’s best to start with a wide-angle lens so you can focus relatively close. This will allows you to capture a wider scene, and also target larger animals like sharks, rays, dolphins and whales.
Macro photography is popular and can be extremely rewarding, but you need good underwater control, and know what to look for, or you may end up doing damage to a reef and not finding any good subjects to photograph. Wide-angle photography allows you have a greater choice of subjects, and provides more opportunity to experiment with composition and lighting.

Practice, practice, practice
Like anything, underwater photography requires plenty of practice. If you want to be good at it you need to get wet and take photos! Find subjects that are comfortable in your presence and experiment with different camera settings, lighting setups and compositions.
You’ll soon get a feel for what works and what doesn’t. And when you next see something amazing happen underwater, which you surely will, you’ll be perfectly placed to capture it.
Caine Delacy is a wildlife photographer and marine biologist who travels the world seeking out amazing underwater locations. See more of his work on his website and instagram.