
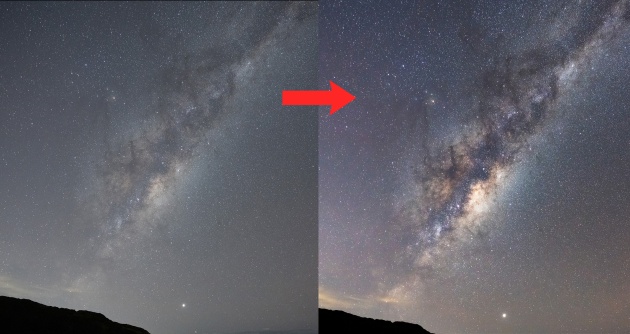
How to edit the Milky Way in Lightroom
In this tutorial, I'm going to show how a few simple steps will help you get the most out of your astrophotography RAW files and remove light pollution in Adobe Lightroom Classic.
If you’d like to follow along the steps below with the image we're using here, you can go here to download the hi-res project file, or click the link on the right (PC/Mac users).
Step 1: Lens Corrections & Straightening
Once you have imported the tutorial image into LR, click on the Develop module. Scroll down to the Lens Corrections tab and enable Remove Chromatic Aberration and Enable Profile Corrections to correct for any lens distortion and vignetting.
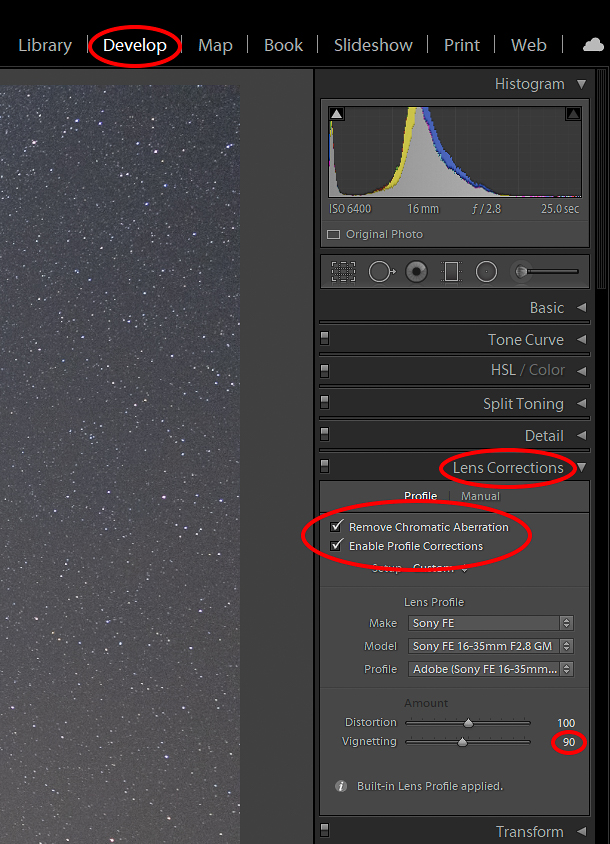
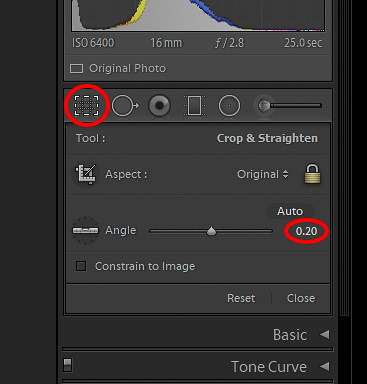
Under Vignetting, reduce the intensity of the correction to 90, to leave a subtle amount of natural vignetting to draw attention to the Milky Way. Lastly, click on the Crop & Straighten icon and adjust the Angle to 0.20, then click Close.
Step 2: Basic
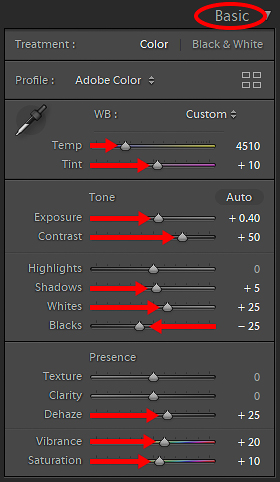
With profile corrections applied, we can start making global colour and tonal adjustments to the image. Under the Basic tab, adjust the followings sliders to; Temp: 4510, Tint: +10, Exposure: +0.40, Contrast: +50, Shadows: +5, Whites: +25, Blacks: -25, Dehaze: +25, Vibrance: +20 and Saturation: +10.
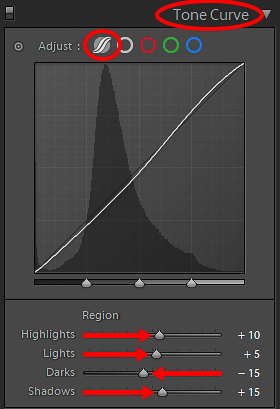
Step 3: Tone Curve
We are going to further refine our tonal adjustments and add some contrast by using the Tone Curve. Under the Tone Curve tab, click the Parametric Curve option and increase Highlights: +10, Lights: +5, decrease: Darks -15 and increase Shadows: +15.
Step 4: Reducing Light pollution
Even if you are at a location with little or no light pollution, depending on the direction you shoot in, distant towns can introduce light pollution into your image along the horizon.
Whilst the mountain on the left has blocked most of the light pollution, there is still some visible above the edge of the mountain that needs removing. To darken this section of the sky in a natural looking way, we are going to create a heavily feathered Radial Filter.
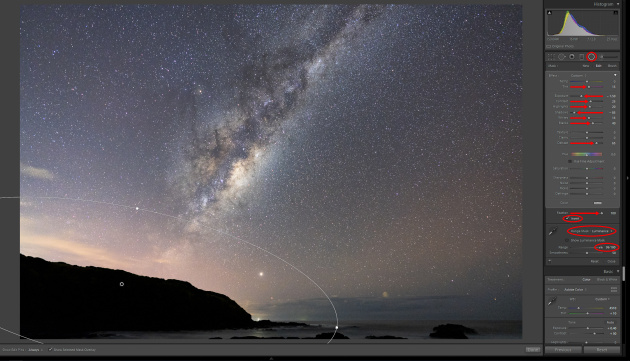
Click on the Radial Filter button which is located just below the histogram. Once selected, click and drag to create a large oval shaped mask, with the pin or centre point positioned just below the edge of the mountain.
This mask can be moved or resized at any time. To remove the glow in the sky caused by light pollution, change the following values to; Tint: +15, Exposure: -1.50, Contrast: +25, Highlights: +20, Shadows: -85, Whites: +15, Blacks: +40 and Dehaze: +65.
Then, click the Invert box and increase Feather to 100 to create a very gradual transition within the mask. Whilst we have reduced the effects of light pollution, we’ve also unintentionally darkened the water.
To further refine our selection so that it only applies to the brightest parts of the image within the Radial Filter, we can apply a Luminance Range Mask. Under Range Mask, select Luminance and change Range to 95/100 and Smoothness to 50.
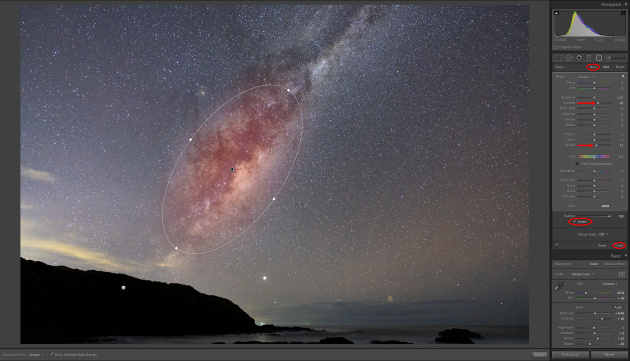
Step 5: Galactic Centre
Whilst we are in the Radial Filter tool, we are going to make some localised adjustments to draw the viewers attention to the Milky Way. Click on New, then place a mask over the Milky Way, with the pin in the middle of the Galactic Centre.
Increase Contrast: +25, Dehaze: +15 and Feather: 100. Make sure that the Invert box is still ticked so that the adjustments are applied only to the inside of the mask, then click Close.
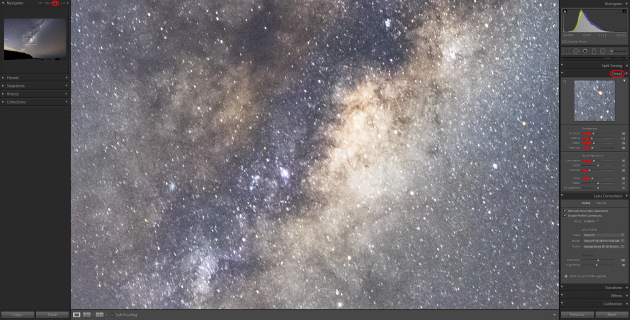
Step 6: Sharpening and Noise Reduction
To finish off, we are going to apply sharpening and noise reduction to the image. When shooting at high ISO values, the aim is to find a balance between reducing noise without sacrificing image sharpness. The more noise reduction you apply, the more fine detail will be lost.
Click on the 1:1 icon in the toolbar to view the image at 100% so that you can accurately see the adjustments. Open the Detail panel and under Sharpening, increase Amount: 50, Radius: 1.2, Detail: 35 and Masking: 30. Lastly, under Noise Reduction, adjust Luminance: 35, Contrast: 20 and Color: 30.
About the author: Pro photographer and Sony imaging advocate Dylan Giannakopoulos shoots landscapes, wildlife, portraits, street, weddings, and anything else that inspires him. See more at dylangiannaphotography.com.au