
Fantastic files: An easy Lightroom workflow for photographers
These days, our modern cameras all seem to fire away like machine guns, shutters roaring away while buffers and cards fill faster than you can blink.
It means that most photographers now come back from adventures with hundreds or even thousands of images clogging up their cards or external drives.
To give you an idea, if I am out on a morning street walk, I can come back with 80-100 images with my camera set to three frames per second (fps). If on a game safari, I could come back with 1000-2000 images! Some photographers shoot even more, with the camera blazing away constantly at 20-30 fps.
It's too easy to overshoot and fill those expensive memory cards, and worse yet, have piles of unsorted images clogging up your hard drive. So, what do you do with all that data? And more importantly, how do you decide what to keep and what to ditch?
Finding a workable workflow
First things first, regardless of how many images you capture on a shoot, if you do not have the right tool to view your results or download in a logical way, you will make things much harder.
If you take the odd trip, or just short adventures, then iPads and even your phone can work as a quick storage/transfer and viewing device. But as you spend more time in the field, you’ll want an up-to-date laptop, with good RAM, core speed and storage space.
A fast laptop means I can sort, cull, and process most images before I return home. I love a big screen and I do not find it a hassle to carry as my main luggage and camera bag is lightweight.
I recently updated my MacBook Pro to the 16” version, with 64GB of RAM, a 4TB hard drive and lots of core grunt. It cost a lot, but it makes my workflow more efficient, and with a bit of luck I won’t need a laptop upgrade for several years.
Hardware sorted, now it is the software and the workings of the job that come into play. A few different styles of workflow are possible. The most important point is that it is logical and efficient.
For myself, after a shoot, I connect my camera to my laptop and download my new images into a folder on my laptop named: ON TOUR IMAGES, via Lightroom Classic.
I then have a subfolder for each trip. I’ll often run two to three tours/workshops to a region, so one subfolder might be India, and the next Madagascar. I download the images each day into the country folder.
They automatically line up in date order. I do not use day-by-day sub folders. I’m even happy to mix two camera files. If a clash of numbers occurs, I just rename them. My files are based on time shot and date.
The cull
Next, it's about identifying the keeper shots.
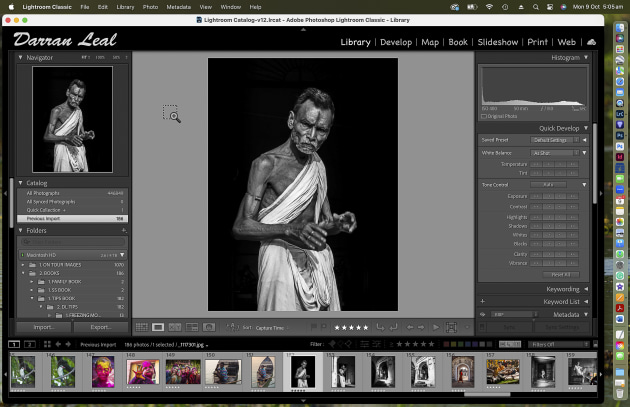
I also use Adobe Lightroom Classic to view and sort my images. Let’s say I have been on a shoot and I have captured 803 images.

I start by importing and converting these to DNG. DNG (Digital Negative) offers a smaller file size than the original camera RAW, and as you process your images, it records the processing changes. Think of it this way – it's a smaller file at the best quality - perfect!
Next, comes the cull. I look at my images via the line of smaller thumbnails at the bottom of the LR window. In some instances, I'll enlarge an image that interests me. Here's a tip – hit 'F' to view an image in the reel at fullscreen.
When I find a keeper, I'll hit the number '1' key to rate it. This tells me it is good but not processed yet.
I try to remember key images from my shoot. That moment when the eyes are looking at you, or the lion grabs its prey. Some of the other images around that hero shot might become part of the story. I will hit the number 1 key for these also, but I might not process them. I also hit the X key for images that are of no use. More on that shortly.
I move on and repeat until I get to the end, marking any key shots with the 1 key. I then go to the filter at the bottom right and choose to display just the one-star images. I have now limited my search from the original 803 images to just the key few important images.
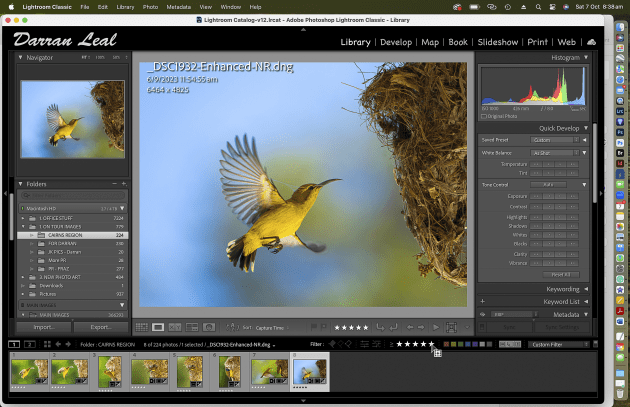
At this point, I take my time, going image by image, to process and check for technicalities like sharpness. I check sharpness most often at 50% but will move to 100% for some.

This may take a while but as I complete the processing for each image, I'll upgrade them to five stars by hitting the '5' key.
Now I have a great starting point with a series of the best images, all easily identified as 5-star images from the shoot. These are ready to export. This whole process is quick, and If I do this every day during a month of travelling, I come home with most of my main processing already finished.
One step I’ll often do later down the track is turn off the filter and return to the first image and start to look for any 'seconds'. Maybe I missed a hero image, or another image with potential.
Like before, I give these a one-star rating, and then I’ll process them as before.
My final check is to get serious on the previous criteria, and 'X'ing out images. By hitting the letter X, I am saying that this image is not up to my usual technical standard.
Perhaps I missed focused, cut a head off, or have too many of the same image, etc. However, I am very careful as to what is 'greyed out' with the X.
Historically, I have had film images with bad processing scratches. One that comes to mind is a brown falcon shot in central Australia in 1982. I kept the image, and in 1994 with Photoshop I fixed the scratch in a couple of minutes. I offered it to a publisher, and it was used in a bird calendar!
Thinning the herd
These days, I'm not bothered about keeping multiple, exact copies of the same subject, and especially so if I was shooting 20 frames per second.
The same goes with technically poor images. But I will keep small variations between shots like head movements, or different background perspectives. That said, if I have 4-5 images that are the same head angle, then I will delete some, usually keeping just one or two.
I say this because I'm never sure of the future use of my images. Plus, if I manage to capture a successful and rare subject, it would be to my advantage to have multiple variations. I can use one in this magazine, another in a new book, and a third on my website.
Ten years down the track a buyer might like an image, but say "I love your whale shot, but I was after two whales in the image, not three". Guess what, I have that, plus I have a few more variations!


Smash the trash!
Remember those images that I hit the X button on? Those are the ones that are either not up to scratch, or I have too many copies of. It's time to take care of those.
First, in Lr I hold down the Command (MAC) or Control (PC) button and then the Delete button. This will bring up all my X'ed images. In the dialogue box, I select Delete to Disk and it follows that command. It has placed all my unwanted images into the Trash. Periodically I'll then delete the Trash and they are gone for good. The culling is over!

Closing the workflow
With that done, my result is a series of images neatly organised and rated, and all in one folder ready to be backed up when I get home. The first image I shot and kept is at the start of the folder or will appear first in the Library in Lr. I can scroll through the images while waiting at the airport, and easily move between unedited and edited images by filtering to display the one- or five-star images.
Better yet, with a click I can filter to show the five-star shots, and up comes the very best of my latest adventure - I love this system!
No matter which editing software you use, or filing/processing system, make sure it's logical and systematic. This will guarantee you can keep up with the larger image capture rates and quantities of images we're all capturing these days, and it will also help you to keep up to date, and able to find images quickly and efficiently. ❂