

Editing wildlife - 5 Lightroom tips for better images (part one)
Adobe Lightroom Classic CC is a powerful tool for editing, and understanding how it works is vital if you want to make your wildlife images really sparkle.
Perhaps Lightroom’s most important feature is that it is non-destructive. This means any changes you make to an image can easily be reversed.
In this step-by-step guide, we will learn a variety of techniques that will help to improve the quality of your images and the speed of your workflow. I’ve also used the methods mentioned in this article to significantly reduce my image post-processing time.
We’ll do all our editing in the Develop module, and we will post-process our images in the following order – global or overall adjustments, and then local or targeted adjustments, some of which we'll explore next week. Let’s dive right into it with global adjustments.
1) Crop
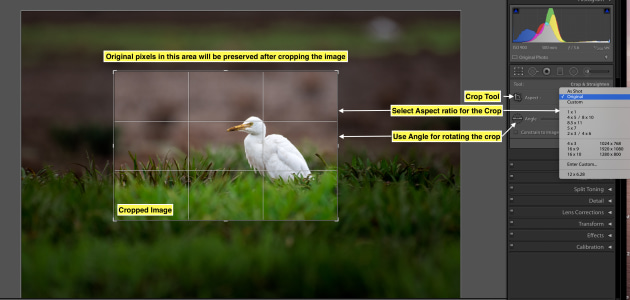
The first step while editing an image is to crop it. You can crop the image based on the visual appeal of the picture – you may like to position your subject along the rule of thirds like I have here, or in other ways – the choice is yours. Crop presets are available for standard sizes. With free crop, the crop size will not be constrained to standard sizes.
Firstly, select the crop tool, then select an Aspect Ratio for the Crop.
If required, you can rotate the crop by turning the crop angle. Once you crop an image, the original data is always available and you can always change the crop size in the future.
2) White Balance
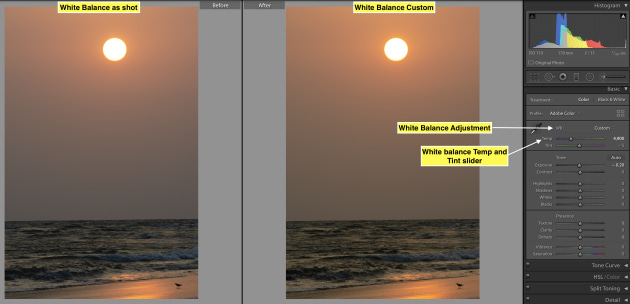
By adjusting the White Balance, you can choose to make your image realistic as well as dramatic. Under the White Balance slider, there are multiple presets such as Cloudy, Sunlight and Shade.
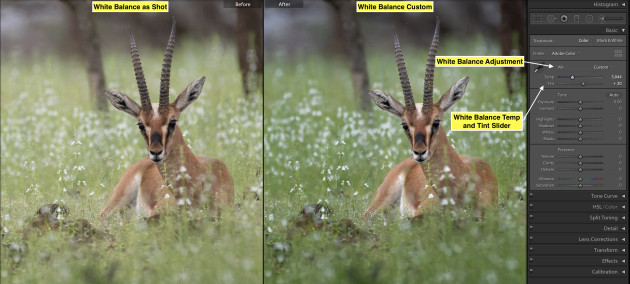
To adjust the colour temperatures and tint, use the White Balance slider which will also allow you to remove blue or yellow colour casts in your image.
You can adjust the Temp Slider to adjust the colour temperature if you can see there is tint in the image, and you can also play with the White Balance slider to add your own creativity.
3) Black and White point
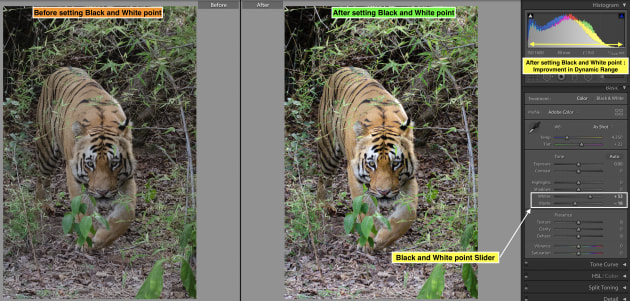
With the black and white point slider, you will define the darkest and brightest pixels in the image. This tool is useful for enhancing the dynamic range (the range of shadow and highlight information in an image).
To set up the white point, first select the white point slider. Then, press the Option/Alt key. The image will be completely black. Move the slider towards the right (positive number) until you see the first brightest pixel.
As you start revealing the first bright pixel/area in the completely black image, this is your white point. Stop at this point; this is the white point for the image.
To set up the black point, do the same as above, but select the black Point slider. When you press the Option/Alt key, the image will become white. Drag the slider towards the left or negative number until you see the first darkest pixel.
As you start revealing the first dark pixel/area in the completely white image – that is your black point. Stop at this point; this is the black point for the image.
4) Shadows and Highlights
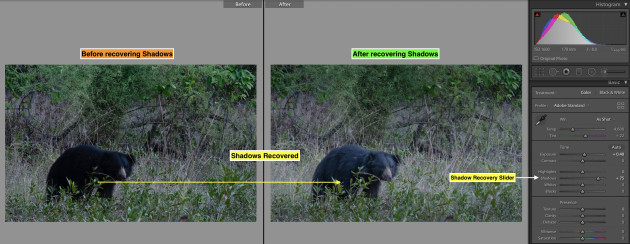
With the Shadow slider, you can recover the details in dark areas of your frame. The Highlight slider is also useful for recovering the details in bright areas of the image.
To adjust shadows, click on the shadow slider and drag the slider towards the right (positive number), and you will see details revealed in the dark areas.

To recover highlights, drag the highlight slider to the left (negative number). Remember that before you apply shadows and highlight recovery, always set the black and white point first. This will help to recover most of the dark and bright areas in the frame.
And finally, always use Shadow and Highlight recovery in moderation. The overuse of this tool can cause halos around the edges in an image.
5) Vibrance and Saturation

The Vibrance slider boosts the colours which are less intensive or dull. The saturation slider affects the overall colours, including the dull colours and the colours which are already bright.
Use the Vibrance slider first. Move the slider in the right (positive number) direction until you get the desired boost for the colours in your image. Use the Saturation slider second. Drag the slider towards the left (negative number) direction a bit. A saturation value of -1 to -7 will help in most scenarios.
Look out for part two next week.
About the author: Shreyas is an Adventure explorer, Nature and Wildlife Photographer. After photographing in different parts of India for more than a decade, he has focussed on what he is most passionate about : Digital Post Processing and Photography Mentoring. You can see more of his work and tutorials at shreyas-yadav.com.