
11 tips for better smartphone photography
The best camera isn’t the one you have on you, it’s the one you’ve mastered. Jake Traynor tells you how to make the most of the one in your pocket.
They say a poor workman blames his tools, and I can’t count the number of times where there’s been a good photo opportunity and I didn’t have my trusty Sony with me. So, why not just take a shot with my phone? I kept telling myself that my phone would never do the shot justice, so I didn’t bother. I blamed my tool, when it was my technique that was lacking.
Then I had an epiphany – if my phone is the camera I always have on me, why haven’t I bothered to learn how to use it properly? So, that’s what I did. Here’s 10 ways I improved my smartphone photography game.
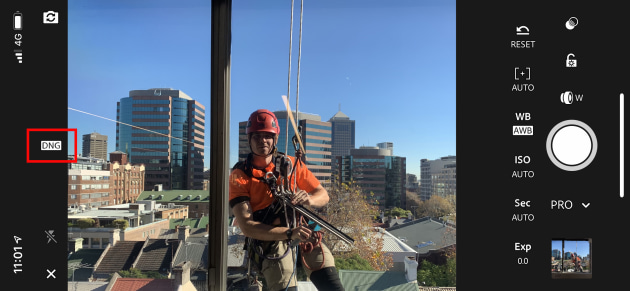
01 SHOOT RAW
If you’re a quality snob like me, shooting RAW over JPEG makes a world of difference. I’m a pixel peeper – that annoying guy that looks at a nice photo, then zooms in to see if it’s sharp at 200%. While your phone can’t shoot RAW right out of the box, there’s a few choice apps that let you capture RAW files instead of the compressed JPEG – the most popular being Lightroom, Halide and VSCO. You may not want to do this for every shot, but it’s a handy tool to have if there’s a few signature snaps you’re looking forward to taking on your next adventure.
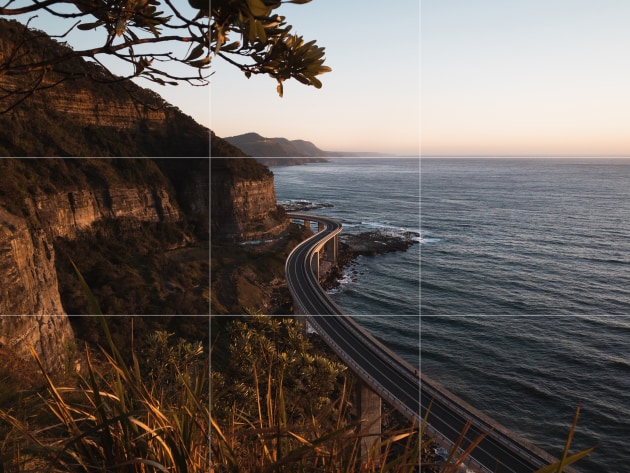
02 TURN ON THE GRID
Due to the rushed nature of smartphone photography, composition often takes a backseat. Any photographer will tell you that composition makes or breaks a shot, so nailing this in-camera is a big step in the right direction. All smartphones can display a grid to allow access to the rule of thirds and straight horizons, making compositions more intentional. Turn these grids on in iOS under Settings > Camera > Grid and in Android under Camera > Settings > Grid Lines. Apps like Adobe Lightroom CC have these built right in to the camera function (and even have a horizon level!)
03 SAVE THE HIGHLIGHTS
You’ll quickly discover that most smartphones don’t have the best dynamic range, so exposing for low key scenes can be tricky. To get the best looking shot out of your smartphone, make sure you expose for the highlights to preserve those brighter details, as usually crushed blacks are far more eye-pleasing than blown highlights because they look more natural.
If your phone offers it, always shoot in HDR (high dynamic range) mode – the files will be larger, but they’ll hold a lot more shadow and highlight detail.
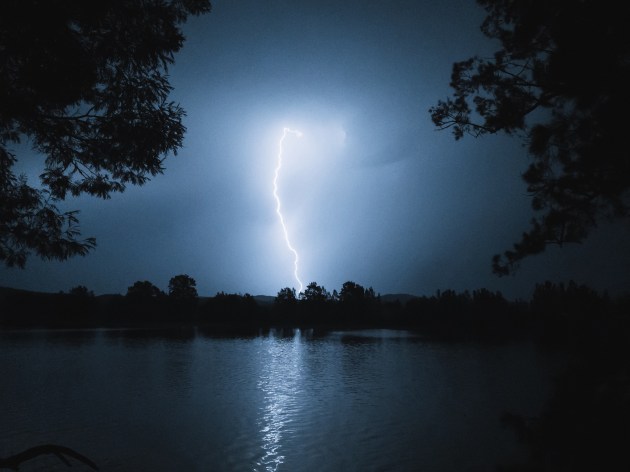
04 KILL COLOUR TO KILL NOISE
Smartphone sensors aren’t that big, so quite often you’ll get a lot of noise in your shadows, making low light photography almost impossible. A handy trick that a lot of concert and event photographers use is to desaturate your image to make noise look more like film grain. It’s far from perfect, but black and white grain is far more pleasing to look at than colourful sensor noise.

05 WALK, DON'T ZOOM
There’s no denying it, digital zoom is gross. We’ve all been that person that pinches the screen to zoom in on a far away object, only to find things get noisier and fuzzier the closer we zoom in. Why is that? Smartphones don’t have an optical zoom function, meaning your lens can’t change its focal distance. Digital zoom essentially just crops in, creating the illusion of zooming. You’re not actually getting closer, you’re just cutting away the surrounding scene. If you want to get closer to your subject, take a few steps forward – you’ll be able to make the composition you want and retain as much detail as possible.
06 EDITING IS MORE THAN APPLYING A FILTER
A lot of photo sharing apps, as well as the gallery apps that come with your phone, have built-in filter presets. Often these are very strong and don’t have much flexibility. Your best option is to download an app that allows for manual editing, as well as more preset options. VSCO and Snapseed are generally regarded as the top dogs of the mobile editing market, but Adobe offer a lot of their desktop apps (like Photoshop and Lightroom) as scaled-back mobile apps. If you’re already using these apps on your computer for your DSLR/mirrorless shots, there’s no excuse when it comes to your mobile shots.

07 EMBRACE NEGATIVE SPACE
Negative space is the empty space around your subject, and it’s always a good idea to include negative space to deliver scale and context to your audience. Smartphone photography especially benefits from this technique due to the size we are viewing the photos at, as a tighter crop will feel cramped and claustrophobic. Experiment with the amount of negative space in your shots to influence the amount of control and power your subject has (e.g. more negative means a smaller subject, giving a sense of being lost or overshadowed.) Given the size of smartphone sensors, a smaller subject often looks sharper too!

08 SHOOT PANORAMAS
If you’ve ever shot a panorama image with a DSLR/mirrorless camera, you know just how much of a chore it can be – making sure your tripod is level, worrying about taking enough shots, weird distortion and stitching issues in Photoshop… if only there was an easier way. Oh wait, there is! The ease of taking a great panorama shot on a phone is mind-blowing. Not only do you get an instant result, you are free to capture so much more of the view in a matter of seconds.
A good tip, however, is to limit the length of your panorama – instead of following the arrow all the way to the edge, shoot short distances. Not only will you get less wobble and thus a sharper image, you’ll have less distortion making for a nicer image overall.
09 CREATE SOFT SHADOWS WITH FLASH
The tiny flash on your phone doesn’t always yield the best results. In fact, it often makes contrast, skin tones and eye colour look worse. It’s normally recommended you leave it switched off, however if you’re shooting in a well-lit area and your subject is casting undesired shadows, turning the flash on can actually help soften or remove these shadows. This is especially effective is your subject is small, such as a coffee cup or flower.
10 EXPERIMENT WITH DIFFERENT ANGLES
For more dynamic images, avoid shooting at eye or chest level. The great thing about using your phone is how small and light it is – this makes shooting from low or high angles much easier. Perspective is an incredibly powerful tool in photography that shapes the tone of our images. Shooting up from low angles, for example, will help show the dominance of a person, building or waterfall. Conversely, shooting down from a high angle can make things look small and weak. You can use this knowledge to highlight emotion in your shots, such as a triumphant mountain climb or small people lost in a big city.
11 A FEW HOUSEKEEPING TIPS
Keep your lens clean – if you keep your phone in your pocket or bag, you’re bound to get dust, dirt and other smudges on your lens, so make sure you give it a wipe every now and then
Shoot in the best light possible – more light will give you a cleaner and sharper image, and avoid backlighting where possible
Shoot in bursts – an oldie but goldie, taking a lot of photos in quick succession will give you plenty to pick the best one from.
Don’t take things too seriously – at the end of the day, are you really going to be printing any of these? Keep things simple and enjoy the moment.