


It's tough getting out of bed early on cold, foggy mornings, but if shooting stunnning landscapes is your thing, it's well worth the effort. In the first of a new two-part story, Thomas-Liam Ryan shares some brilliant tips.
Landscape photographers love fog. It adds mood, mystery and drama. And, as an aesthetic element, it opens up a host of creative options for composition and lighting. Take my word for it – fog is well worth getting out of bed for!
Fog tends to form on cold mornings when there is little or no wind. It can materialise suddenly and dissipate just as quickly. It will often begin to dissipate when the morning sun starts to rise. In some situations (especially in the winter months) fog can linger well after sunrise, or if you’re in mountainous terrain fog can linger throughout the day. The way in which fog moves with wind movement, how thick it is and how it dissipates is always changing and unpredictable, but it’s this unpredictability which makes shooting in fog so much fun, because every second in this type of environment is different.
01 SETTINGS
Just like when you’re shooting photos in the snow, fog tends to fool the camera’s metering system into underexposing. What you’re aiming for is the white of the fog to be white without blowing out any highlight details. To compensate for the camera’s underexposure I start by overexposing by one stop. I then review the histogram on the back of the camera and adjust the exposure to get an exposure that has the highlights as bright as possible without any clipping.
Of course, overexposing isn't always the best option. For instance, when you’re pointing your camera into the fog and the sun is facing you or side lighting the scene, a slight underexposure may be needed to retain highlight details and create moody shadow details. When you're getting started trial and error is an important part if the process – keep on taking photos and adjusting the exposure until you get the result you’re happy with.

Waterways in foggy conditions can provide you with the chance to shoot objects that could otherwise be ordinary. Canon 7D, 10-22mm lens @ 22mm, 1/400s @ f/8, ISO 100. Curves and levels adjustment, monotone conversion, dodge and burn in Adobe Photoshop CS5.
02 MANUAL FOCUS
In situations where the fog is very thick and there isn’t a lot of contrast between an object you’re trying to shoot and the fog, your camera’s autofocus will have trouble locking into a point of focus. Switch to manual focus.
03 IN THE FOG
Shooting when you’re surrounded by fog can create some wonderfully moody and dramatic images. Sometimes visibility will be poor if the fog is very thick but this can prove useful as it gives you time to walk around locations such as streets, or get to a vantage point to prepare for your image making when conditions are optimal for what you want to achieve. Street scenes, forests, creeks, rivers and lakes that are enveloped by fog take on a whole new dimension.

This image was photographed in early morning light as the sun created backlighting on the trees. I was looking for strong texture and shapes. Canon 7D, 70-200mm lens @ 91mm, 1/499s @ f/8, ISO 200.Curves and levels adjustment, monotone conversion, dodge and burn in Adobe Photoshop CS5.
04 HIGHER GROUND
Try positioning yourself so you’re shooting above the fog. Useful vantage points include lookouts, hills, mountains, bridges, or buildings. When shooting from a higher vantage point I often like to use a telephoto zoom lens because it allows me to ‘compress’ a scene. Standing on an elevated point and using a zoom lens also allows you to focus in on particular details and create images with abstract qualities. Being at a high elevation allows you to easily see where and how the fog is moving, and to be able to capture these fleeting moments.
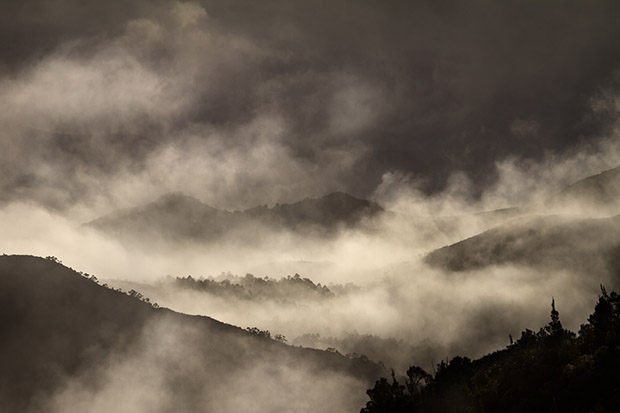
I used a zoom lens to 'compress' these mountain ranges. Shooting into the sun helps create strong contrast between highlight and shadow areas. Canon EOS 7D, 70-200mm lens @ 200mm, 1/1000s @ f/9, ISO 100. Curves and levels adjustment, selective dodge and burn in Adobe Photoshop CS5.
Check in next week for Part Two of Shooting in Fog.