


Three talented shooters share their best tips for night photography and explain why capturing the night sky is an endlessly rewarding challenge. Story by Rob Ditessa.
Phil Hart loves shooting the night skies. Best of all, he says, anybody can tackle night sky photography with nothing more than a basic DSLR and a tripod, using simple equipment and techniques. He adds that ideally you'd use a wide, fast lens, but even the 18mm end of a kit lens fitted to a DLSR with a cropped sensor can produce pretty good results. He suggests that on their first effort, most people may find themselves a little lost with the controls on the camera in the dark, but they can overcome that quickly.
Hart has won awards for his night sky work; he teaches the subject, and he has written a book about it. He routinely takes photographs with a Canon 1100D and an 18-55mm lens "to show what can be done with even the most affordable gear". As a keen amateur astronomer Hart enjoys being out under the sky at night, and as a photographer he enjoys the wondrous nature of what he can capture in images, which draw a range of reactions. "They range from 'you've faked that in Photoshop' to 'stunning' or even 'life changing'. It's very rewarding that people respect and find interest in my photography and it certainly motivates me to pursue it more," he says.
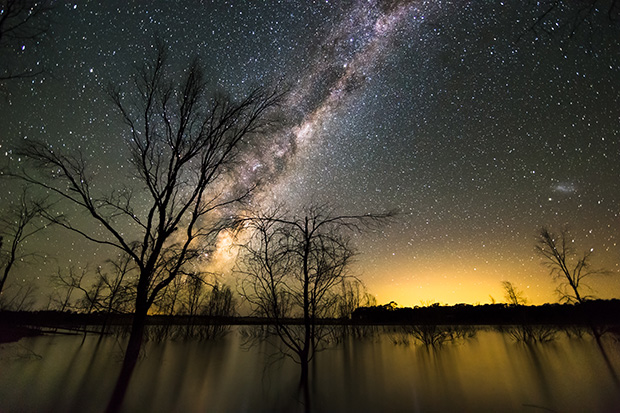
'Lake Eppalock, Milky Way,' by Phil Hart. Canon EOS 6D, 14mm lens, 30s @ f/2.8, ISO 3200. Lake Eppalock, Central Victoria.
Andrew Carter, who operates his own gallery in the heritage township of Mogo (near Bateman's Bay) on the New South Wales South Coast, loved lying beside a fire looking up at the night sky as a youngster. So it was a natural subject to explore when he took up photography full time. Because he extensively researched techniques and settings he quite quickly produced shots he was happy with. "I have many different photos on display in my gallery at any one time, but the night sky photos always seem to draw people's attention. I think night-sky shots are still something different that people aren't used to seeing. I love being able to share this aspect of photography."
Mark Slater has also won awards in shows and exhibitions and he's always pleased to introduce viewers to his style of art. Slater says that when he first shot a 'night sky' image in 1986 he was attempting to cover Halley's Comet as it rose above the Victorian Alps. He used a roll of ISO 1000 film, but he says he had little idea of what he was doing. However, he managed to get a couple of shots he was very pleased with, even though they were grainy. Today, he aims not just to photograph the stars, but to create an image with "wow" factor. One of the most important aspects of good night sky photography, or 'landscape astrophotography' as he describes it, is to include an interesting foreground or silhouette so the landscape complements or interacts with the stars. Sometimes it works and sometimes it doesn't, he muses. While he doesn't consider himself an expert, he does enjoy the challenges and he's inspired by the talents of Julie Fletcher and Greg Gibbs in Australia and Michael Shainblum in the US.
Preparing to shoot
When Slater is travelling and he comes across an interesting feature in the landscape, he records the details to consider it later as a location for a shoot. Otherwise, he begins a shoot by envisaging an image that works well as a landscape incorporating the night sky, and then identifying possible locations close to home. He uses Google Maps and Google Earth to determine if features he wants to include will line up with the Milky Way in the way he has in mind. If possible, he will reconnoitre a location during day time to identify the best spot to shoot from and confirm that the landscape features will line up with the night sky as he envisaged, using a reliable compass to confirm the position of the Milky Way.
He says the centre of our galaxy forms the brightest part of the Milky Way and when it's included in your photos it can produce amazing images. The centre is found between the constellations of Sagittarius and Scorpio. To pinpoint the location in the sky of the brightest area of the Milky Way on any given date and time, Slater uses a smart phone app called Stellarium.
He says that when undertaking night sky photography you need to get well out of town and have an unobstructed view in the direction of the centre of the Milky Way. Depending on the time of year and the time of the night this could be anywhere from the east, overhead or to the west. In his view, there ideally should be no towns within 50km in the direction you intend to photograph, as a town's light pollution will often detract from the stars. He says, "Autumn, winter and spring are when the brightest part of the Milky Way can be seen above the horizon. During summer it dips below the horizon for several months. Night sky photography is still possible, but that important 'wow' factor can definitely be reduced."
For maximum visibility of stars Andrew Carter waits for the end of Astronomical Twilight, for which tables are available online. This is the darkest part of the night, when the stars are brightest. When he wants extra colour in the skies, he says he will shoot just before sunrise or just after sunset. Slater finds the best time to photograph is usually at least one and a half hours after sunset and one and a half hours before dawn, or when there is no moonlight, or very little. Both suggest a quarter moon or less provides some ambient light to add detail to the foreground, but not so much that it interferes with capturing the stars. Slater uses an app called The Photographer's Ephemeris (TPE) to determine the phase, location and timing of the moon in relation to his selected locations, and Carter suggests checking the tides as well when photographing by the sea. He was caught out once and had to spend the night on a rock ledge, waiting for the tide to recede!

'Twilight Moods,' by Mark Slater. "Very little planning was involved here as I was just exploring a nearby area and stumbled across this interesting scene with great colour in the sky," says Slater. Taken near Lake Hume, outside of Albury in southern NSW. Canon EOS 5D Mk II, Samyang 14mm lens, f/2.8, ISO 3200, 30 seconds.
In the bag
A basic kit for night sky photography, Carter says, should include a camera with manual mode and preferably manual focus. Better quality cameras allow you to use a higher ISO rating without the photos suffering from excessive noise. He suggests using wide-angle lenses – 14-16mm lens on a full-frame camera or a 10mm lens on a cropped-sensor camera. He says a lens with a wide maximum aperture – f/2.8, f/4 – allows you to let in more light and set a lower ISO. A sturdy tripod which will hold your camera still is vital for night sky photography and this can make a critical difference to the images. A remote shutter release is also a valuable tool, although Carter says he often just uses a 30-second shutter speed with a two-second delay to minimise vibration from the mirror. For safety he carries a head torch, spare batteries, a Personal Locator Beacon, and a first-aid kit.
Carter's own personal kit includes a Nikon D800E, a Nikon 16-35mm lens f/4, a 14mm Rokinon f/2.8, a remote release, and a three-section carbon-fibre Gitzo tripod without a central stand. Tripods without a central stand are generally more stable, though not quite as user friendly, he says. The tripod carries a RRS BH-55 ball head with panning head. "I also use a panning clamp and nodal slide, which allows me to take multiple-shot panoramas without parallax error. My camera also has a RRS L-plate which allows quick movement between landscape and portrait orientations," he adds.
Hart agrees a sturdy tripod is essential, and adds it's important to know how to use it and how to firmly attach your camera to it in the dark. He recommends a remote to do long-exposure star trails. A red light head torch is valuable for operating the controls on your camera without affecting your eye's adaption to the dark. What's in his favourite kit? "I use a Canon 6D, which performs exceptionally well in low light, offering the same low-light capability as the 5D Mk III without the expense of the bells and whistles such as auto-focus, metering and video, for instance. It's a very affordable full-frame DSLR. I pair the 6D with fast lenses, particularly the Canon 14mm f/2.8 and 24mm f/1.4. Fast and wide is really the way to go for most night sky photography."
Slater recommends wide-angle lens because they reduce the amount of star movement showing up on an image. He uses a Samyang 14mm f/2.8 and a Zeiss Distagon T* 21mm f/2.8 ZE lens, and says the Samyang 14mm is a great lens for night sky photography because it's reasonably sharp right into the corners and it's relatively cheap. He uses Canon EOS 5D Mk II and 5D Mk III cameras. He sets up with a Manfrotto 055XPROB tripod with a Manfrotto 460MG head because this combination lets him point the camera to any position in the sky, explaining that many tripod heads will not let you point a camera straight up, a significant capability for when you want to stitch a number of shots of the night sky together to create a panorama. For remotes he uses JYC and Viltrox intervalometers, both cord and wireless.
He suggests carrying several powerful LED torches with both wide and narrow beams to paint in light when necessary in areas of the foreground. During winter you might need a lens warmer, he adds, to prevent condensation from building up on lenses. A warmer may be as simple as hand warmers which you attach to your lens barrel with rubber bands. Slater also carries warm clothes, including a hat and gloves to avoid hypothermia; a torch; sturdy footwear; a backpack for his photography equipment; a mobile phone; a compass; and water and snacks. And, he suggests, always tell someone where you're going and your proposed schedule.
'Barlings Beach,' by Andrew Carter. Three images were taken using a panning head and nodal slide to eliminate parallax error. Photos were taken in RAW, adjustments made in Lightroom. White Balance equalised through all shots, adjustments to levels, vibrance, contrast, clarity, lens distortion corrected, noise reduction, sharpening and chromatic aberration reduced. The images were then opened in Photoshop and stitched manually. Three-shot panoramic image with a 14mm lens, 30s @ f/2.8, ISO 2500. Made with a wide-angle lens covering nearly 180 degrees.
Techniques & settings
Slater takes most of his shots with manual focus, ISO 3200, f/2.8 aperture, and a 25 or 30 second exposure. Similarly Carter will generally start with the widest possible aperture at f/2.8 or f/4, set the shutter speed to 30 seconds and then vary the ISO as needed, starting at ISO 2500 or 3200. Hart suggests shooting on a setting of 30 seconds with the aperture wide open and a high ISO (around 3200) as a starting point. Slater explains that the trick is to get as much light onto your camera's sensor as possible with a combination of a high ISO, a wide aperture, and a wide-angle lens combined with a slow shutter speed. Crisp round stars are central to a good image. You capture them by knowing how long you can keep your shutter open without having the stars trail across in the image, which is determined by the focal length of your the lens. He continues, "I follow the '600 rule' to find the shutter speed to achieve the minimum of star movement in my images. That rule is where you divide the real full frame equivalent focal length of the lens into the number 600 to determine the optimum shutter speed, that is, 600 divided by the real focal length, which equals the maximum exposure before trailing occurs. For example on a full-frame camera with a 14mm lens the longest shutter speed to minimise star movement is 42 seconds – 600/14= 42, which I round down to the standard 30 second setting." Andrew Carter uniquely uses 500 instead of 600, saying the outcome from that works best for him.
Hart shoots in RAW. "You can adjust the white balance after the shoot, but I typically start with the camera set to daylight sunny white balance as whatever colours that show are technically correct from a scientific point of view, relative to sunlight being defined as white. I will often tweak the white balance a little to taste afterwards, but I try to avoid making the image look too blue, which is what most people seem to expect the sky should look like. In reality it is a more yellow-brown colour, although it can vary enormously due to natural air glow in the upper atmosphere or moonlight and light pollution."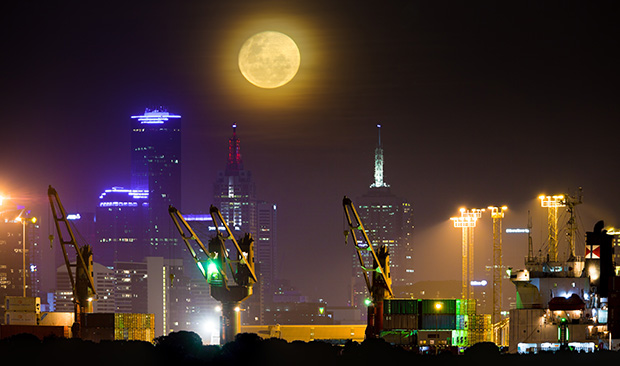
'Melbourne Moonrise,' by Phil Hart. "I used LR Enfuse in Lightroom to combine three exposures of 1/4, 0.8 & 2.5 second exposures, all at f/8 and ISO 100," says Hart. Canon EOS 5D Mk II, 300mm lens with 1.4x teleconverter. Taken from Williamstown in western Melbourne and planned with The Photographer's Ephemeris app.
Learning how to focus accurately takes up a lot of time in Hart's courses. He says simply there is no single method which will apply to every gear set up and which will work in every situation. Generally the infinity symbol on the lens is a guide only and is often not accurate enough for sharp stars. "With a wide-angle lens, you focus on a bright light nearby or the moon if it's up. Even a torch placed 20 metres away from the camera will do if there is nothing else around as that is effectively the same as infinity for very wide lenses. The main technique I use is to do a focus bracketing test to find the right position on my lens' focusing scale once and then note that down and quickly set to that position anytime I need it."
Using a hood to eliminate side lighting is helpful, though generally it's not essential. It helps to slow down the formation of condensation on the lens, says Hart, and Slater suggests using a lens hood will also protect the lens if you trip over in the dark! Hart suggests further that most people will also be surprised at how cold it gets at night when you're standing and using your hands to operate a cold camera. Dress warmer than you think you'll need to, he says.
In his night sky work, Hart uses a few simple tweaks in Lightroom to correct for vignetting, adjust white balance and contrast, and to smooth out noise. Dealing with lots of light pollution in the sky can take a bit more effort, he says. Slater's adjustments in Lightroom (which he uses almost exclusively for his post-production work) include corrections for lens distortion, whites, blacks, contrast, clarity, and noise reduction. The impact of his adjustments with clarity and luminosity result in an almost painterly, crisp finish to many of his images. He says sometimes he has to mask off the sky and tweak it separately from the foreground. "The effect you want to achieve with the stars is often not the same as you want for the landscape in the foreground. If you have a lot of light pollution from distant towns, you may need to tone it down so it doesn't become the dominant factor in the image. Although at times some light pollution can work in well to become a significant feature of the image. On some occasions I'll use Photoshop to stitch photos together to form panoramas of the whole Milky Way arching across the sky." After shooting in RAW, Carter uses Lightroom to correct any lens distortion, adjust levels, vibrance, noise and sharpening. Adjustments to contrast and clarity are useful to get the most from your night sky photos, he says. If he is printing the image, he will then open it in Photoshop to convert the photograph into the correct colour space, re-size and sharpen it.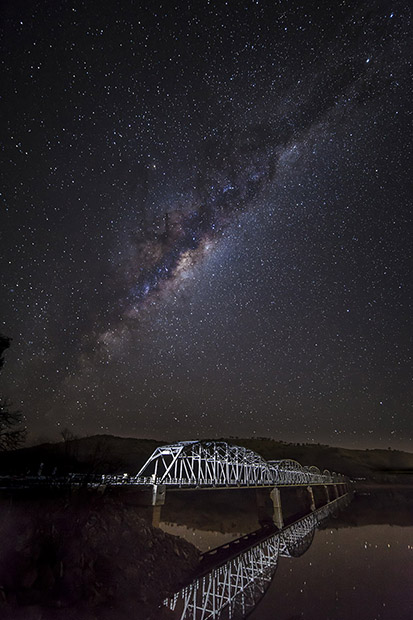
'Bridge to the Heavens.' Bethanga Bridge, near Albury, NSW. Mark Slater says, "A fair bit of research was required to identify when the Milky Way would be in the desired position for this composition. The bridge was lit up by light painting it with several high-powered LED torches and spotlights." Canon EOS 5D Mk II, Samyang 14mm lens, 30s @ f/2.8, ISO 3200.
Extended battery?
Battery life in the new cameras, says Hart, is pretty good and they can and do last for about four hours, even when temperatures are near freezing. "In Alaska I could still get two hours, even at -20°C. Older cameras don't last as long. For all the night sequences I use an external 12 volt power source to run the camera." Slater says he always tries to use genuine Canon batteries because they hold their charge better and continue to work very well in the cold weather. He always takes a minimum of three spare batteries on any shoot, adding, "Although not the best method of creating quality star trails, long exposures are a good way for beginners to start out. They can be achieved either on a good quality battery or using a battery grip containing two batteries." As Carter doesn't take many long exposures, he currently shoots with one fully charged battery and a fully charged spare. But he notes some people use a battery grip which extends, allowing longer shooting between changes. 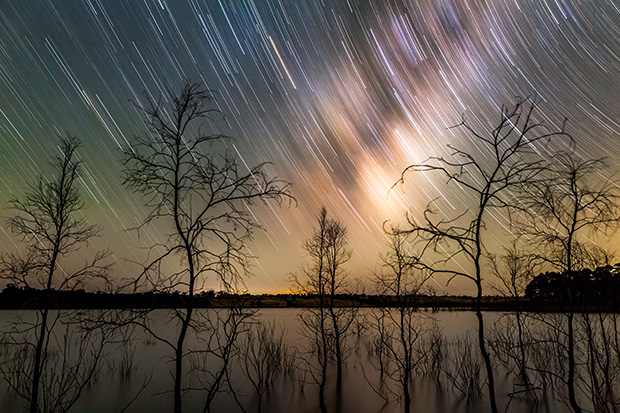
'Milky Way Star Trails,' by Phil Hart. Canon EOS 5D Mk II, 24mm lens, 30mins @ f/5.6, ISO 100. Lake Eppalock, Central Victoria.
STAR TIPS
01 STAR TRAILS
"It's relatively simple to shoot trails. I recommend starting with a short 15 minute exposure, at f/4 and quite a low ISO setting. I also recommend using the camera's Long Exposure Noise Reduction setting for star trails, but after your 15 minute bulb exposure is complete, the camera will appear to be frozen for another 15 minutes as it captures the 'dark frame' which it uses to record and then subtract away the undesired hot pixels from the main image. Once you're comfortable with 15 minutes, you can double the exposure time once to 30 minutes or twice to an hour and increase the aperture one stop each time. Star trails will often look quite flat on the back of the camera, but they process up nicely with a boost to contrast and saturation." – Phil Hart.
"There are several ways to capture star-trails, including setting your shutter speed to bulb (B) and keeping it open for anywhere from five minutes to five hours. However, one of the better ways is to take an extended series of five-minute photos close together, then blend them together using a program such as Star Stacker." – Mark Slater
02 COMPOSITION
"One of the key tips I can share to help you improve is that you should concentrate on composition. People can get caught up in the technical side of night sky photography and forget about their composition entirely. Try and remember the usual techniques of composition, including foreground interest, leading lines, and showing depth. Combined with an accurate exposure of a prominent night sky feature, the added impact of a distinctive earthbound element adds extra punch to any scene." – Andrew Carter