


Michael Snedic has spent much of his photographic career shooting inside rainforests. He shares six great tips to help you shoot great images in this challenging environment.
Australia is fortunate to have so many wonderful rainforests. Large areas are protected and visitors are encouraged. Life is hectic for many of us these days, so it’s a joy and a privilege to experience the tranquility, beauty and clean air of a rainforest. I love spending time in them with my camera. But rainforest photography can also be really challenging. Here are few basic techniques and tips which can start you along the right path in these tricky environments. I want to outline the six most effective ideas I’ve discovered for quickly achieving better rainforest shots.
01 USING NATURE'S DIFFUSER
Beginners might be surprised to learn that by far the best weather for shooting in a rainforest is when it’s overcast. The clouds act as 'nature’s diffuser’ and they’ll stop unsightly highlights and shadows appearing in your images. Whether you’re photographing a waterfall or cascade, buttress roots or a valley filled with tree ferns, subtle lighting will really help you to take a good rainforest photo. On cold mornings mist will often appear throughout the forest, and if you happen to be in the right place at the right time, rays of light can also appear beaming through the rainforest canopy. The combination of overcast weather, mist and rays of light can make for very special rainforest images. Remember, this often happens around sunrise, so early starts are unfortunately essential!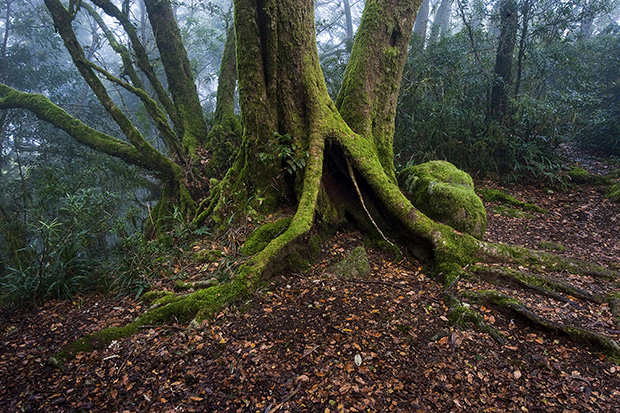
Antarctic Beech Trees. Lamington National Park. Qld – Fortunately, it had been raining only days earlier, making the moss on the beech trees a very lush and rich green. Nikon D700, 24-70mm f/2.8 lens @ 25mm, f/11 @ 0.5s, ISO 200, Gitzo tripod and Really Right Stuff ball head, cable release.
02 TRIPOD OR NOT TRIPOD?
Small apertures or f-stops, such as f/11 or f/16 for SLRs, allow more of your landscape scene to stay in focus (they create a better depth-of-field, for foreground to background sharpness), but they also let less light in, so to make a ‘correct’ exposure you’ll need to use a slower shutter speed. Hand holding a camera using a slow shutter speed can then create a blurry image.
For this reason I always carry a sturdy tripod. If you’re using a heavier SLR camera and lens, a flimsy tripod can still be quite unstable and any tiny movements (often caused by a breeze) can cause blur in your images. If you’re walking long distances, I recommend you take a carbon fibre or mag fibre tripod. These are lighter, but they’ll provide your camera with more stability. I also recommend using a cable release or a remote trigger device (or even a self-timer setting) with your camera, whether it’s a compact or DSLR. This will further reduce any vibration caused when you press the shutter button.
03 THE BEST SETTINGS
To achieve good depth-of-field for a rainforest image, apertures of f/11 to f/16 are the aperture settings I recommend when I’m using a wide-angled lens with an SLR. Setting a smaller aperture like f/22, or even smaller, can cause unsightly diffraction (where the edges of your photo lose sharpness to some degree because the light entering the lens is bent or sometimes broken into its component elements). For many compact cameras an aperture of f/8 is ideal, and this is sometimes the smallest aperture you can set. When you’re using a tripod to photograph a landscape in a rainforest, I suggest setting the camera’s ISO rating to 100 (or whatever minimum ISO your camera allows). On this minimum setting no ‘noise’ should be visible in your image. Digital ‘noise’ is indicated by tiny red, green and blue dots appearing all over your shot (visible when you blow the image up). It adversely affects image quality.
For photos of rainforests or waterfalls I recommend using the meter setting that reads the entire scene, rather than just a small section of it. Metering is the way a camera reads the overall light exposure of the scene or subject you’re shooting. For the Nikon cameras I use I find the best metering is ‘matrix’. For Canon users it’s called ‘evaluative’ and for some other brands it’s known as ‘multi-segment’.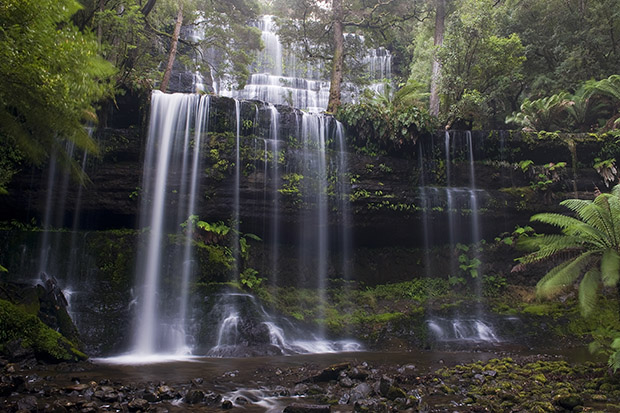
Russell Falls, Mt Field National Park. Tasmania. By choosing an overcast day to photograph the falls, I was able to create an image with smooth, even lighting. Nikon D700, 24-70mm f/2.8 lens@ 27mm, f/16 @ 2.5s, ISO 200, Gitzo tripod and Really Right Stuff ball head, cable release.
04 LONG EXPOSURES
I’m often asked by photography workshop students how to achieve the ‘milky’ or ‘silky’ water appearance you often see in waterfalls, cascades and other scenes where water’s flowing. This look is very popular with photographers and it’s one that’s relatively easy to achieve. By using a small aperture (a higher number like f/11 or f/16), low ISOs and a tripod, you can achieve that ‘milky’ effect, especially if you’re photographing pre-dawn, after sunset or on a darker, gloomy day. The relative darkness and small lens aperture means your camera needs to use a very slow shutter speed to make a ‘correct’ exposure. If the exposure is long enough, the fast-flowing water in your scene will simply blur as it moves rapidly across your camera’s frame, which ultimately causes the water to look ‘milky’.
Sometimes, however, you might not have low enough light when you’re at a waterfall or cascade, so some help is needed! By using a neutral-density filter fitted to the lens on an SLR camera, the scene automatica
lly becomes darker. This has the same effect as photographing in naturally darker conditions. You’ll then need a longer exposure time (achieved via a slower shutter speed) in either situation. Neutral-density filters come in various degrees of ‘darkness’, so the darker the filter, the milkier your water will be. I use variable neutral-density filters because I find you only need one filter rather than a series of individual units with varying degrees of darkness to create different effects.
For SLR users a circular polariser is also effective in rainforests, because it can remove much of the glare often found on wet leaves, rocks and on the water itself. The circular polariser works in the same way as polarised sunglasses. By turning the circular polarised filter around as you look through the camera’s viewfinder, you’ll actually see the shiny areas disappear. The polariser can also work as a kind of neutral-density filter, by allowing you to reduce your camera’s shutter speed and thus once again allowing the water to blur.

Groom River, Tasmania. By using a sturdy tripod and ball head, with a cable release, I was able to make sure this image was sharp, even though the shutter speed was 6 seconds. The slow shutter also helped create the slow ‘milky’ effect in the water. Nikon D700, 24-70mm f/2.8 lens @ 26mm, f/16 @ 6s, ISO 100, Gitzo tripod and Really Right Stuff ball head, cable release, circular polariser.
05 MAKE BETTER MACROS
Rainforests are filled with a myriad of wonderful tiny subjects. These can range from multi-coloured and shaped fungi and berries, to lichens and mosses. I often spend a full day in just one small area of rainforest, seeking out and shooting different types of macro subjects. Overcast weather is once again the best option for achieving evenly lit macros, just as it is for many landscapes. When the sun is out and beating down on macro subjects the light will generally be too harsh. Fortunately, there are ways around this! All you need to do is use a hand-held diffuser and position it between the subject being photographed and the sun. If you’re using a tripod you can hold the diffuser in one hand, with your remote or cable release in the other, to take your shots. The closer you hold the diffuser to your macro subject, the richer the colours will become.
For compact or SLR users the use of a flash can also assist in scoring great macro shots in a gloomy rainforest. Using the inbuilt flash can work quite well for both types of cameras. For SLR users, an external macro or ‘ring’ flash is even better, and in most cases the light intensity can be adjusted to suit your needs. If you’re using an external flash or the camera’s pop-up unit, a diffuser can be used in front of the flash to create smoother, more even lighting. It’s all about controlling the light.
Sometimes the darkness in a rainforest can create unwanted shadows on parts of the flower, fungi or some other macro subject. You can then use a hand-held reflector (which can be a round professional unit or even just a sheet of stiff white cardboard) to ‘bounce’ light into the dark areas without creating any unnaturally harsh light. Reflectors are cheap to buy and small, portable ones are light to carry. I think they’re a ‘must’ for every macro photographer.
As far as the best aperture to use for macro subjects in a rainforest is concerned, this depends on the look you’re trying to get. If the main aim is to have a few berries in focus with the background blurred out, then a wider aperture is required. For an SLR in this situation an aperture of f/4 or f/5.6 will be good, whereas an aperture of around f/2.8 will be best if you’re using a compact camera. If your aim is to have all or most of a flower in focus, then an aperture of f/16 might be needed. The best part of digital photography is that you can take a series of shots at various apertures and check them instantly on the back of your camera’s LCD screen. If more or less depth-of-field or focus area is required, adjust your camera’s aperture accordingly.
Leaf-tailed Gecko. The subtle, morning light created this lovely backlighting effect that silhouetted this gecko perfectly. Nikon D300, 105mm lens, f/5.6 @ 1/800s, ISO 800, hand held.
Musky Rat Kangaroo. The fact the Rat Kangaroo was under a canopy meant there wasn’t any harsh light to contend with. Handholding also made it easier for me to compose - the Rat Kangaroos rarely kept still! Nikon D700, 150mm lens, f/5.6 @ 1/160s, ISO 5000, hand held.
06 RAINFOREST BIRDLIFE
For most outdoor photographers birds have always been popular subjects. But photographing birds in a dark rainforest can be quite hard. So here are a couple of useful tips. If the birds are fairly tame and they can be approached slowly without them flying off, the inbuilt or pop-up flash on your camera is good for adding extra light. For birds which are further away an SLR with a decent (longer) zoom lens and an external flash is very useful. The external flash throws light so much further. But if I’m using a flash, I’ll invariably use a diffuser on it to create more subtle lighting on the subject. Because ‘freezing’ the action can often be a priority with birds, I recommend setting your camera to ‘manual’ and choosing a shutter speed of between 1/60th of a second to 1/250th of a second (depending on how ‘twitchy’ your subject is). I would also adjust the aperture to approximately f/4 or f/5.6 (if your camera’s lens doesn’t go to down to these settings, select the widest aperture the lens allows) and set the ISO to either 100 or 200, for minimal noise. The flash then needs to be set to the TTL (Through The Lens) function. This way, it will shut off when enough light has been thrown onto your subject.
All you need to do then is wait for the bird to be in a good position and fire away! This same method works for other forest wildlife like mammals, reptiles or frogs. If you prefer more natural lighting when photographing wildlife you can always open your aperture to its widest setting (remember, its lowest number), which in turn means that to secure a ‘correct’ exposure you have to increase the shutter speed. Changing the camera’s ISO to a higher setting also allows you to increase shutter speed. By doing both things in unison, the shutter speed may be high enough in a dark rainforest to allow for some hand-held shots without the use of flash. Switching on image stabilisation (if it’s available) on the lens or camera also helps in creating less blurry shots when your shutter speeds are slower.
Rainforests are perfect places to spend time with your camera. They’re also a great place to not only unwind, but to let your creative juices flow. Whether you own a small compact camera and you’re a complete beginner, or you’re a more experienced enthusiast with an SLR camera and lots of lenses, I recommend venturing into a rainforest when you next get the chance. You’ll end up with a great photographic experience!
Michael Snedic is a professional (AIPP Accredited) wildlife and nature photographer, writer and tutor. He is also co-owner of Trekabout Photography Workshops which present photography workshops and tours across Australia.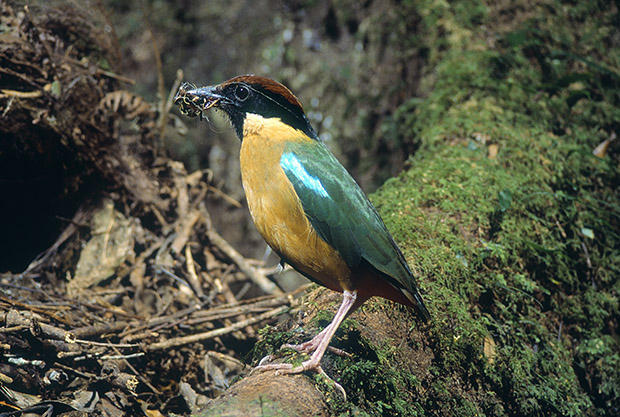
Noisy Pitta. Sitting in a camouflaged hide made it easier for me to get closer to this bird, deep in the rainforest, without scaring it away. I sat in the hide every day for two weeks. Nikon D200, 80-200mm lens @ 200mm, f/5.6 @ 1/125s, ISO 100, twin flash (diffused), flash bracket, hand held.