


Portraiture requires specific skills, but when combined with travel there are a wider range of issues to consider. In Part Two of his series on travel photography, veteran travel shooter David Lazar shares 5 more useful tips for photographing people when you are travelling though a new country.
01 Framing the subject
Framing a subject with other elements in the scene is a good compositional technique in many styles of photography. In a travel portrait context it requires you to look around and think about what options are available to act as a frame. Look for infrastructure which has a nice symmetry or pattern, such as windows, doors, archways or tunnels.
Don’t forget to look at the natural world as well; you might find trees, branches, long grass or leaves which can be used to set the subject nicely in a frame within the photo’s actual frame.
It’s often best to photograph people on their level. If they’re seated on the ground, don’t photograph them from your higher standpoint, move down to their level.
This will involve you bending over, standing on your tip toes or even sitting down on the ground, depending on the height or positioning of your subject. Breaking this rule for extreme high or low angles can work well too, but for the most part it can be very effective and useful to stick to this idea.
A young Balinese girl with her traditional fan, taken in Ubud. This girl was with her mother who ran a shop in an alleyway, and I showed interest in the fan and then asked if I could take a photo of the girl holding it. Nikon D800, 24-85mm lens @ 24mm, 1/500s @ f/11, ISO 500.
02 Patterns
Try to imagine a shape or pattern you could arrange your subjects into, for interesting and creative compositions. This will make a photo appear more artistic and pleasing to the eye. Consider your angle; maybe you can make a pattern looking down from a bird’s eye perspective. Framing a person dead centre in a symmetrically balanced scene is also a technique to consider, as this can be very powerful and a change to the usual off-centre composition we usually employ when photographing people in their natural surroundings.
 Three Balinese girls in a Tenganan, Bali, who were attending a wedding feast. I was invited to come in and the girls were only too happy to be photographed. Nikon D800, 24-85mm lens @ 40mm, 1/60s @ f/4, exposure bias -1 step, ISO 800.
03 Focus on the eyes
The eyes are the focal point in any close-up portrait. It’s important to frame them in one of the thirds, usually the upper third of the frame. They need to be clear and sharp. However, if you use autofocus on your camera and let the camera find a focal point, there’s a good chance it will choose something else like the nose to focus on. It’s paramount that the eyes have pinpoint focus because they are the elements which truly reveal the personality of the individual you’re working with.
Here’s what I do – I have my camera on autofocus, but on centre point focusing mode. Not only do I frame the eyes on the centre dot while it’s auto focusing, I zoom right into the eye and aim the central point on the iris or eyelashes.
Once that’s in focus, I hold it with the shutter half depressed, zoom back out, recompose the shot and then take it. This is how I can aim to get the eyes as sharp as possible when I’m capturing portraits, while keeping the camera as steady as possible and making sure there is decent light on the subject.

Taken in Puthia, Bangladesh, this portrait features a young girl’s green eyes. I came across a group of friends playing games outside their houses, and I was met with overwhelming attention and curiosity, and got to know some of the people living there. I arranged to meet this girl and her family again the next day, and when I came back I was welcomed into their house. We took this photo in the afternoon using natural light. Nikon D700, 24-85mm lens @ 50mm, 1/30s @ f/3.5, exposure bias -1 step, ISO 400.
04 Complementary colours
Having a specific colour scheme running through a portrait photo can make it stronger and more focused. Usually there are only one or two featured colours in my photos, sometimes three. If the background compliments the colours of the person, such as their skin or clothing for example, the photo can be more aesthetically pleasing to look at and therefore more engaging to the viewer.
Uncluttered backgrounds are also important, so as not to distract from the face, and this is a photographic technique also common in wildlife photography. The obvious advantage of this technique is that an image with minimal distractions allows viewers to focus on the key elements within the scene.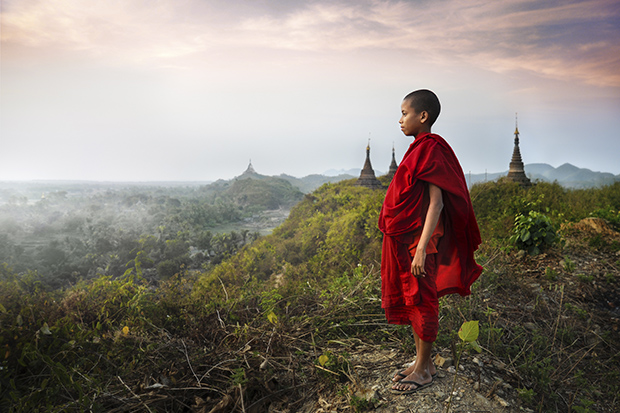
A novice monk scans the horizon of the former kingdom of Mrauk-U, Myanmar. Countless temples from the 16th century dot the hills and make it a great place to explore, after a flight from Yangon and an eight-hour boat trip. Nikon D700, 24-85mm lens @ 28mm, 1/100s @ f/5, ISO 500.
05 Post processing
Post processing is an important step to further your creative vision – sometimes the camera just doesn’t capture a scene as you saw it in your mind’s eye. In fact it often captures the scene a lot ‘flatter’ than you’d like it, especially as you often have to shoot in conditions with limited control over the lighting. Post processing can help you achieve technical perfection and make your images more aesthetically and artistically impactful. Blurry focal points, however, can’t be fixed and this is one of the most important aspects for capturing an image correctly in camera. I use Photoshop and Lightroom to enhance the light and colours to my taste. In Photoshop I brighten parts of the image and darken other areas, which I achieve by using adjustment layers and layer masks, which are a great way to control the editing of a photo in the specific areas of the frame, as a more efficient alternative to using the select tool.
This is a portrait of an elderly lady in a rural part of Bangladesh. While spending four days in the small town of Puthia, I was escorted by some friendly locals to their home, giving me the opportunity to meet a close community of families. Nikon D700, 24-85mm lens @ 38mm, 1/50s @ f/3.5, ISO 400.
See Part One of 'How To Shoot Stunning Travel Portrits.