


Learning the ins and outs of your camera is one thing but if you want to take your landscape skills to the next level you need to get creative says Dylan Fox. In the final installment of his two-part series Fox shares five more clever tips to help you take your photography to the next level.
01 FIND A FOCAL POINT
It seems obvious, but in good landscape scenes there should be a point which you want the viewer drawn towards. That may not happen straight away, as you may want them to start at the bottom of the frame and be led to the main subject. Maybe you just want to lead the eye out to a stunning sunset on the horizon. Whatever it is, in general you don’t want the viewer’s eye to be wandering aimlessly through the frame with no real sense of direction. You want them to search your scene with a purpose. Sometimes it helps to help the viewer to get to this part of the image and this can be done in a number of ways. The use of colour can be a great way to attract the eye. Maybe it’s the only source of strong colour within the frame or it is a point of warm colour contrasting against an otherwise ‘cool’ scene. Contrasting elements will attract viewers’ attention. This could be as simple as a dark lone tree in an otherwise bright setting. You could have harsher contrast on your subject, because it’s the only part of the image in direct sunlight, while the rest is in the soft light of the shadows.
Brightness is also very valuable. Generally speaking our eye is drawn toward brighter areas. So a bright setting sun or a glowing milky way over a dark eerie landscape will draw our attention. Conversely bright areas in peripheral or unimportant parts of a scene can be a strong distraction, even if they’re in the background (as they often are!).

'Trail Blazing.' Being among sand dunes in strong winds isn’t comfortable but the results can be fantastic. This was captured at Wedge Island, a shack town on the coast a couple hours north of Perth, WA. Canon EOS 5D MkII, Canon 16-35mm lens
@ 29mm, 1/20s @ f/16, ISO 100.
02 NO RISK, NO REWARD
I have a photograph I captured a couple of years ago called ‘The Reward’ (see following spread). This name stemmed from the notion of 'no risk, no reward'. I arrived at a coastal location I’d photographed many times and I was running a little late. I set up a composition I had previously used, knowing it would be different as it looked like this was going to be a colourful scene this time around. To capture the composition I wanted I had my tripod low in a channel between two rock platforms where water was rushing in and out. As it came in the waves were crashing and each time the tripod would be submerged, as well as on a few occasions part of the ball-head! Experience told me this was going to be a nice image, but I got incredibly lucky when lightning strikes starting to flash in the distance – right along the axis of this channel. It was unplanned and I couldn’t believe my luck! I often feel that for these dramatic photographs which take on a great new perspective, there’s a risk involved. It might be bad weather, crashing waves, or sheer cliff faces. Sometimes the risk won’t pay off, and you may simply find yourself with a soaking wet camera and no useful result! But on other occasions, you might produce a piece you absolutely love. I’m not advocating you put your life in danger, but you should be willing to risk a spray of water or freezing cold conditions for a shot that might pay off.

'Tranquil Moment.' Coloumbia River Gorge is filled with stunning forest scenery. Here, Metlako Falls bursts out of the trees making for a beautiful scene. Canon EOS 5D Mk II, Canon 24-105mm lens @ 105mm, 2.5s @ f/16, ISO 50.
03 MAKE IT SHARP
There’s nothing more frustrating than getting back to your computer, uploading your images, and then realising they’re out of focus. Even if it’s by the smallest margin, it burns me up inside!
So I take the time to make a test shot and then quickly zoom in and check sharpness on the LCD before locking it in. Generally with landscapes, a sharp image from front to back is desirable. Sometimes, though, this is easier said than done. If you’re shooting at a very wide angle, say 16mm, with a foreground 30 centimetres from the lens and a background element on the horizon, you might need to employ a technique known as ‘focus-stacking’. Basically this is the process of capturing the scene in a number of frames, each with a slightly different focal point, then blending these together in post-production. There are a range of software programs available which can handle this task, though it can be time consuming, and completing the process successfully – from shooting to the finished product – is a skill in itself.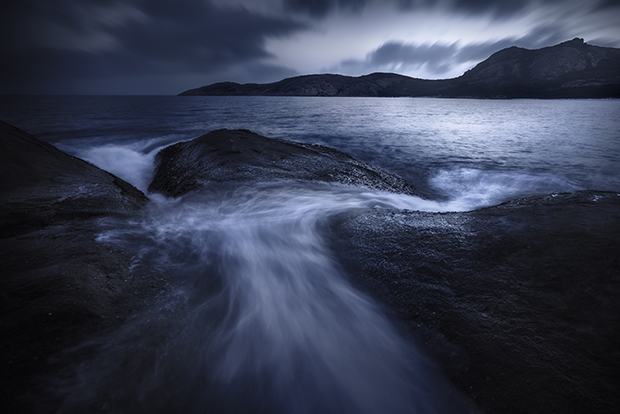
'When The Light Fades.' After shooting a number of exposures I packed up and was leaving when I noticed the same location from a new angle. It always pays to keep your eyes peeled. Sony A7R, Canon 16-35mm lens @ 19mm, 1.3s @ f/16, ISO 100.
04 FRAME YOUR SUBJECT
Finding natural elements in the field to ‘frame’ your subject often creates distinctive images. Often this may come in the form of a tree and its branches that surround your distant subject. The branches can just dip into the frame from the top or sides, or you could have the tree in its entirety in the frame, but still have it partially framing your subject. Different elements in a scene can be combined to make a frame, too. 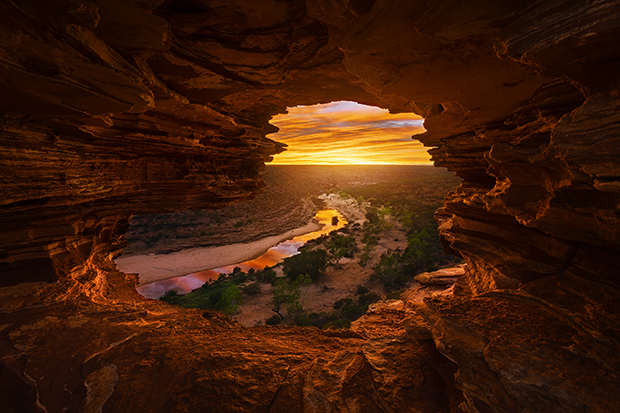
'Cherish These Moments'. I waited the better part of a year to photograph Nature's Window in Kalbarri National Park. I needed the right time of year so the sunrise would line up with the view through the window, overlooking the Murchison River as it curves its way around 'the loop'.
05 ART BEFORE TECHNIQUE
I can’t stress this point enough – the artistic concept must be paramount. I truly believe this is something that’s often neglected in the pursuit of a technically great image. A technically perfect photograph is not necessarily a great photograph!
It’s all good and well to know how to focus-stack, exposure blend, or stitch images to create a 120-megapixel image, but if it’s a boring photograph none of that technical stuff matters. All top photographers have images where technically something isn’t spot on, but they are the only ones who will ever notice it.
Don’t get caught up with camera gear, or what tools or techniques you have up your sleeve. They cannot come before the art. Sometimes great light might literally last less than a minute and if you’re worrying about stitching multiple images, you’ll miss the shot. Those techniques are just tools.
By all means use them if they’re needed, but don’t get hung up on them if you don’t need to. Remember the old adage – Keep It Simple Stupid (KISS)! Spend more time concentrating on how you could improve your composition, lighting angle, use of colour or lack thereof, rather than just bragging about how pin-sharp your image is or how massive the file size is.
While technical brilliance can’t be overlooked, it can’t be placed above the art of your photograph. Find a good subject, then make a great photograph of it.