


Tired of the usual three-by-two picture format offered by most digital cameras? Pro photographer Justin Gilligan shares his best tips and tricks for shooting and stitching seamless panoramic images.
Have you ever witnessed a spectacular sunrise? One of those mornings when you’ve finally positioned yourself in the right spot at the right time and the whole sky lights up? Perhaps there’s a rainbow, streaks of lightning, or a palette of electric colours more like a Jackson Pollack painting than the lifeless scene you scouted the previous day.
It’s moments like these I feel confined by the conventional three-by-two aspect ratio of my viewfinder. If you know the feeling, perhaps it’s time to start thinking bigger – and wider! Say hi to stitched panoramas!
Panoramic photography has been around for years and was made famous in Australia by iconic photographers Ken Duncan and Steve Parish, who initially used specialised, panorama-format film cameras to create sweeping views of the Australian landscape.
These days, with the advent of digital cameras and clever post-processing software, it’s easier than ever to capture that expansive scene by capturing a series of overlapping images and stitching them together in post to create a single, stunning, wide-format panoramic image.
So, how do you create seamlessly stitched panoramas of your own? It’s really not that hard – as long as you have some basic software and follow a few basic principles. So, without further ado, here are my tricks and tips to get you shooting beautiful panoramic landscapes in no time!
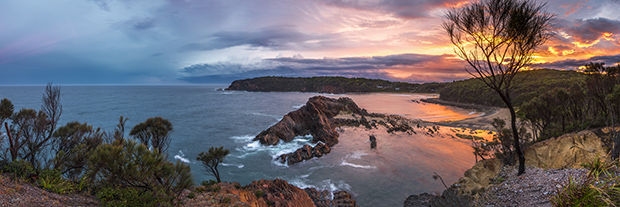
Having scouted this vantage point at Guerilla Bay, NSW, I waited patiently for a perfect sunset to create this panorama comprised of 15 vertical images with the aid of a Nodal Ninja panorama head. Nikon D800 with16-35mm lens @ 28mm, 2s @ f/14, ISO 100.
Getting started
Most lenses can be used for panoramic stitching, with the exception of fisheyes. My preferred lens for panoramas is a 16-35mm zoom lens, however on rare occasions I have also used a 60mm lens and even a 120-400mm lens for a distant mountain scene. It’s worth noting panoramic stitching works best with rectilinear lenses, not fisheyes which produce too much distortion when it comes to stitching the final panorama.
A tripod is essential. Not only will it help ensure your images line up in post, it will allow you to choose slower shutter speeds in magic-hour lighting conditions. I use a special panoramic head to help me find the optimal nodal point for the camera and lens combination, but it’s not essential. A regular tripod head is fine – only think about upgrading if panorama stitching is something you do a lot of.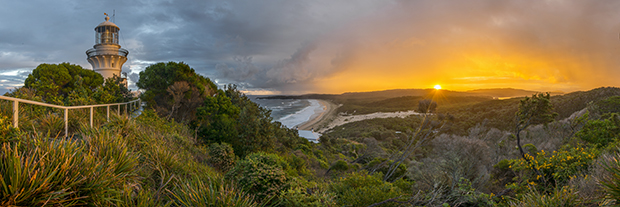
I didn’t hold much hope during this rainy afternoon at Sugarloaf Point Lighthouse. The rain showers finally cleared at the exact moment the sun hit the horizon. The final image was created using a 9 image vertical stitch with the assistance of a Nodal Ninja panorama head. Nikon D800 with Nikon 16-35mm lens @ 16mm, 1/10s @ f16, ISO 50.
Composing your panorama
Like most forms of photography, your first step is to visualise the scene and think about the way the key elements will be arranged in the final composition. Experience and practice will help you develop the skills to visualise panoramas in the field. If I’m planning on shooting a panoramic image that features breaking waves on a shoreline, I will often ditch the panoramic head and wing it by shooting three to four images in normal landscape format. I will then try to time each image so the waves on the shore and in each respective frame are in roughly the same position. Quite often I will also include the overlapping area of the images around natural breaks in the scene such as rocky outcrops, which helps with stitching and blending the images when it comes to post-processing.
Best camera settings
Because you are shooting several images, it doesn’t really work to set the camera up in auto mode. What you don’t want is for the camera to adjust the exposure, white balance or focus, partway through a sequence of shots. With that in mind, these are the camera settings that I find work the best:
• Use manual exposure and white balance and don’t change settings in between frames. Altering the exposure or white balance between images will lead to uneven areas of tone across the final image.
• Obtain the correct exposure for the brightest frame in your series and be sure to check your histogram and blinking highlights (only a few highlights should be blinking in the brightest frame).
• Autofocus on the main part of the scene you want sharp and then switch to manual focus – you don’t want the camera to be refocusing part-way through the scene or you may end up with at least one of the frames out of focus.
• A mid-to-narrow aperture (f/11, f/16, f/22 etc) is recommended to give you the greatest depth of field through your scene. Some experimentation between a suitable combination of ISO, shutter speed and aperture based on your shooting conditions will be required before you commit to your final attempt.
• Shoot Raw to maximise your camera’s resolution and give yourself more options when it comes to fine-tuning tone, white balance, contrast and other variables in post.
• Do a test shoot of your series to check exposure and focus, and ensure you are perfectly positioned before attempting the final series.
I needed to wait for high tide and a spectacular sunset to capture a panorama of this jetty to nowhere on Wagonga Inlet. A five-image horizontal stitch was used to create the final panorama. Nikon D800 with Nikon 16-35mm lens @ 31mm, 6s @ f18, ISO 50.
Lighting
Think about where the sun is and how the scene is lit before you start shooting. Positioning the sun at your back will result in a uniform and easy-to-manage exposure throughout the entire scene. Shooting into the sun, when it is very low and close to the horizon or when it falls behind a cloud, is also possible. In terms of exposure, it’s important to expose for the brightest part of the scene. I often use filters to assist with exposure control – neutral density filters to slow the shutter speed, and graduated neutral density filters to darken bright skies.
Straight shooting
You’re almost ready to start shooting. Before you do, the following tips can save you hours of mucking around in post:
• Shoot from left to right, the images will load in your browser from left to right, so it will make it easier to keep track of your series when you’re back home on your computer.
• Before you commence the series, take a picture of your hand with a finger pointing in the direction you are about to pan to.
• You can use your viewfinder’s grid display to help keep your images level. Line up the horizon with one of the grid lines to improve your chances of capturing a level horizon.
• Pan slowly and accurately, there is no need to hurry to the next image. Keep an eye on the entire scene and on your viewfinder to ensure you’re panning accurately to the next frame.
• Shoot more images than you need. I usually aim for around six frames with about 25% overlap. The more overlap you have the greater your chance of obtaining a successful stitch. The greater the overlap however, the more images you will need to take to obtain the ideal 3:1 ratio.
• Stop to take each frame, there is a natural tendency to pan through the whole scene whilst clicking frames along the way. By stopping you are ensuring the sharpest images possible and can concentrate on your composition.
Panorama images are suited to spectacular sunrises when you find yourself in the right place at the right time, such as this scene at Moruya, NSW. A five-image horizontal stitch was used to create the final image. Nikon D800 with 16-35mm lens @ 28mm, 1/30s @ f/10, ISO 100.
Raw processing
Before you start stitching your images, it’s important to refine the Raw files to optimise tonality, white balance and clarity:
• Once you have downloaded your memory card, place each series into a separate folder, so you can keep a track of
each attempt.
• Highlight all the Raw images in the series and drag them into Adobe Camera Raw (Photoshop) so all the files open at once – the thumbnail of each image should appear on the left side of the screen.
• Choose ‘Select All’ (at the top of the thumbnails) to ensure any adjustments you make are applied to all the images in the series. This ensures the exposure and tonal range is consistent across the entire scene.
• Generally, I make small adjustments to exposure, highlights, shadows, white and black points, and clarity at this stage of the process.
• Save the processed images as TIFF files back into their folder of origin.
Stitching software
There are plenty of choices when it comes to software for stitching panoramas. If you already own Adobe Photoshop or Lightroom, both offer good stitching features. Alternatively there are powerful specialist stitching programs such as PTGui. Here’s a brief overview of how to get started with each of these programs:
• If you’re using Adobe Photoshop, go to File > Automate > Photomerge. In the pop-up box, select Browse to find your processed TIFF files. For the layout option, select Auto. Auto usually does a good job, but if you’re not happy with the results try Cylindrical. Remember to tick Vignette Removal before hitting OK and save as a TIFF file.
• To get started in PTGui confirm your camera and lens parameters and select Align Images. The Panorama Editor automatically applies control points to your images before aligning the images. The Panorama Editor then shows a preview of the panorama that you can adjust by editing individual images, repositioning the panorama, setting the centre point, or by changing the projection and blend modes. Select Create Panorama, save as a TIFF file if you’re happy with the blended preview, or save as a PSD file if you want your blended image to also contain the original image files as layers. This can be useful if there are stitching issues, which can later be fixed by using the Brush tool to add and subtract elements in an adjustment layer in Adobe Photoshop.
• If you’re working in Adobe Lightroom, import the series of Raw images (rather than the processed TIFF files) and Shift-click to select all. Right click on the highlighted series (Ctrl-click, Mac) and select Photo Merge then Panorama. The Panorama Merge Preview display appears with the output image displayed. Choose Auto Select Projection if you want Lightroom to automatically select a layout projection. Otherwise, choose your own projection (Perspective, Cylindrical, or Spherical) depending on which projection produces the best panorama. Finally, select Auto Crop and then Merge to create the panorama and place it in your catalog. The panorama will now be saved as a Raw file, so it is possible to make Raw adjustments to the processed panorama – a major benefit compared to the other programs above.
This old homestead, captured on a foggy day in Bermagui, NSW, was the perfect panorama subject. The final image was created using a seven-image horizontal stitch. Nikon D800 with 16-35mm lens @ 27mm, 1/13s @ f/11, ISO 50.
Crop and final adjustments
Open your final image in Adobe Photoshop and enlarge it to 100%. Check that everything is lining up properly and there are no unusual or mismatched features in the final panorama. Choose the Crop tool and crop the image as desired.
Final adjustments to levels, curves, saturation and sharpening can now be made to complete your perfect landscape panoramic image.
See more of Justin Gilligan’s images at justingilligan.com.