


Street photography is an endlessly diverse and rewarding activity, writes pro shooter Drew Hopper. In a new two-part series he shares his best tips for capturing striking images of daily life, from technical considerations such as which gear and settings to use, to creative considerations like timing and composition.
Street photography is about documenting everyday life and society on the streets. There are opportunities for street photography everywhere, and you don’t necessarily need to travel to capture great images. It’s a genre often done candidly, without permission, and without your subject’s knowledge. However, taking 'street' images doesn’t rule out creating staged pictures, or asking for portraits. You might spot an interesting character who catches your eye; there’s no law saying you can’t wander up to strangers and ask for permission to take their picture! This is a great way to get a more intimate portrait of someone in his or her environment. The most important thing with street photography is to have fun and enjoy getting out with your camera. Remember, your goal is to capture emotion, humanity, and something of a person’s character. It takes time to get these shots, but with some practice and patience it can be really rewarding. Here are some tips about the genre which I’ve picked up from my own experience.
01 THE BEST LENS
Deciding what lens to use is one of the most important factors in creating interesting street photography. You may be tempted to use a telephoto lens, but that’s more than likely to result in more harm than good. While it can be an effective option in some circumstances, usually you don’t want to be that ‘creepy person’ standing across the road aiming a giant lens at strangers! If you want to look inconspicuous generally you’re going to have to get up close and amongst the action. Use a wide-angle lens and get lost in a busy crowd. Most street photographers use a focal length between 35 and 50mm, though sometimes they’ll go wider if they’re trying to fit more in the frame. By using a prime lens you know exactly where to be so you can focus on composing and not worry about what focal length you’ll need to use. Often street shooters will use compact cameras in preference to SLRs because they are more discrete.
Businessmen wait for their ride home in Sydney CBD. I wanted to capture a sense of motion so setting the camera on a tripod I was able to blur passing traffic. Canon 5D Mk II, Canon 17-40mm @ 39mm, 0.5s @ f/4.5, ISO 400, tripod. Curves, contrast, saturation and sharpness in Photoshop CS5.
02 THE BEST SETTINGS
I find the quickest and easiest way to set up my camera for street photography is to switch the camera to AV (aperture-priority mode) and select the f-stop (aperture) and ISO manually. The camera will then decide for itself what the shutter speed (exposure) should be set to. On a bright sunny day, a good place to start is around f/16 with an ISO between 200 and 400. If your camera shows you a shutter speed higher than 1/200s you’re ready to roll. Take note of the shutter speed your camera is reading and make adjustments to aperture and ISO accordingly. If your camera is giving you a shutter speed that is below 1/80s chances are it’s going to blur your photos (though this can be a good effect in the right situations). If you need to overcome this for the type of image you want, simply increase your ISO and/or open up your aperture (set a smaller number like f/4). If you’re new to photography you can always set the camera to P mode (program or auto) and let the camera figure out the settings. You can still adjust the EV (Exposure Value) if you want to either over- or underexpose your shot. This is useful if you’re shooting ‘run and gun’ (in a hurry, with no time to think), but you’ll have little control over what the camera is doing, so this isn’t always the best option. Program mode does a pretty decent job, but I wouldn’t rely on it in low light where there’s a high possibility your shutter speed will be too slow to freeze any action.
An art gallery owner and his loyal companion in Hoi An, Vietnam. We spoke briefly about his love for his dog that he named ‘Merry Christmas’ because of the joy they share together. Canon 5D Mk II, 35mm lens, 1/500s @ f/1.4, 640 ISO, handheld. Converted to monochrome, contrast, levels and sharpening in Photoshop CS5.
03 USE YOUR FEET
By using a wide-angle lens you’ll be able to get nice and close to your subjects. The advantage of this is the wide angle will give the viewer a sense of being ‘right there’ in the moment. You’ll also blend in with the crowd as part of the environment, rather than standing across the street looking with a telephoto lens. A lot of successful street photos were taken within a couple of metres of the action – sometimes only centimetres away. Taking a walk through a busy street, market or park can result in some rewarding pictures when you put yourself in the moment. If your images aren’t working out the way you visualised them, you’re probably not close enough. Activate the shoe-leather zoom (get closer) and your images will almost certainly benefit!
Rush hour, early evening, Sydney CBD. I walk the streets at night in search for bustling everyday life chaos. This image was shot with a tripod to capture the traffic zooming past. Canon 5D Mk II, 17-40mm, 1/5s @ f/4.5, 400 ISO, tripod. Curves, contrast, saturation and sharpness in Photoshop CS5.
04 BE PREPARED
Street photography is spontaneous – it waits for no-one. It’s a discipline you have to force upon yourself. Your camera is an extension of you; it’s your gateway to sharing your vision with the world and you don’t want to miss an amazing photo 'op' because you don’t have your camera with you.
If you’re serious about street photography you’ll have your camera within reach whenever a key moment presents itself. The ‘decisive moment,’ as it was named by legendary French street photographer Henri Cartier-Bresson, requires anticipation and split-second timing. You’ll rarely get a second chance, so you have to be prepared. Having your camera at hand at all times means you’ll be able to make the most of those decisive moments.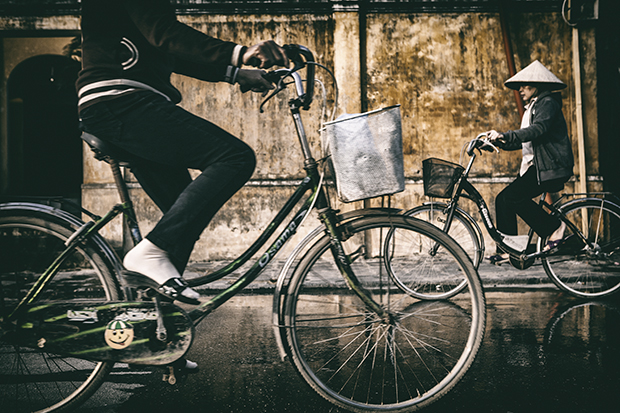
The daily commute in Vietnam. I liked the tones and textures in the wall, so I waited about an hour for my subjects to come into frame. Canon 5D Mk II, 24-70mm @ 42mm, 1/640s @ f/4.5, ISO 250. Curves, contrast, colour balance and sharpening in Photoshop CS5.
05 BE BRAVE!
Some people struggle with the idea of street photography. It can be like a voice in your head, telling you that your idea won’t work. A common fear is that subjects will respond angrily if you take their picture, threaten you with physical violence, or call the police! It’s possible to overcome these fears by practicing and getting out more with your camera. Here are some things I’ve tried in an effort to overcome or at least push those fears to the back of my mind.
Try different techniques while you’re out and about. Find an interesting spot to sit with your camera at the ready. I spend a lot of time at cafes and restaurants when I travel, and I always have my camera handy. By observing street life from a comfortable setting you’ll feel at ease and be able to wait for pictures to come to you. You’re less likely to be noticed sitting outside a café than standing in the middle of the street. I also find it useful to listen to music, which can be both a distraction and an inspiration. Most of all I find that it helps me relax and feeds my creativity. It might not sound logical, but it works wonders, and if it means you’re comfortable in your surrounds then it’s worth a shot.
Please note, I don’t suggest you listen to music at night, in unfamiliar locations, or anywhere you feel unsafe! You should always be aware of your surroundings.
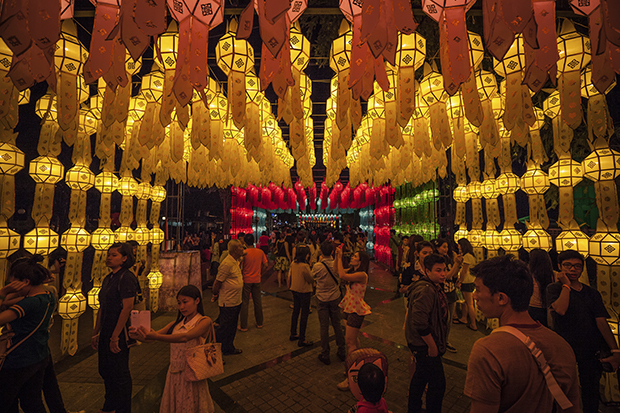 Art installation, Loy Krathong Festival, Chiang Mai, Thailand. It made my job easier shooting in a busy crowd where I went unnoticed. Canon 5D Mk II, 16-35mm @ 16mm, 1/100s @ f/5.6, 640 ISO, handheld. Curves, levels, saturation and sharpening in Photoshop CS5.