In nature, where things are rarely neat and ordered, it can be difficult to find and capture compelling compositions. But, as Michael Snedic reports, a few simple composition rules can help you dramatically improve your success rate.
There are three elements that most photographers agree are key to a successful photo: subject, lighting, and composition. In nature, compelling subjects are plentiful, as long as you take the time to look. Lighting can be trickier but the odds of finding good light improve if you shoot in the early hours of the morning and the dying hours of the afternoon. The element that I find most people struggle with is composition. This is particularly true in nature, where things are rarely neat and ordered. Getting the composition right is something that requires practice and a sound understanding of a few basic rules. Here I’ll look at different techniques which can be used to make better compositions in macro, wildlife and landscape images.
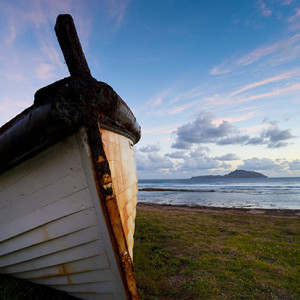
This vessel on Norfolk Island was a perfect foreground feature for this sunset. The key to this shot was gettingdown low with a wide-angle lens, ensuring the boat and island in the distance were included.
01 ‘RULE OF THIRDS' FOR LANDSCAPES I’m not one to advocate using photographic rules for every scenario. Sometimes rules work, sometimes they don’t. One rule that is useful for composing landscape images is the so-called ‘rule of thirds’. The rule divides the viewfinder into a grid of equal thirds, both horizontally and vertically. The photographer then places the most important parts of the picture on the lines, or the points where the lines intersect. Rather than having the horizon in the centre frame, the rule of thirds suggests you position the horizon closer to the bottom or top third of the photo. In most landscpes this results in a more pleasing composition. Many digital cameras these days offer an option to overlay a grid on the camera’s display to make it easier to position elements according to the rule of thirds when shooting.
It was important to leave space in the direction this juvenile Australian Sea Lion was facing so he didn't look it was squashed against the left side of the frame.
02 LEADING LINES Leading lines can be used to draw your viewers’ eyes into a photo and towards a particular focal point or primary subject. A leading line will often start at the bottom of the frame and guide your eye towards a main subject. In nature you can find all manner of things to which your eyes are naturally drawn. Leading lines can be found in ripples on sand dunes, waves on a beach, garden paths, rock formations or even in a row of trees. You can use any of these effectively, and they can be powerful visual tools. An important way to make leading lines work is to make sure you set up an image with plenty of depth-of-field. A soft, out-of-focus foreground or background can ruin the effect of a leading line because the eye is distracted by the blurred parts of the image, rather than being drawn along the line itself. I recommend using a small aperture (around f/11 or f/16) for greater depth-of-field.
Remember though, that a small aperture lets less light into the camera, creating a slower shutter speed. If the scene is dark, for example at sunset or sunrise, in a rainforest or on an overcast day, a sturdy tripod will be essential to minimise camera shake as your exposure time becomes longer. A remote or cable release also greatly reduces any movement which might occur if you press the camera’s shutter button manually, rather than via a timer or cable.
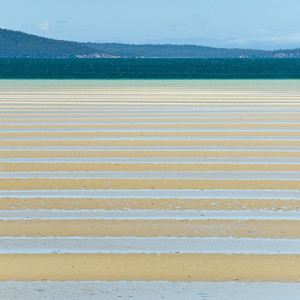
This image was taken along the east coast of Tasmania. By composing the image so the parrallel lines of sand and water were in line with the bottom of the camera's frame, the aim was to draw the viewer's eyes up through the scene.
03 LOOK FOR PATTERNS Patterns in nature are everywhere. They can appear as identical shapes, the same colours or in repetitive lines. The best way to photograph patterns is to completely isolate them from any surroundings which could potentially lead the viewer’s eye away from the pattern. Using a telephoto or longer zoom lens enables the photographer to isolate the pattern. If the pattern has distinct textures or colours, the result can be quite mesmerising. A beach scene, for example, where there’s a series of lines created by water channels in the sand, can look quite distinctive, as the viewer’s eyes are drawn along the pattern as well as to the contrasting colours.
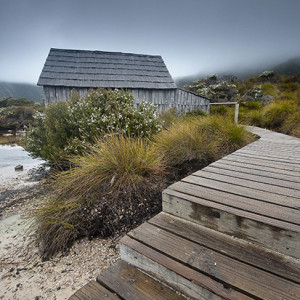
This image, taken at Cradle Mountain in Tasmania, used a `leading line' to draw viewers' eyes along the steps from the bottom left of the image.
04 REMOVING DISTRACTIONS Whether you're shooting beautiful rainforest fungi, a bird displaying its plummage, or a moody landscape, distractions in the background can ruin any image. The viewer's eye will automatically be drawn to the distraction. This is especially so with distracting bright spots, which can be virtually impossible to look away from if they’re prominent in the background.
By far the easiest way to remove distractions from an image is to simply open your eyes! This may sound obvious, but it amazes me how often, when I’m critiquing an image and I point out a distraction, the photographer will say they didn’t see it when they were taking the photo! When you’ve composed your image and taken a number of shots, always have a quick look at the back of your digital camera to check for any distractions. If there are any, it’s usually easy to recompose the image by moving slightly the left or right, therefore eliminating the distraction. Some might say you can 'fix' the problem later on in Photoshop, Lightroom or a similar image-manipulation program, but it’s better to get it right 'in-camera' in the first place. Would you rather be out in nature with your camera, putting in that little bit of extra care when you're composing your shot, or sitting in front of a computer for hours trying to 'repair’ the problems created when you actually took the picture? I know which one I prefer!
 Photo by Michael Snedic.
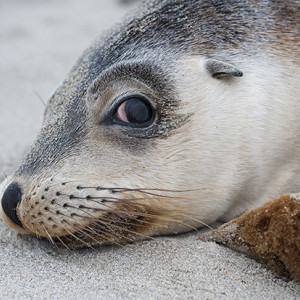
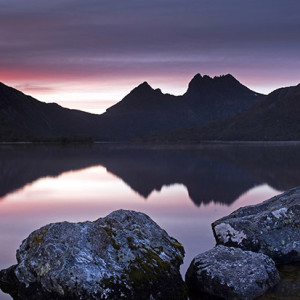 Cradle Mountain and Dove Lake. Photo by Michael Snedic.
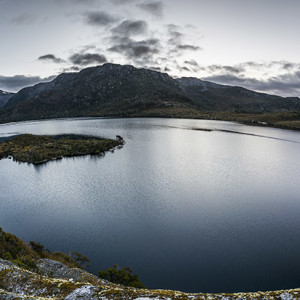 Cradle Mountain and Dove Lake, Tasmania. Photo by Michael Snedic.


