


In the final installment of Michael Snedic's three-part series on wildlife photography, he explains the finer points of flash, recommends some useful gear and exposure and lists five common pitfalls to watch out for.
See part one of 'How to shoot stunning wildlife shots'.
See part two of 'How to shoot stunning wildlife shots'.
07 FLASH TECHNIQUES
Over the years, many of my photo workshop participants have said they struggle to get decent shots using flash. The settings I'm about to explain here are tried-and-tested and work well. They are my own, personal settings that I have explained to lots of workshop students for many years and they work!
For SLRs, set the camera to manual mode. Use a wide aperture (as you would normally for wildlife) and set the shutter speed to 1/125s and the ISO to 100. Connect the external flash to the camera's hot shoe and select TTL (Through The Lens) or B-TTL metering. Take a shot and check the exposure. As long as you aren't too far away, you should get decent exposure, as most external flash units aren't powerful enough over long distances.
If quite close to the subject, I recommend adding a diffuser to the flash, which helps to create soft, natural lighting. If the image is still too bright, even with an added diffuser, most flash units allow you to reduce the power of the flash in third-stop increments.
There are various twin-flash arms that can be connected to the hot shoe, and allow you to use two flash units. The benefit of a dual-flash setup is that the image is more evenly lit and it minimises the chance of 'red eye', a phenomena that's more common when the flash and lens alignment are very similar.
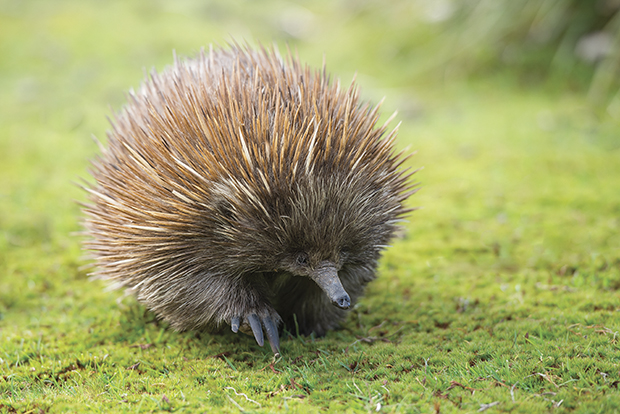
Lots of patience was needed to get this image of a moving echidna. I observed its movements, lay on the ground in the vicinity and pointed the camera straight at it. This took a few attempts but was well worth the effort to get the shot. Using continuous focus helped to focus a moving subject, too. Nikon D800, 70-200mm lens @ 190mm, 1/800s @ f/3.5, ISO 200, hand-held.
08 COMMON PITFALLS
There are a few pitfalls to watch out for when photographing wildlife:
1. One of the most common pitfalls is concentrating so hard on the actual individual being photographed, that your eye misses unsightly distractions in the background. Watch out for trees or other structures sticking out the back of the subject's head.
2. Photographing a bird straight up a tree from directly below doesn't look good. Try moving back, giving you a much better angle to photograph.
3. Watch that shutter speed! So often I see people photographing in low-light conditions and hear the sound of a very slow shutter going off; guaranteed blurry shot! Either increase the ISO (to increase the shutter speed), stabilise the camera and lens or use flash.
4. Don't always try and fill your frame with the animal. Sometimes taking a shot of a stunning scene, where the animal is a very small part of it, can make for a great environmental image.
5. When photographing in a zoo or wildlife park through glass using flash, turn the camera/lens/flash at a 45 degree angle. This stops the flash bouncing off the glass and straight into the lens, causing unsightly flares and ruining the shot.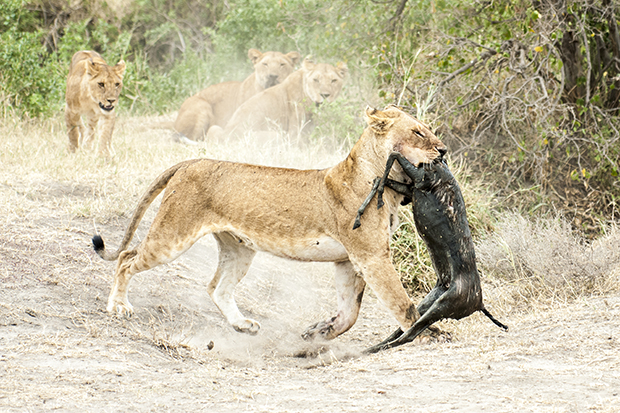
This lioness had just grabbed a hapless young gazelle, who was trapped at the edge of a mud pond. The other lionesses were very restless and this female was doing everything to protect her 'prize'. The key to getting shots like this is to observe wildlife closely and be ready to press the shutter when something does eventuate. Nikon D800, 70-200mm lens @ 140mm, 1/2000s @ f/5.6, ISO 800, hand-held.
09 RECOMMENDED EQUIPMENT
There are a number of photographic accessories that are invaluable when photographing wildlife. Hand-holding a large lens can be quite difficult and tiring, especially for long periods of time. If your subject is stationed in one spot (the subject could be preening, displaying, bathing, feeding etc), then a tripod with some type of gimbal, like a Wimberley, is highly recommended. A gimbal lets you move the camera and lens in all directions quite easily, without getting sore arms and shoulders.
If your plan is to walk a reasonable distance with a heavy camera and lenses, a carbon-fibre monopod with a dedicated monopod head might be the way to go. Much lighter than a tripod, a monopod doesn't offer quite the same degree of stability but it does give you more freedom to move around.
Another useful piece of equipment is a photographer's beanbag, handy for stabilising heavy lenses. Beanbags can be filled with rice, birdseed or beans and can be placed on car bonnets or half-opened car windows, rocks or fence posts. You'll be amazed at how much beanbags help minimise movement of your camera and lens, allowing for shots to be taken at quite low shutter speeds.
I recommend using some sort of neoprene covering for your lenses and tripods, to protect them from scratches, bumps and dust. I use a brand called 'Lenscoat'.
I also suggest some type of rain cover for your camera and lens, especially if you are lot of outdoor photography.
Happy shooting!
I couldn’t resist photographing this very anthropomorphic (human-like) Red Kangaroo, lazing in the dusty soil. A real character! Nikon D700, 80-200mm lens @ 200mm, 1/800s @ f/5.6, ISO 200, hand-held.
See part one of 'How to shoot stunning wildlife shots'.
See part two of 'How to shoot stunning wildlife shots'.
Michael Snedic is a professional wildlife/nature photographer and professional photographic tutor. He is owner of WildNature Photo Expeditions, specialising in quality photography workshops and tours across Australia and overseas. His aim is to show participants the most amazing subjects and locations, while at the same time teaching the best techniques for photographing them.