


In the final part of our series on using light more effectively for landscapes, Marianne Lim and Dylan Toh look at environments where finding and using available light can be a challenge.
Shooting great landscape images in most outdoor environments is a real challenge, but the degree of difficulty goes up significantly in some situations. This week we take a look at how you can shoot strong images in a few of those scenarios – rainforests, seascapes, and under starlight.
01 SHOOTING IN FORESTS AND RAINFORESTS
Where foliage is dense, such as in forests, many of the same guidelines apply as when we’re photographing waterfalls. Usually bright, diffuse lighting is the most aesthetically pleasing because there are no areas of harsh, uneven lighting. This type of light gives a soft, dreamy feel to the scene, which we can enhance with a blur layer in post-processing. The best subjects on bright, cloudy days are moss-covered trees, waterfalls within the forests, fungi growth and detail images.
However, shooting with light in forests and rainforests isn’t as difficult as it might seem. Once again, dynamic range can be captured in multiple images, rather than relying on a single exposure. Look for interesting lighting situations, such as a lone tree that’s in good light, or a patch of light on the forest floor. When the sun is out, there is also an opportunity to create a sun star, especially in such a conducive environment where tree trunks and foliage are perfect for partially obscuring the sun.
Shooting with the sun as a side lighting source can add depth to an image. Some trees will be lit, and others may only partially be lit, or not at all, which allows the viewer to explore the play of light within the image. Consider also the type of forest you’re shooting, because different types of forest will look their best at different times of the day. For example, a redwood forest photographed near sunset will pick up the orange hues of the sun and take on an even more reddish hue. An evergreen rainforest might benefit from early morning sun to create a green scene with golden overtones.
Ecola State Forest, Oregon, USA. While exploring the surrounds of Cannon Beach mid-morning we noted faint mist and light streaming through the backlit trees and composed into the light to capture the effect. Image by Dylan Toh. Canon EOS 6D, 17-40mm f/4L lens, 3 exposures 0.4s, 1s, 2s @ f16, ISO 200. Benro tripod, cable release. Exposure blending done with luminosity masks in Adobe Photoshop CC. Colour, local contrast, vertical motion blur filter, ‘orton’ effect done in Adobe Photoshop CC.
02 LIGHTING FOR SEASCAPES
Shooting on the coast can be challenging technically in terms of composition, and regarding safety. To prevent movement of the camera during an exposure, the tripod either needs to be on immovable objects (rocks), or firmly planted in the sand – especially if water movement occurs at or near the tripod. Seascapes can be photographed in any lighting conditions, although the type of mood you want to convey will determine when you make the image. Bright, sunny days call for a midday session, when the sea will best reflect the colour of the sky. Stormy weather can make for dramatic images at any time, but at sunset can result in a fiery show of light. Very cloudy days can be good for monochromatic images.
At the coast we tend to shoot during the golden hours, capturing side lighting for the best textural effect. Details in the sand and rocks are most accentuated when the sun is low in the sky. Depending on the location, we like to use any or all of our filter kit (GND and ND filters, and polarising filters) to create the image we want. ND filters are most useful where a smooth water effect is desired, or if it’s very bright and we want to use a long shutter speed. If there are fast-moving clouds in the sky an ND filter combined with long shutter speeds will produce interesting effects.
To capture an image with moving water, we’ll take more than one exposure. In many cases we use a graduated ND filter to control the light above the horizon, then take as many exposures as required until we feel we have the right water movement in the foreground. We try to keep rocky elements either well below the horizon or well above. In the latter case if we use a graduated ND filter we will take another exposure of the rock without the filter so that the filter gradation line doesn’t run through it.
When we shoot seascapes, it’s one of the few times that we might shoot into the sun. Sometimes it can be particularly difficult to control the light if there are no rocks with which to create silhouettes or sun stars. In these cases we take an exposure of the scene just prior to sunset, while there is still light, then take a second exposure of the sky when the sun has dipped below the horizon.
This technique can also be used at sunrise, but it’s slightly more challenging. If you’re after a sun star it can still be created by using the horizon to partially obscure the sun, although this moment can be very fleeting.
Three Sisters, North Island, NZ. Accessibility is tide dependent. Two exposures were required – one for water motion and one for all other elements. The sun was obscured by the rock to give a flare effect, and tripod had to be elevated on sturdy rocks. Image by Marianne Lim. Canon EOS 6D, Canon 17-40mm f/4L lens, 2.5s (water) @ f/16, ISO 200. Benro tripod, remote release. Contrast, colour adjustments, screen and soft light blends in Adobe Photoshop CC.
03 ULTIMATE BACKGROUND: THE MILKY WAY
In general, when shooting stars you need to have an idea of the style of ‘night’ image you want because certain technical aspects can differ from one scene to another. It’s important to note that for the clearest stars, you need to be as far away from light pollution as possible. Shooting the Milky Way involves achieving the correct focus and ensuring the shutter speed doesn’t result in star trails due to the Earth’s rotation. It’s very useful to have a wide-angle lens with a minimum f-stop of 2.8 so that the ISO settings do not need to be pushed too high.
When shooting with a wide open aperture, depth of field is reduced so you need to make sure that the stars are the focal point. Unfortunately the infinity marking on most lenses does not actually correspond to infinity as a focal point. We’ve found the following technique to be helpful in focusing on the stars. Using manual focus mode, turn on live view while pointing the camera at the brightest stars, then fine-tune the focus until the stars are as fine or sharp as possible. At wide open apertures such as f/2.8 or f/3.2, the stars will be in focus, but anything in the immediate foreground may fall outside the focal plane of this narrow depth of field.
A rough guideline to prevent the appearance of star trails is to ensure that exposure duration is no longer than 500 divided by the focal length for full-frame cameras. For example, if you’re taking an image at 16mm, then using the guideline 500 divided by 16, you get an exposure time of approximately 31 seconds. For non-full-frame cameras, multiply the focal length by your camera’s crop factor for the true focal length before using the formula.
To create an engaging ‘star’ image, you need an interesting foreground to complement the stars. There are three main approaches we take in creating a foreground with enough lighting. Firstly, the foreground can be ‘painted with light’ by using a diffuse light source during the exposure. You simply take a torch or some other artificial light source and walk around the foreground during an extended exposure.
As long as you move quickly enough, the light will be recorded, but you won’t be! However, care should be taken not to overexpose the foreground or to paint too unevenly. Secondly, the night photographic session can be timed for a night around the half-moon phase or less. This way the stars will still be visible while the foreground should not need additional lighting. If the moon is any brighter, the foreground will look like a daytime image and the stars will be fainter. The final approach in shooting this style of image is to take separate shots for the stars during darkness and another at twilight using different exposure settings. They can then be blended later during editing.
Some of the tips given here are repeated to create very different images, like the technique of taking more than one exposure to capture the dynamic range of a scene. This tip in particular is limited by the sensitivity of the camera’s sensor, and may well be better with new models. In general, all the other tips explain methods we have used to manipulate light in the field using a combination of our knowledge, science and our equipment to capture a final image. We hope these techniques will help you to read the light better the next time you’re chasing it!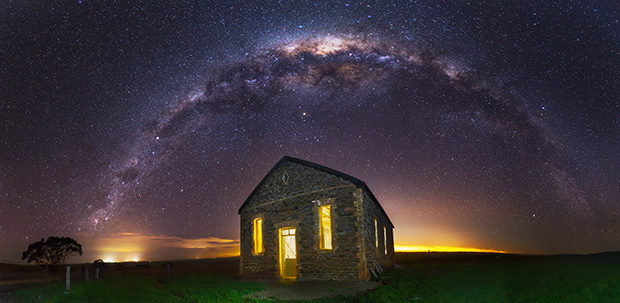
Bondleigh House in South Australia. This ruin was accessible 20km along a dirt road from Callington. Taken in August when the Milky Way core is visible directly overhead. A total of 13 exposures in vertical format with 3-4 seconds of light painting each image for exterior lighting. One additional frame was shot for interior lighting, done with a torch. Image by Dylan Toh. Canon EOS 5D Mk III, 16-35mm f/2.8II lens, 30s @ f/3.2, ISO 3200. Benro tripod, cable release. Panorama stitching and warping in Adobe Photoshop CC. Colour, contrast and noise reduction adjustments using luminosity masks in Adobe Photoshop CC.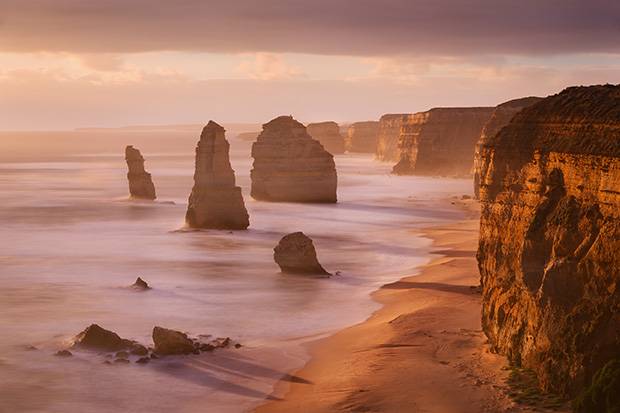
The Twelve Apostles on the Victorian coast. Very windy conditions and plenty of cloud cover made shooting conditions difficult, but a long lens allowed a closer shot when the sun briefly surfaced. A longer shutter speed smoothed out the water and side lighting added texture. Image by Marianne Lim. Canon EOS 6D, 70-200mm f/2.8L lens, 25s @ f/16, ISO 400. Tripod, ND filter. Contrast, colour adjustments, sharpening in Adobe Photoshop CC.
HOW TO MASTER LANDSCAPE LIGHTING (PART ONE)