
Review: DJI RS 3 Pro
DJI’s newest gimbal builds on the already impressive RS 2 to deliver a thoroughly refined stabilisation system for professional videographers, but for more casual users there are cheaper and equally capable options out there.
Stabiliser gimbals have increasingly become a must-have in the modern toolkit for professional videographers, and the RS 3 Pro, Chinese-company DJI’s latest stabilisation system, is a powerful tool in the right hands – although it requires a bit of finessing to get the most out of it.
When you do, you’ll find it makes panning, tilting, racking focus, and following subjects a breeze, even with a heavy camera and lens. This is helped by its large 4.5kg payload, handy smartphone app and brighter 1.8" OLED touchscreen compared to the one on its predecessor.
Build
DJI sent me its Pro Combo for review, which includes a few additions over the regular Pro package. For the $1,599 RRP you get 21 items in the box, including six USB and HDMI cables to handle just about any setup possibility, a focus motor and mount, DJI’s RavenEye image transmission system, an Arca Swiss Quick Release Plate, and a handy carrying case for the unit.

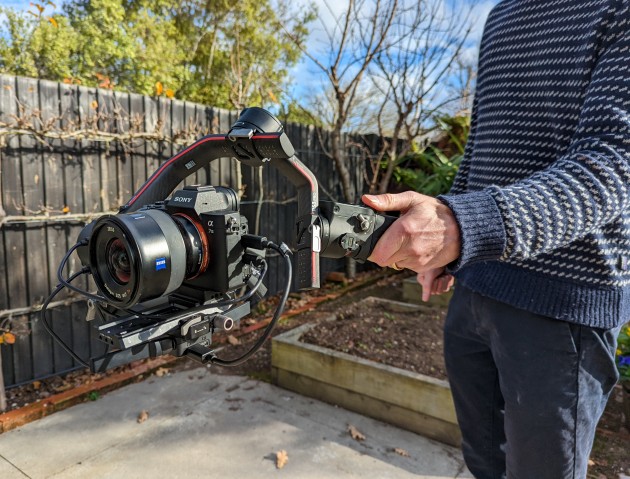
Like its predecessor, the RS 3 Pro has sturdy (but lightweight) carbon fibre arms, and at just 1.5kg, is comfortable to hold for long periods. In addition, DJI have also included an extra handle with the RS 3 Pro, which lets you hold the stabiliser with two hands, and would be welcome if you find yourself pushing the limits of its 4.5kg payload.
The other star of the show is the new brighter touchscreen. It’s 28% brighter than that on the older RS 2 model and can be used to switch between modes such as PTF (Pan Tilt Follow), PF (Pan Follow), and FPV (where the gimbal rolls as well as pans and tilts), although there’s now also a physical mode switch on the side that lets you switch these too. In addition, a Bluetooth shutter button enables you to start/stop recording on compatible cameras without the need for a cable.
Setup
Gimbals are notoriously finicky devices, and although there’s been some thought given to making the process a little less involved on the third iteration of the RS, it’s still time consuming.
With this in mind, DJI encourages you to setup the gimbal in conjunction with the DJI app, which bizarrely doesn’t appear in the app store but instead is found via a QR code you can scan at start-up. Once you’ve logged in, setup is begun by unlocking each individual axis on the RS 3 Pro and then balancing it before locking it in place via individual axis-locks.
In the DJI app there are videos that will walk you through the process, but they’re not overly detailed and I had better results by YouTubing RS 3 Pro setup videos which provided plenty of detail on how to do it. When it comes to the initial calibration, I had the best results when I slightly supported the weight of the camera in one hand while making small adjustments to its positioning on the stabiliser until the balance was right. A steady hand and plenty of space helps.

One of the new features on the RS 3 Pro is a knurled knob for finer adjustment on the tilt axis. It’s positioned under where the Quick Release plate mounts, and it can help adjust the balance of your camera in much finer increments than would be possible otherwise. It’s elegant and well made, but I still found it required a bit of manhandling.
This is because the locking lever that holds the plate is positioned very close to the lever, and when unlocked it partially blocks the knob, making moving it a bit clunky.
If I'm to have one more criticism, it’s that all the locking levers on the RS 3 Pro are very stiff. It’s reassuring that your camera is held securely in place, but opening and closing the levers requires more work than it should when you need to adjust them every time you have to recalibrate the stabiliser.
Once you’re happy with the initial setup, you then can run through an automated calibration process via the touchscreen. This finely tweaks the balance, and also gives you a visual indication of whether you’ve got your camera set correctly. Profiles can also be stored inside the RS 3 Pro for faster setup or lens changes on the fly, and a previously paired camera will automatically reconnect, saving time with every ensuing use.

When you’re done filming, closing the gimbal down is as simple as hitting the off button. The individual axes locks will close themselves automatically and the RS 3 Pro will power down. This is a new feature that’s pretty slick, and much quicker than having to close each lock individually like on the RS 2.
Performance
Once you get the calibration out of the way (and to be fair you’ll only have to do this when you change your payload), you’ll find a wealth of filmmaking features that will really extend your moviemaking.
One of the reasons why I’d recommend paying a bit extra for the Pro Combo is the inclusion of the focus motor and mount. This wraps around your lenses’ focus ring and allows you to rack focus with the touch of a button. DJI says its focus motor is 25% stronger than the previous model, and it uses a quick release for east setup – although it still takes a bit of time depending on your lens.
The other standout included with the Pro Combo is DJI’s RavenEye Transmission system (now rebranded as just ‘Transmission System’), which is a dedicated transmitter and integrated receiver-monitor-controller, with onboard recording of the system’s 50Mbps transmitted stream. '
DJI claims a 6km range, and although I was unable to test it at the extremes of this, it’s very stable, no doubt helped by a straight HDMI connection from your camera to the stabiliser, in my case a Sony A7III.

The transmission system allows for touchscreen control of aperture, shutter speed and ISO via your smartphone, but it also opens up functionality that’s not possible with just the RS 3 Pro on its own – most notably Active Track, which lets you identify a subject and then track their movements. It works exceptionally well and could be a useful feature for solo operators and vloggers seeking to add movement into their frame when filming themselves.
In addition, DJI says that the more you use the RS 3 Pro, the more it will learn your individual movement and how to compensate for it. These ‘profiles’ can also be saved, which is a nice feature if you plan to share the RS 3 Pro with a crew.
The wrap-up
The DJI RS 3 Pro is easily the most advanced gimbal stabiliser I’ve used, and a reminder of just how far this technology has come in the past few years – it’s mind-boggling how capable a device like this is in the right hands.
That said, you’ll need a fair bit of time for the initial setup, so make sure you go through this in advance rather than doing it with a film crew breathing down your neck. It’s also much more powerful with the Transmission System, so I’d strongly encourage you to get the upgraded Pro Combo which includes this, as it costs an additional $239 if purchased separately.
For more casual users there’s less advanced options out there that would be a wiser choice, with last year’s RS 2 for example still very capable. However, for professionals and run-and-gun filmmakers who plan to push their moviemaking and capture truly dynamic footage, the DJI RS 3 Pro sets the benchmark for gimbal stabilisation. I recommend it highly.