
Photo tip of the week: smarten your storage
As a photographer, the only one thing worse than missing the shot, is losing it.
This happened to me many years ago during my time as a news photographer. One dark, moody morning I had photographed an impressive 15-metre long model of a Taniwha (a mythical Māori creature) being carried high on poles along a beach by high school students. The photo was used on the front page of the local newspaper, but a few months later when I went to enter the photograph into some awards, I could not find the negative anywhere. I looked through all my neg files, the darkroom and the office but I never found the negative again.
While many of us have probably lost our share of negatives and slides over the years, the fact is that now in digital age there should almost be no excuse for ever losing a file again. Unlike negatives and slides, it is easy to create perfect a copy of a digital photograph and you can save these copies in more ways than you might imagine. So, lets talk about smart storage.
The capture
Most of us assume good storage practices begin at the end of a shoot, but for some photographers (myself included) the process now begins with every click of the shutter. Many cameras now have dual memory card slots and this makes it possible to write every photograph to two memory cards at the same time. This is good for two reasons, this first being that if one card should fail, your work is still safely backed up on the second memory card.
The second reason is physical security. As I finish a shoot I put one set of memory cards into my wallet or a jacket pocket while keeping the other set of cards with my camera; if anything should happen to my camera bag, I know at least one set of images should hopefully be safe.
Some photographers use two matched memory cards in their dual camera slots, such as two 16-GB memory cards, and when these cards are full they swap in another matched pair of cards. My preference though, is to use one set of small cards and one large 128-Gigabyte memory card; the smaller cards get changed in and out with each photoshoot while the 128-GB card literally lives in the camera, backing up a week or even a months worth of work at a time. Once I am certain all my images are safely backed up to my computer and hard-drives, I erase both the small and large memory cards and start the process over again.
Shooting with two set of memory cards at once, instead of one set, is more expensive but it provides a level of insurance that money cannot buy, particularly if you are photographing unique opportunities, be it wildlife photographs or a friend’s weddings.
When buying memory cards, don’t skimp; years ago we used to argue that film was the cheapest part of any shoot, and nowadays it is the digital media we use. Buy one of the better brands (most pro photographers prefer Sandisk and Lexar cards) and buy the professional series cards rather than the consumer series. Professional series cards have better read / write speeds, which is useful for shoot action and HD video, but they also perform better in extreme conditions such as hot deserts or frozen landscapes. Why spend thousands getting to these locations, only to have a cheap memory card fail on you because it was $50 cheaper than the professional memory card!
The transfer
Transferring your photos from the memory card to the computer is one of the more critical processes within digital photography; this is your best opportunity to uniquely file the images for future reference.
Some programs including Adobe Lightroom give you the opportunity to rename every file, add keywords to metadata and determine where you want the files will be stored on your computer. Some photo apps though don’t give you these options; they simply bury the images into a system file that might not be easy to access in the future. So here is a question for you; what happens in the years to come when your favourite photography program is redundant, or you have changed computer systems? Will you still be able to access your photos?
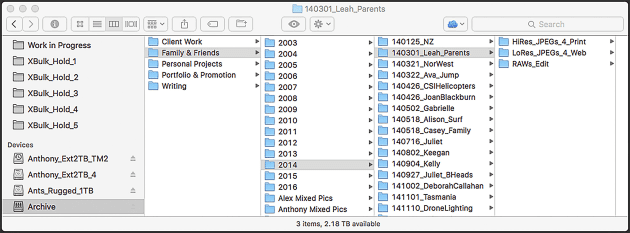
It is for this one reason that I prefer to keep my photographs in folders, independent of the photo apps. As I import my images, I drag them into a new folder that has a name created using the date and description of the shoot. If I photographed the editor, Mike O’Connor on the 18th of September 2016, I would name the folder “161018_Mike_OConnor”. Putting the date in this form (Year,Month,Day) keeps all the job folders in chronological order, and I can easily search for this folder in the finder using the date or the keywords.
What is worth noting is that even if you do use this system for managing your files, you can still access to these files using most photo editing programs. The main point to note is that YOU have full control of where your photos are stored, not the computer.
Automatic backups
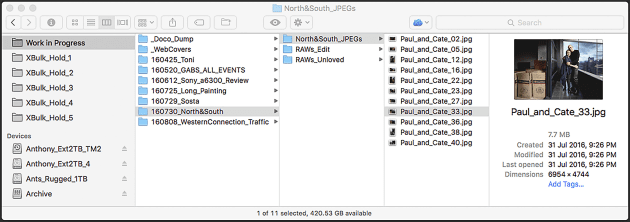
All of my current shoots and projects are kept within a folder I have labelled “Work in Progress” that lives in the “Pictures” section of my computer’s hard-drive (I never keep folders on the desktop). This “Work in Progress” folder it is an important part of my workflow; all assignments, whether it be a few photos of a friend or a large corporate shoot stay in this folder on my computer until they have been edited, processed, converted into JPEGs and delivered to the end user.
I do my editing in Adobe Bridge and I keep the process very simple. I look at each image from a job and quickly giving it a rating; images that I like get a 3-star rating, all the other images including the out-of-focus shots and the off-moments get no rating. Keeping the editing process simple makes it easy to edit work quickly (I can edit about 1000 images in under half an hour). I then select all the 3-star photos and move them to a new folder called RAWs Edit; again, this new folder is kept within the job folder. I now have two folders of RAW files; the RAWs Edit folder and my initial RAWs folder that I now rename to RAWs Unloved.
Now you are probably asking yourself, “am I backing up these photos?” and the answer is yes. I usually keep all the photos on the cameras memory cards until I have delivered the work to my client. At the same time, I also have two hard-drives working with two separate programs to automatically back up my computer’s main hard-drive.
One of these hard-drives is a 2-Terabyte external drive located on a shelf beneath my desk that constantly backs up my computer’s internal hard-drive using Apple’s Time Machine software. I rarely access Time Machine, but I know it is there if I ever have to look back several months to find files that I might have accidentally deleted. In the rare event my computer should crash entirely, I can also restore my computer using this drive.
Hiding in another corner of my desk is a 1-TB external drive that is dedicated to another piece of backup software called Carbon Copy Cloner. This software runs a scheduled back-up every night and unlike Time Machine, it has the advantage of being a bootable drive.
The archive
Between the memory cards, the computer’s internal drive and my two back-up drives, my Work in Progress files are fairly safe, but eventually I need to move these files off the computer to create room for more work. This is when I move my files across to my archive drives.
My archives consist of two distinct systems. The first is another 2-TB external hard-drive that lives beneath my desk; this drive is too small to to store my entire photographic archive, but it is big enough to keep my last two years worth of work on hand. Keeping the work on a simple external hard-drive makes it moderately fast to access over the USB3 connection. When this drive becomes full I put it in a storage cabinet and replace it with another new external hard-drive.
The second element of my archive system is a little more sophisticated; it is a Network Attached Storage device (a NAS) that is in-effect a small computer driving a bank of hard-drives. My NAS has five hard-drives within its casing, including two 3-TB and three 4-TB drives, and although this provides me with a maximum capacity of 18-TBs of storage, I actually use a RAID configuration that reduces the available data by a modest percentage. RAID stands for Redundant Array of Independent Disks and it is a clever system that spreads all your data over all the available disks so that if one disk should fail, the data is still protected.
NAS systems are more expensive than an ordinary external hard-drive, but they are significantly more efficient, both in storing and protecting data. The other advantage with using network storage is that you can access on both your local home network, and remotely using the internet. The advantage in this is that you can actually upload files to your NAS device from anywhere you have an internet connection; this might be from your office at work, or a hotel room in another country.
When I move job folders from the Work in Progress folder across my archive drives, I usually move the entire folder complete with the RAWS_Edit folder and the JPEG folders. The one folder that I often do not copy is the RAWs_Unloved file; these are all the RAW files that missed the initial cut. Some photographers do like to hold onto their rejected images, but I see it as one opportunity where I can conserve some storage space. Besides, typically I will have made at least a dozen images of a subject, so I feel I only need to save the best 3 or 4 images in most situations.
Above and beyond
Some photographers keep extra copies of their work on hard-drives that they store at a friends or a relatives homes. The only problem with this option is remembering to keep the files updated. As an alternative though, many photographers are now opting to store their photographs online.
One of these services is called Zenfolio, and for about $100 a year you can store an unlimited number of JPEG photographs of any size onto the site. Some of the more advanced plans also let you share folders of images with friends and clients using secure passwords. You can also sell your photographs directly to clients from the site in either as digital files or in print form. The advantage in using an online service is that it does provide a safe form of off-site storage for you and your client, and it removes some of the stress managing your own hard-drives.
Now, a mate of mine has yet another storage system that is worth mentioning. It is an old blueprint cabinet in which he keeps hundreds of his favourite prints. We might live in a digital age, and yet the best photographs are still those ones that we can hang on a wall and love forever. Don’t be afraid to create an archival print and give it to people who will love it. That’s real photography.