
Photo tip of the week: build your own backup storage system for under a grand
Speaking from experience, it usually takes a drive failing before most begin to appreciate just how important having a good storage setup is.
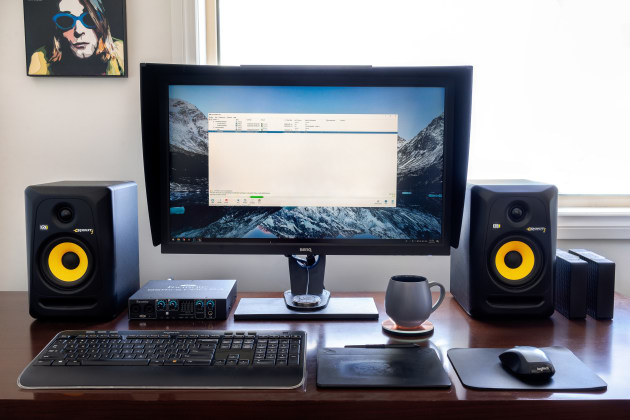
About a year ago, I made the decision to switch from my Macbook Pro to a desktop PC as my main work station. Before doing so, I wanted to reassess my workflow and implement a new backup strategy which was both automated and had an offsite backup.
Most blogs that I came across recommended the use of costly NAS (Network Attached Storage) drives that offer RAID (Redundant Array of Independent Disks) storage. Whilst this approach certainly has its advantages, even entry-level systems are quite costly and don’t provide any protection against theft or natural disaster. Instead, I decided to go with a more cost effective and simplistic approach using large capacity external hard drives.
3-2-1 Backup Strategy
One of the most commonly adopted strategies for backing up is the 3-2-1 rule. The strategy involves making three copies of your data, which should be stored on two different storage mediums, and one copy should be kept offsite.
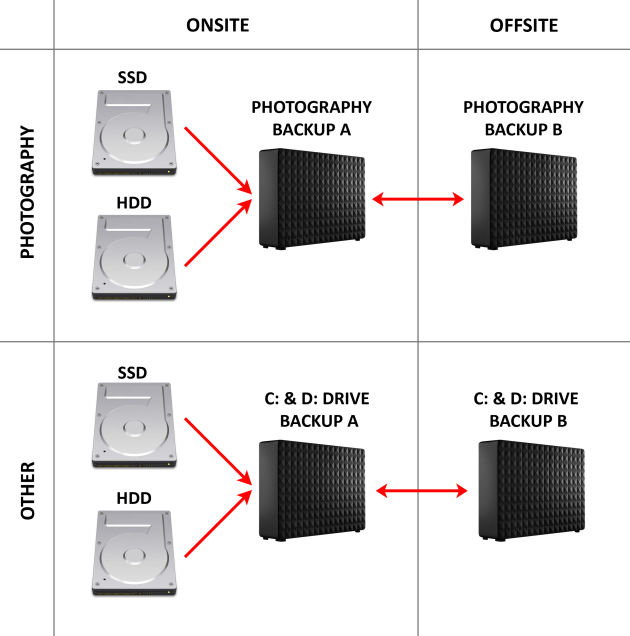
In my PC, I have four internal drives, two SSD (Solid State Drives) and two HDD (Hard Disk Drives). I use one 500GB SSD as my working drive. This stores my RAW files that are currently being worked on and my Lightroom catalogues. Once I’ve finished working on a file, I move it to a slower 2TB HDD which contains my most recent images.
These two internal drives are what I call my photography drives. The other SSD and HDD store everything else, from system and program files, to my music and documents. I refer to these as my C: and D: drives. These four drives make up my first onsite backup and are known as my primary drives.
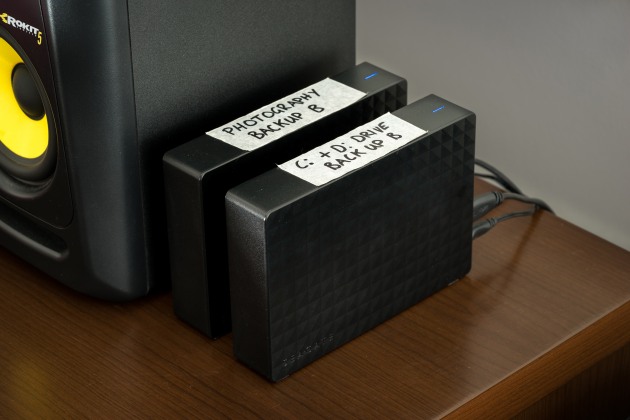
The second onsite copy is comprised of two 5TB Seagate external hard drives, one which backs up my photography drives and the second which backs up my C: and D: drives. As this second copy uses external drives instead of internal drives, I am satisfying the second rule of using two different storage mediums. I use a second set of identical two 5TB external hard drives, which make up my offsite backup. As these drives are not remotely accessible, they must be regularly rotated with my onsite backup to ensure they remain current.
The biggest strength of the 3-2-1 backup strategy is it provides plenty of redundancy. If one of my primary drives fail, I would be able to instantly recover the lost data from my onsite backup. Even if both onsite copies are stolen or damaged, I have a third copy of my files stored safely offsite.
Automated Backups
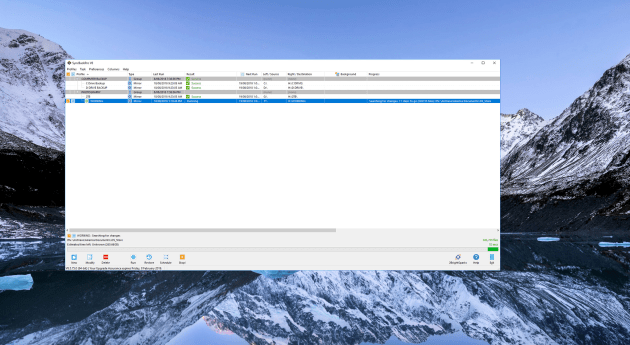
So how does this system work on a day to day basis? At the centre of everything is a program called SyncBackPro. SyncBackPro is a highly customisable backup program, and with the use of its scheduler, automatically creates a versionised backup of my primary drives every night whilst I sleep. By automating as much of the backup process as possible, I ensure that they are being performed daily rather than sporadically.
As the saying goes, time is money! When I’m editing, I want my computer doing as minimal background tasks as possible. To maximise the performance of Lightroom and Photoshop, my backups don’t begin until 1:00am. This means I don’t have to worry about the backup process slowing down my computer.
Versioning
Another safeguard I have in place is versioning. The way versioning works will slightly vary from program to program, but to put it simply, whenever a file is replaced, deleted or moved, the original file found on the backup drive is moved to a hidden folder, which can be recovered at a later stage.
For example, if I’m working on a Photoshop document over three days, SyncBackPro will end up creating three copies of the document, one current and two versioned. This is useful for two reasons. If on day two or three, I were to make a change which I couldn’t undo, I could simply roll back to a previous version of the file. The second reason is, if a file becomes corrupt or damaged and I don’t identify the issue before my daily back up is performed, the healthy version of the file will be deleted and replaced with the corrupt version. Because I use versioning, the healthy version of the file will be moved to a hidden folder, rather than being deleted.
The one downside to versioning is the amount of additional storage it requires. My two primary photography drives which have a maximum combined capacity of 2.5TB, are backed up to a 5TB external hard drive. Versioning requires this addition storage because every time a file is modified, another copy is made. By using a backup drive which is double the capacity, it ensures I have plenty of room for versioning. There is no golden rule for just how much bigger the backup drive should be, but I personally like to aim for 1.5 to 2 times larger.
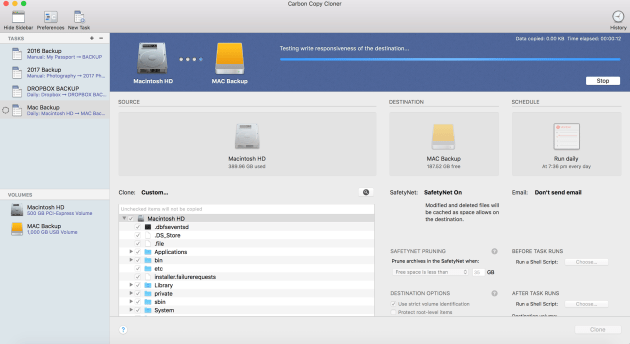
There are plenty of great backup programs available which feature versionising, but my personal paid favourites are Carbon Copy Cloner for Mac and SyncBackPro for Windows. You can also access versioning for free through Time Machine (Mac) or File History (Windows).
Offsite Backups
My offsite backup consists of an identical, secondary set of two 5TB external hard drives which are regularly rotated with the first set. This process is made easy because my offsite location is one that I routinely visit and is only a 30min drive from my office.
This is important because the onsite and offsite backups should be far enough away from each other, that in the event of a flood or fire, it’s unlikely that both sets of drives will be affected. Storing an offsite backup next door, will offer very little protection.
The process starts by disconnecting my drives from my PC. I then put them into a safe case and transport them to the offsite location. At the offsite location, the second set of drives which are safely stored in an additional safe case, are swapped out and transported back to my office. This process is repeated twice a week.
This leads me to one of the bigger weaknesses of using a physical offsite backup, over cloud-based alternatives. Twice a week, the offsite backups will be between three to four days old. Secondly, because this process isn’t automated, human error is inevitable. There have been times where I have been unable to or have forgotten to rotate the drives. To reduce this vulnerability, I try to schedule the rotations so they occur the day after a major shoot, so the offsite backup has at least a copy of the RAW files. I also rotate the use of my SD cards, as I do not format them until the images are safely copied onto all three drives.
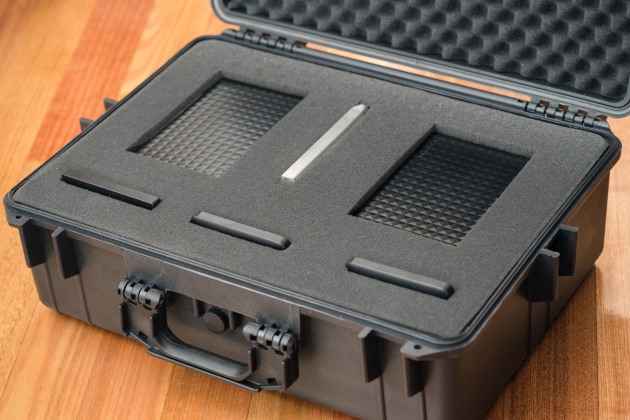
Most external storage drives use HDD storage which unlike SSD, has plenty of moving parts which are more susceptible to damage. The enclosures these drives come in are built so they can be transported, but given how often I rotate my backup drives, throwing them in a backpack isn’t going to be great for their longevity. Therefore, I like to store and transport my drives in a pelican style, safe case. I purchased mine from my local hardware store, which included good quality pull and pluck foam for a secure fit. These cases help protect the backup drives from the elements and provide additional protection whilst in transport.
Archival Process
Over time my primary 2TB drive does fill up and once it reaches around 90% capacity, I begin the archival process. I start off by determining whichimages will be archived, then I make a copy of those files on to two portable hard drives, one which will remain onsite and the other offsite. Once I have verified that the files were successfully copied onto both drives,
I delete the images from the primary 2TB drive.
Cloud Backup
There are a wide variety of providers which offer cloud backup solutions, which are relatively affordable and provide an alternative to using a physical offsite backup. The reason why I haven’t integrated cloud backups into my system is due to my upload speeds being far too slow to efficiently back up the volume of data I produce day to day. Likewise, if both of my onsite copies were destroyed and the only copy I had left was the cloud backup, I don’t even want to know how long it would take to download terabytes worth of data.
The one form of cloud computing that I have adopted into my work flow is Dropbox. I work across multiple devices, so having a shared folder which I can easily access without going through a web browser has been a game changer. I also store a copy of my portfolio in my Dropbox account. This is a fantastic way for me to easily share my images with clients and for quick reference when I’m out of the office.
I believe cloud backup has some really great features and advantages. For users who don’t create large volumes of content and have fast internet speeds, this is going to be a great alternative to using a physical offsite backup. But for me, until my internet speeds rapidly increase, it won’t replace my offsite backup.
A System That Suits You
One of the greatest advantages of this system is its affordability. This setup can be scaled to meet just about anyone’s budget. To illustrate this, I’ve put together three example systems, each targeting a different level of user and budget.
If you want to implement these strategies and build your own system, first you need to determine your budget and the total capacity of the drives that are to be backed up. The next step is to decide if you want to use versioning and if it will fit your budget. Versioning will require you to purchase larger, costlier hard drives and you will likely need to purchase paid versions of software.
The final step is to determine where you will store your offsite backup. It’s important that you choose a location which you routinely visit and is a reasonable distance from your onsite backup. Once you have answered these questions, you will be able to get started on building your own system! ❂
About the author: Pro photographer Dylan Giannakopoulos shoots landscapes, wildlife, portraits, street, weddings, and anything else that inspires him See more at dylangiannaphotography.com.au

Get more stories like this delivered
to your inbox each week. Sign up here.