
Photo tip of the week: 5 tips to use flash better
Using flash can feel like there is a lot to learn. I have found that the thing people have the most trouble with is knowing when and why to use a flash.
Here's five simple techniques to solve common exposure problems and get you on the road to using flash with confidence.
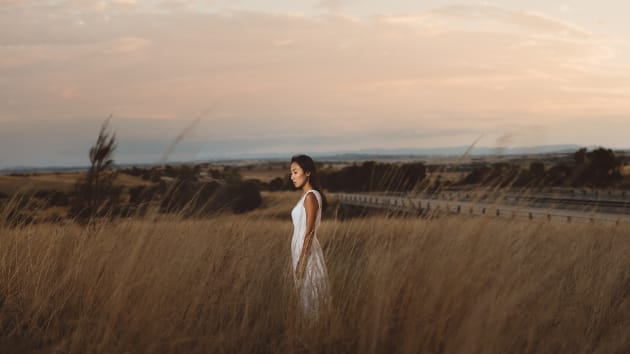
1) A subtle change
One of my favourite types of light is "doorway" light. This type of light is found in outward-facing doorways, when your garage door is open, and under awnings. Basically, it can be found in any place where the overhead light is blocked from hitting your subject. This light in and of itself is beautiful, and I recommend you search it out for your portraits. Adding a subtle hint of flash to already beautiful light can make it something really special.

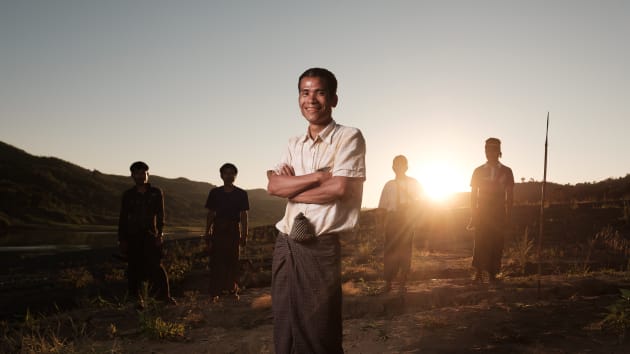
2) Bring back contrast in a back-lit situation
One of the most beautiful kinds of light you will come across when shooting photographs is back light. It might be the sun going down behind a couple on a gorgeous beach, or a pair of headlights behind a model in a city street. When those extremely bright lights shine into your lens, you'll often need to overexpose them to see your subjects. Then, you'll see flare in all its forms. If the light source is in the field of view of your lens, you may see flare manifest as circles, rings, or other shapes within your image. However, as it moves out of the field of view, you will most likely see a reduction in contrast or haziness to the image. Both of these can be reduced by using high quality lenses with anti-flare coatings and lens hoods. Even after you've reduced visible artefacts, you'll still see reduced contrast.
From here, you can reduce your exposure to bring back that contrast and reduce the flare even further. However, as you darken your exposure on the background, you'll also darken the light on your subjects.
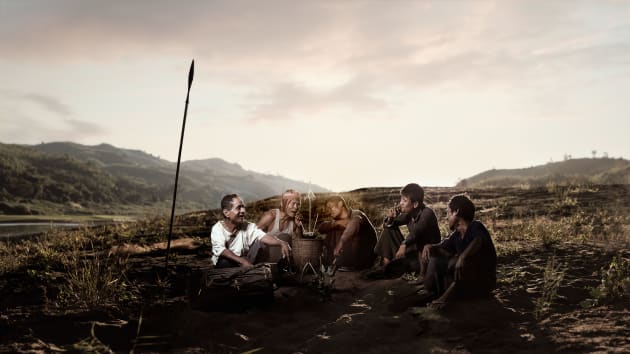
3) Speedlight without a modifier
Using speedlight in the great outdoors presents some challenges we need to overcome. When working in a studio, we are in a controlled environment where we can easily mitigate any other light contaminating our scene, close doors to prevent wind knocking over our lights, and use flags and other additional lights modifiers to shape the light to our will. With this level of control, speedlights can often be enough to create the look we are after in the studio. Once we head outdoors, however, all bets are off.
Firstly, if we modify the light (ie. add an umbrella or softbox), we'll be contending with the wind. You can use sandbags or an assistant to keep the light from falling, but sometimes this isn't practical. You may need to take off the modifier and use the flash unmodified. Secondly, as daylight is significantly brighter than your little speedlight, you may need the extra power from not having a modifier spreading that light around. An umbrella or softbox is going to spread the light everywhere, reducing it's effective power (rather like spreading vegemite onto toast). This means that to get the most power and physical stability from your light, you'll want it sitting on a stand by itself. This presents another challenge for many types of shooting. The light gets very harsh.
4) Mimic and improve the existing light
Sometimes you have beautiful light for the scene, but you want something a little more flattering on your subject. This might be so in an office, where the overhead lights give the perfect feeling for the office reflect harshly off your subject's skin. It might also happen in sunlight, where the sun is lighting the scene up beautifully, but is either too harsh on your subject or maybe even making them squint with it's brightness. On potential solution in situations like this is to recreate the existing light with your own.

5) Freeze your subject
One other useful aspect of flash is that, true to its name, it is a flash of light. A benefit of this is that we can freeze motion using our flash, even at very slow shutter speeds. This can be very handy in creating dramatic portraits with motion in the foreground or background. For this, we need to understand two things about how flashes work, and one about how ambient exposures work.
Firstly, ambient exposure. In order to blur objects, you will need to use a slow shutter speed. The result of this is that all moving objects will blur, including your subject. So you will need to either accept the motion in your subjects or work to reduce it.

We can reduce visible motion blur in the subject in a few ways. Where possible, we can use a shorter shutter speed. If 1/30 or 1/15 will create the desired amount of blur, then you are already in territory where people can hold still without flash. If you have to go with a longer shutter, then ensuring that as little ambient light as possible falls on the subject is another way to reduce motion blur. Finally, you can ensure the person is in an easy to hold, static pose. This will allow them to stay still enough that they won't blur too much.
Then it is time to add flash. How much you add here, and what quality will be completely up to you based on the look you're trying to achieve. With longer shutter speeds, it is usually advisable to work with second curtain (rear) flash sync. Simply put, this means that the flash goes off at the end of your exposure and not at the beginning. Each camera does this differently, so consult your manual to find out how to enable this mode. The benefit of this is that blur happens throughout the exposure, and then objects are frozen at the end with a quick flash of light. This will give you the sharpest results on everything that your flash touches.
Of course there are countless more situations where a flash can be used to add drama or create entire scenes. Get these basic techniques down and then head out and have fun with your lights!