7 tips for better black and white photos

Comments Comments

In our photo tip of the week, photographer Drew Hopper shares his advice for better black and white photos.


The very first photographs were once all shot in black and white. This dates back to 1839, after Mr. Daguerre discovered a method to fix an image captured inside the camera obscura – he called this the Daguerreotype. If you want your images to evoke a response and standout in monochrome you’ll need to put some thought into your shots. Here are my seven tips for mastering the art of black and white photography, or at least learning to see what works and what doesn’t in monochrome.

Men building a wooden ship in Central Vietnam. The wind was howling so I wanted to capture a sense of setting sail with the sail flapping in the wind. The sky was overcast so I converted to black and white, which helped draw the focus to the men working.
Fujfilm X100S, fixed 35mm f2 @ 35mm @ f/5.6, 400 ISO. Monochrome conversion, contrast and levels adjusted in Adobe Lightroom.
Men building a wooden ship in Central Vietnam. The wind was howling so I wanted to capture a sense of setting sail with the sail flapping in the wind. The sky was overcast so I converted to black and white, which helped draw the focus to the men working. Fujfilm X100S, fixed 35mm f2 @ 35mm @ f/5.6, 400 ISO. Monochrome conversion, contrast and levels adjusted in Adobe Lightroom.

1) Learn to see in monochrome

The key to successful black and white photography is learning to see in monochrome. This means pre-visualising your images before taking the shot. Not all images will work in black and white, some images rely on colour for impact, and therefore they may not be as powerful in black and white. For example, in colour photography we tend to compose images around elements of colour, often working with complimentary colours to build a strong visual statement. However in black and white photography, most colours have the same brightness and/or tone, so the image will appear dull and flat. Removing colour from our vision will bring out the hidden details, textures, and shapes.

Fisherman sitting on his wooden boat on Inle Lake, in Myanmars Shan State. By underexposing and converting to monochrome I was able to highlight the fisherman without the distraction of any colours or hues. Canon 6D, Sigma 35mm f1.4 @ 35mm @ f/2, 400 ISO. Monochrome conversion, contrast, dodge and burn in Adobe Lightroom.

2) Work with shapes, patterns and textures

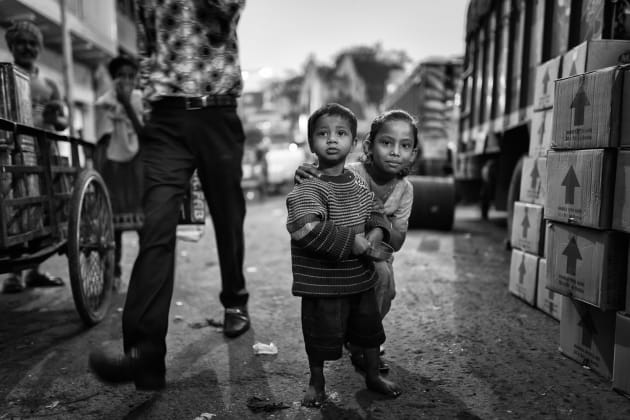
Once you start to see beyond the colour palette of a scene, you’ll begin noticing other elements such as shapes, patterns and various textures to build a compelling composition. For me, black and white photography is very similar to street photography, where you have an open canvas and must deconstruct and/or exclude certain parts of a scene to compose the strongest possible image. Keep an eye out for interesting juxtapositions and striking repetitions that could be used to grab your viewer’s attention.

An elderly man smoking a cigarette in his home in Hoi An, Vietnam. Converting from colour to monochrome helped define the wrinkles on his face to create interesting textures. Underexposing the background eliminated any unwanted distractions.
Fujfilm X100S, fixed 35mm lens. 1/800s @ f2, 
ISO 400. Monochrome conversion, contrast and clarity adjusted in Adobe Lightroom.
An elderly man smoking a cigarette in his home in Hoi An, Vietnam. Converting from colour to monochrome helped define the wrinkles on his face to create interesting textures. Underexposing the background eliminated any unwanted distractions. Fujfilm X100S, fixed 35mm lens. 1/800s @ f2, ISO 400. Monochrome conversion, contrast and clarity adjusted in Adobe Lightroom.

3) Think about tonal contrast

Tonal contrast is important in all types of photography, however it becomes more apparent when you start shooting in black and white. The tonality of an image is what gives a photograph atmosphere and mood. Some images are dark and punchy with distinctive definition of contrast, while other images may be more subdued and softer in appearance. To capture stronger monochrome images it’s essential that you understand tonality and how to use it. The easiest way understand tonal contrast is by categorising into three simple categories: high, medium and low. An image with high tonal contrast will consist primarily of white and black. Medium tonality is a balance of all three, while low tonal contrast is when an image looks more washed out, usually just with grey tones.

Two young children intrigued by my camera as I walk through a bustling street in Kolkata, India. This shot was taken on dusk so my ISO was high. Converting to colour was more forgiving of digital noise that was evident in the original colour file. Fujfilm X100S, fixed 35mm f2 @ 35mm @ f/2, 400 ISO. Monochrome conversion, contrast and clarity adjusted in Adobe Lightroom.

 4) Use light effectively

Lighting is the single most important element in any image. Different lighting will give your pictures different moods. When colour is removed, the quality and efficacy of the lighting is dramatically transformed. Harsh light tends to be more effective, creating dynamic tones in shadow areas, and giving a monochrome image a more edgy and contrasted aesthetic. Soft and/or subdued light has an opposite effect, often producing a dull or flat look. Shooting during the middle of the day when the light is sharp can give some great monochrome images. The secret is to make sure that light is suitable for your subject. Go out at different times of the day and see how the light falls on your subjects.

Buddhist monk inside an ancient temple in Old Bagan, Myanmar. This is a very common scene for photographers visiting Bagan, but I hadn’t seen many monochrome shots of this subject. The natural light spilling in through the cracks in the wall created an ethereal atmosphere that worked beautifully in black and white. Canon 6D, Sigma 35mm f/1.4 lens 1/80s @ f2, ISO 640. Monochrome conversion, contrast and clarity adjusted in Adobe Lightroom.

5) Experiment with High-key and Low-key

You’ve probably heard photographers mention the term ‘high-key’ or ‘low-key’, but what does this mean? High-key refers to images that are typically brighter with a light range of tones, often a lot of whites with very few black or mid-tones. Low-key images focus on the shadows, true blacks and darker tones, with very few white tones. These images are often more moody with deep contrasts.

Using high or low key can be an effective way of capturing a scene in black and white, as we are using the tones to bring out certain elements within a scene. It’s best to experiment to grasp what kind of subjects work best under different lighting.

Tattoo faced woman from the remote hills of Chin State, Myanmar. I wanted to capture the tattoos, however the lighting was harsh and colour wasn’t doing her face justice. Monochrome helped add definition to define her tattoo features.
Canon 6D, Sigma 35mm f1.4 @ 35mm @ f/1.8, 200 ISO. Monochrome conversion, contrast and clarity with some dodging and burning of the tattoos adjusted in Adobe Lightroom.
Tattoo faced woman from the remote hills of Chin State, Myanmar. I wanted to capture the tattoos, however the lighting was harsh and colour wasn’t doing her face justice. Monochrome helped add definition to define her tattoo features. Canon 6D, Sigma 35mm f1.4 @ 35mm @ f/1.8, 200 ISO. Monochrome conversion, contrast and clarity with some dodging and burning of the tattoos adjusted in Adobe Lightroom.

6) Discover the relationship between your subjects

Once you see start seeing the world in black and white you will begin to recognise the importance of composition, without the distraction of colour within a scene. You may have a strong foreground element, but the background is distracting due to a certain colour that is weakening your narrative. When colour is stripped from a scene the focus becomes solely about the relationship between the subject and the rest of the scene. No longer will you have to contend to uncomplimentary colours and hues; instead you’ll be drawn to the structure of how to compose an image with the key elements.

Sadhu standing on the steps 
of the River Ganges, feeding the birds in Varanasi, India. The sun was rising behind him which created a nice deep silhouette for a black and white shot. Canon 6D, Canon 16-35mm f2.8 lens @ 35mm. 1/800s @ f5.6, ISO 400. Monochrome conversion, contrast and levels adjusted in Adobe Lightroom.
Sadhu standing on the steps of the River Ganges, feeding the birds in Varanasi, India. The sun was rising behind him which created a nice deep silhouette for a black and white shot. Canon 6D, Canon 16-35mm f2.8 lens @ 35mm. 1/800s @ f5.6, ISO 400. Monochrome conversion, contrast and levels adjusted in Adobe Lightroom.

7) Visions of the past

Black and white photography definitely has a timeless quality, which can often provoke an entirely different emotion and response from your viewers. When we view a photograph we are viewing the past, but when we shoot in monochrome it has the power to freeze the present moment and transpire us into history.

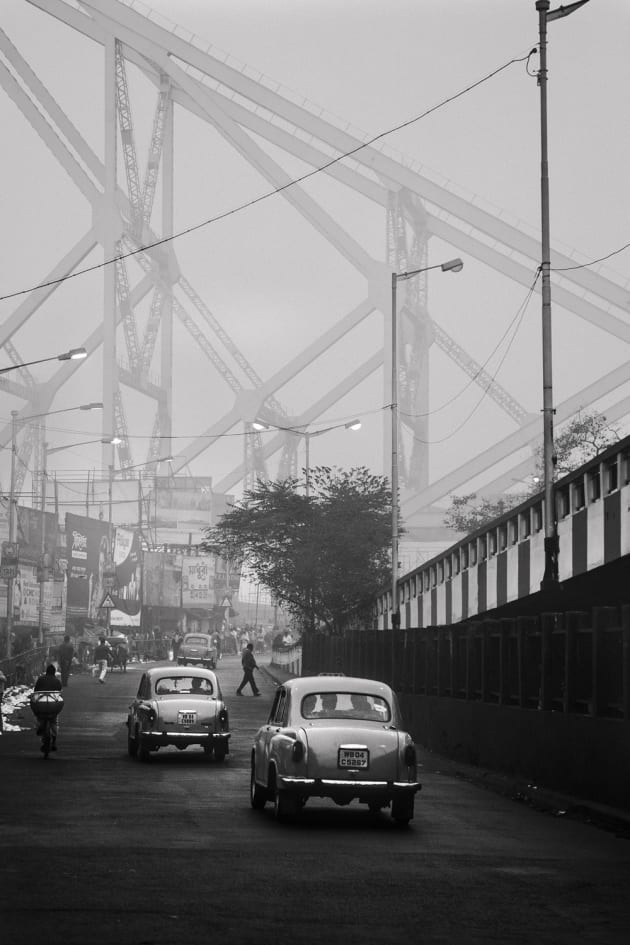
I took an image in 2016, in Kolkata, India. The old Classic Ambassadors are an icon of the past, however when I converted to monochrome it took on a whole other level. It could have well worked in colour, but in black and white it really encapsulates life before the present. When you start to envision your subjects, think how you want your audience to respond or feel, as this will help envision a shot and give your images a quality that you may have never imagined. ❂

Cold and misty morning by Howrah Bridge in Kolkata, India. The old Classic Ambassadors in black and white really capture the essence of India, in an almost timeless manner. It could have been taken in any era. Canon 6D, Canon 24-105mm f/4 lens @ 88mm. 1/200s @ f4.5, ISO 400, handheld.

About Drew
Drew Hopper is a travel and landscape photographer based in Australia, specialising in the Asia-Pacific region. See more of his images at drewhopperphotography.com

comments powered by Disqus