In this step-by-step tutorial, imaging expert Mark Galer shows you how to optimise an image in Lightroom and then create an abstract version using Smart Filters in Photoshop CC.
Software: Lightroom CC Photoshop CC
Rating: Intermediate

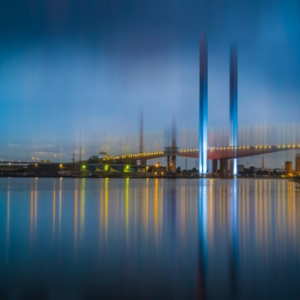
The original image (left) and after processing.
I took this image of the Bolte Bridge from a floating pontoon. It was moving too much to capture a long exposure, so this shot was captured hand-held with an ISO setting of 12,800. There’s some noise in the original capture and the colour and tone are a little flat. The aim of the following tutorial is to show you how I would go about optimising an image like this in Lightroom and then have some fun with it in Photoshop using the very handy Smart Filters feature. You’ll find that the skills you learn here can be applied to your own projects in a variety of ways.
Note: You may notice that the RAW file we’ve made available for download is a little smaller than usual. The file is around five megabytes in size but has the full dynamic range of the original Raw file. The original raw file was opened in Adobe Camera Raw (ACR) and exported as a compressed DNG. If you want to do this with one of your own raw images, in the File Settings section of the Export dialogue box check the Use Lossy Compression option and then in the Image Sizing section check Resize to Fit. Megapixels was selected as the sizing option and then 5.0 entered in the megapixels field.
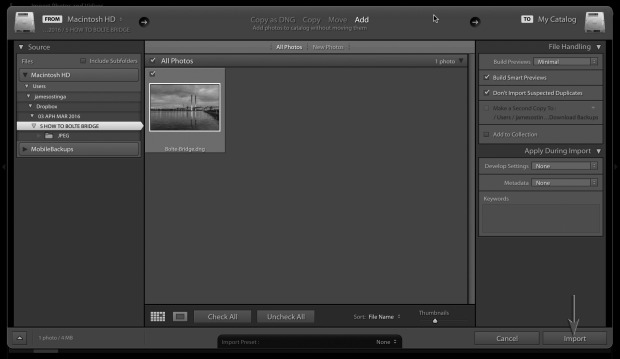
01 DOWNLOAD PROJECT IMAGE
To get started, download the free project image here.
Note: Some internet browsers are better at downloading raw files than others. If you are having trouble downloading the file, right-click the link (Ctrl-click if you're on a Mac) and choose the Download Linked File..., Download Linked File As... or Save Link As... option. Open Lightroom and in the main menu choose File > Import Photos and Video…
02 ADJUST TONE
Once the image is in your working catalog, click to select it and press D on your keyboard to take it into the Develop module. Make the following changes to White Balance, Tone and Presence settings: Temp 6000, Tint -18, Contrast +20, Highlights -80, Shadows +75, Whites -30, Blacks +25, Clarity, Vibrance and Saturation +50. Alternatively you can open the Snapshots panel and select the Tone and Presence preset I created for you so you can adjust all of the settings with just one click.

03 CROP
Press the R key on the keyboard or click the Crop Overlay icon beneath the Histogram to enter the Crop and Straighten panel. Select 16:9 as the aspect ratio and then click and drag the crop overlay to fine-tune the crop. The 6:9 aspect ratio is the same shape as an HDTV and this aspect ratio serves to remove some of the excess negative space at the top and bottom of this image.

04 DARKEN SKY
Click on the Graduated Filter icon beneath the Histogram or press the M key on the keyboard. Lower the Exposure slider to -1.00 EV and then click and drag downwards to add a graduated filter to the sky.

05 DARKEN FOREGROUND
Click and drag a second filter in the foreground of the image to darken the water at the base of the image. Change the Exposure value of this second graduated filter to -0.5 EV. Click the Graduated Filter icon or press the M key to leave the graduated filter controls.

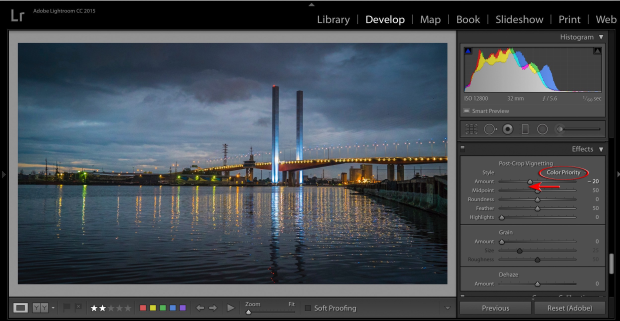
06 VIGNETTE
To further accentuate the drama of this image go to the Effects panel and choose Color Priority from the Style options in the Post-Crop Vignetting section and lower the Amount slider to -20.
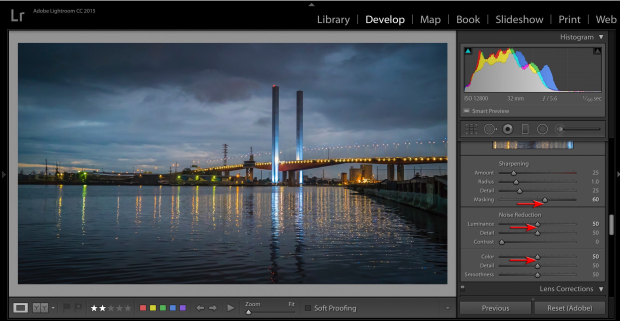
07 REDUCE NOISE
Although the noise of this ISO 12,800 image was remarkably fine when we first brought it into the Develop module, the adjustments we’ve made have accentuated the noise to a point where we can now see it when zoomed out. To suppress the noise go to the Detail panel and raise the Masking slider to 60 in the Sharpening section. This will ensure the sharpening filter does not affecting the smoother tones. Raise the Luminance and Color noise sliders to 50 to bring the noise back to acceptable levels.
08 OPEN IN PHOTOSHOP
The image optimisation stage of the project is now complete. You can now open the image in Photoshop CC. If you open the image in Photoshop in the conventional way all your changes will be rendered into a single ‘Background’ layer. That’s okay, but I find it better if you keep your processing options open. To do this, right click the image (control-click Mac) and choose Open as Smart Object in Photoshop. This will copy and embed the raw file into a Smart Object layer in Photoshop. Now, at any stage, you can modify the actual raw settings by double-clicking the Smart Object thumbnail in the Layers panel of Photoshop CC.

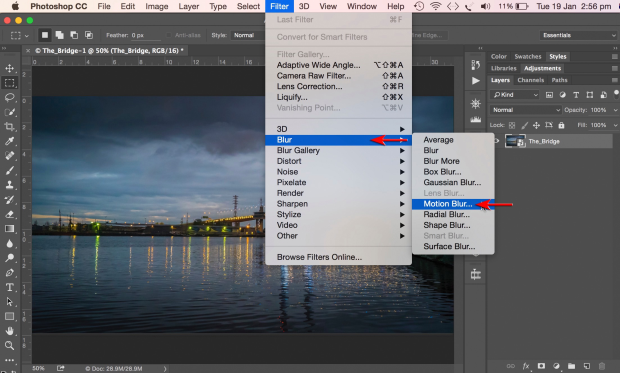
09 MOTION BLUR
Because this layer is a Smart Object, any filter we now apply to this image will be a non-destructive Smart Filter. After applying any filter we will have the creative freedom to either adjust the original settings of the filter or mask the filter so that it is only applied to some of the image area. Make sure The Bridge layer is selected and in the main menu, choose Filter > Blur > Motion Blur.
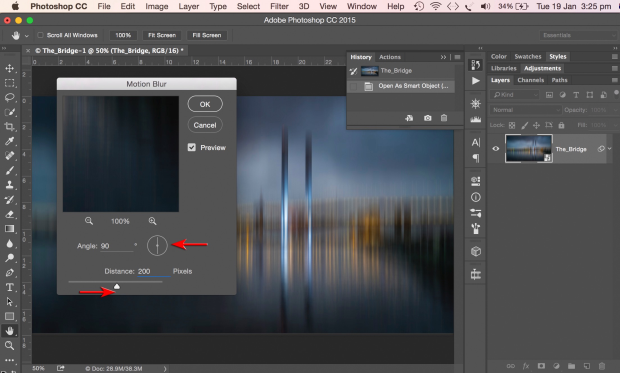
10 STRETCH IT!
In the Motion Blur dialog, change the Angle of the filter to 90° and drag the Distance slider right so that the motion blur appears similar to the effect seen in the illustration. The actual amount depends on the resolution of the image and the subject matter you are trying to blur, i.e. you may need to increase or decrease the value to achieve the effect you are looking for. Click OK to apply the change.
11 MASK SETUP
To hide the motion blur in the central band of the image we will use the Gradient Tool to mask the effect of the filter. Click the Gradient Tool in the Tools bar and choose the Black, White Gradient from the gradient picker in the Options bar. Choose the Reflected Gradient option and set the opacity to 100%. To find the starting point for the Gradient you can temporarily hide the effect of the filter by clicking on the visibility icon next to the filter name in the Layers panel. Drag a guide from the top Ruler (press control-R on a PC or command-R on a Mac to show the rulers) and then switch the filter back on by clicking next to the name of the filter.

12 ADD MASK
Click the white rectangle in the Layers panel to select the Motion Blur Smart Filter then click and drag a short distance from the guide in the image preview to add the reflected gradient. Hold the Shift key as you drag to ensure the gradient is perfectly vertical. Try experimenting with dragging longer or shorter gradients to change the effect.

13 REFINE MASK
You can change the width of the mask with the Free Transform Tool. Click the mask in the Layers and in the main menu choose Edit > Free Transform. Drag the top and bottom bounding box handles to render the mask thinner or thicker. Hit the Commit icon in the Options bar to apply the transformation (alternatively you press the enter key on the keyboard).

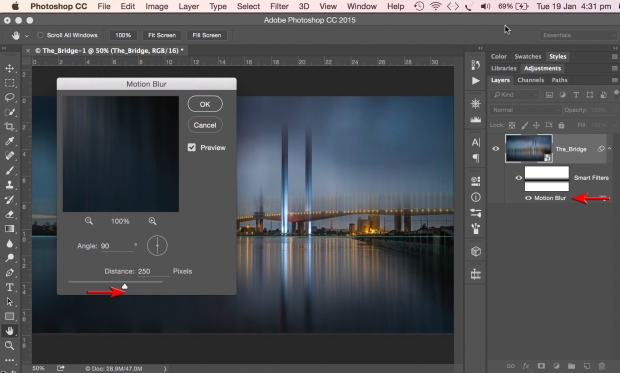
14 REFINE MOTION BLUR
If you want to modify the amount of blur, now that the mask is in place, simply double-click the name of the filter in the Layers panel to re-open the filter dialog. You can now experiment with changing the distance of the blur to fine-tune the effect.
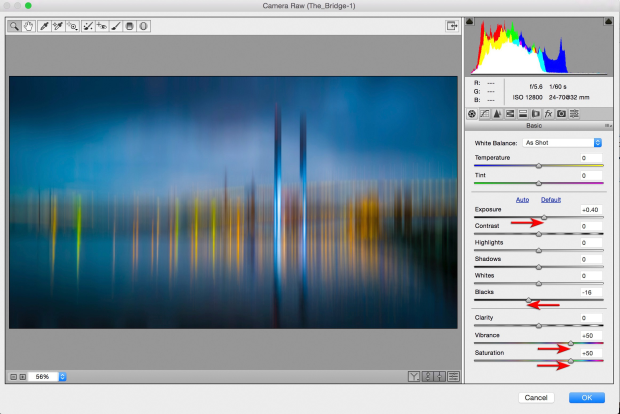
15 CAMERA RAW FILTER
In the Layers panel make sure the Smart Object layer is selected and in the main menu choose Filter > Camera Raw Filter. When you apply Camera Raw as a filter, the image appears in the Adobe Camera Raw dialog complete with motion blur effect. Note that all controls are set to zero as we are not adjusting the embedded raw image in the Smart Object. We are now free to optimise the tonality and colour of the motion blur. Raise the Saturation and Vibrance sliders to +50, lower the Blacks slider to -16 and raise the brightness of the blur by increasing the Exposure slider to +0.40.
This non-destructive workflow, applying filters as smart filters to an embedded raw file (Smart Object) and then using Adobe Camera Raw as a filter to fine-tune the filtered pixels, opens up plenty of creative possibilities for working with different filters as you explore creative possibilities with your own images.