


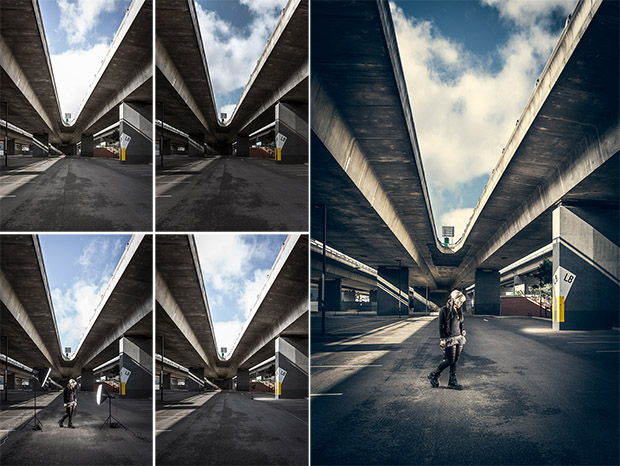
Ever wondered how pro photographers manage complex lighting setups on large-scale photo shoots? In this step-by-step project Mark Galer shows you how to combine elements from several pictures to create one perfectly lit image.
The technique of creating a fixed-position composite image gives photographers the freedom to solve difficult lighting problems. A common situation in commercial photography, it requires one lighting setup for the model and sometimes several more for the background. Professional photographers get around the problem by lighting each component of the location separately and combining the best elements from each shot in post-production. As all of the elements are being captured in the same location with the camera’s position fixed on a tripod, the photographer simply masks out the areas he or she doesn’t want to include with a large soft-edged brush (rather than having to make complex selections using the Refine Edge or Refine Mask tools). In this step-by-step project, I’ll show you how to create a seamless composite image while preserving the Raw files in ‘Smart Objects’ so that the final outcome is completely non-destructive.
Software: Photoshop CS6 and CC
Rating: Advanced
Photography by Greg Elms (www.gregelms.com)
01 DOWNLOAD AND OPEN
First, download the four project images (below). Note that these are ".dng" raw files and they can be a little trickier to download than regular JPEG files. See the notes below...
Download free project files:
 |
 |
 |
 |
| Background.dng | L8.dng | Luna.dng | Sky.dng |
Depending on your operating system and browser it may work to simply click the links to download the project files. If not, you will need to right-click (PC) or Ctrl-click (Mac) each link and choose the option 'Download Linked File,' 'Download Linked File As...' or 'Save Link As...'. (If you have trouble downloading the images email editor@australianphotohgraphy.com and we’ll email the files to you.)
Take note of where the images are saved on your desktop. Select all four project files (Shift-click to select more than one file) and double-click to open them. As the images are ‘.dng’ files they will automatically open in the Adobe Camera Raw (ACR) interface.
02 OPEN OBJECTS
Click the Select All button (above the image thumbnails). Hold the Shift key on your computer and click the Open Object button in the bottom right-hand corner of the screen. The four images will now open as individual tabs in the main Photoshop editing space. Make the Luna tab (the shot with the model) the visible tab and choose the Move Tool from the Tools panel. Hold the Shift key and drag the image onto the Background tab. (Holding the Shift key ensures the images are aligned.) Luna now appears as a new layer in the Background image. Do the same for the ‘Sky’ image (the image with the best sky exposure) and the ‘L8’ image (the image with the L8 sign illuminated), so all four images appear as layers in the Background image. In the Layers panel arrange the layers so the Sky layer is at the top of the layers stack, Luna next, then L8 and Background at the bottom. You can now close the other images leaving only the Background image open.

03 LAYER MASKS
The next step is to add layer masks to the top three layers. Select each layer in turn, hold down the Alt/Option key and click the Add Layer Mask button at the base of the Layers panel. The Background layer does not need a mask.

04 REVEAL SKY
We can now start the process of merging selected areas from each of the four layers. In the Tools panel select the Brush Tool. In the Brush settings (above the image) select a large soft-edged brush (Size 125 pixels, Hardness 0%). Set the Opacity of the brush to 100% in the Options bar and make white the foreground colour (press D on your keyboard to set the swatch to its ‘default’ colours). Select the layer mask on the Sky layer and then paint over the sky in the image to reveal the darker exposure in this area. There is no need for accuracy when painting, and it is okay to extend into the edges of the freeways to darken these areas as well.

05 REVEAL MODEL
We will now reveal Luna (the model) on the layer below. It is easier to reveal Luna if we view the layer mask as an overlay and then disable the layer mask before we start painting. We can show the mask as an overlay by holding down the Shift-Alt keys (PC) or Shift-Option keys (Mac) and clicking on the layer mask. Now disable the layer mask by holding the Shift key as you click on the mask a second time. Make sure the foreground colour is still white and paint over Luna and her shadow, taking care not to paint over either of the light stands. When this action is complete click the image thumbnail in the Layers panel to hide the mask overlay and then shift-click the mask to enable the layer mask.
06 REVEAL SIGN
Repeat the process outlined in the previous step on the L8 layer to reveal the additional lighting on the L8 sign on the right side of the image. As you paint over the pool of light on the ground take care not to include the electric cable trailing across the ground.
07 MOVE TO ACR
As the four Smart Objects all contain the individual Raw files it is an easy matter to modify the color or tone of any of them by simply double-clicking the Smart Object thumbnail to open the embedded file in ACR. In this project I would like to fine-tune the tone and color of the ground surrounding Luna’s feet to make the white balance and tone closer to the surrounding pavement. Double-click the image thumbnail to open Luna in ACR.
08 EDIT MODEL
In ACR, select the Adjustment Brush (it’s in the Tools panel at the top of the screen) and lower the Temperature and Tint sliders to -10 and the Exposure slider to around -1.0. Paint the area around the model’s feet and then select OK in the bottom right-hand corner of the ACR dialog to update the composite image.
09 CONVERT TO SMART OBJECT
The final step is to grade the image, adjusting variables like colour, contrast, and clarity. To maintain a non-destructive workflow we will neither flatten the file nor create a merged layer. Instead, we will select all four layers (hold down the Shift key as you click the top and bottom layers to select them all) and in the main menu select Layers > Smart Objects > Convert to Smart Object. (Note: If at any time you need to modify one of the four component images double-click the Smart Object thumbnail to open the multilayered file inside.)
10 GRADING IN ACR (CC ONLY)
If you have Photoshop CC you can maintain a non-destructive workflow by going to the main menu and choosing Filter > Camera Raw Filter. This takes you back to the ACR workspace. (If you are working in Photoshop CS6, go to step 12).
11 ACR EDITS
Photoshop CC users can continue to grade the image using the tone and color controls inside ACR. I boosted the image’s Contrast and Clarity and used the Tone Curve to add blues to the shadows and yellows to the highlights. I also added a Post-Crop Vignette from the Effects panel to complete the project. As these adjustments are applied as a Smart Filter to the Smart Object we have managed to work in a completely non-destructive way at every stage of the process, so we can still access the Raw data of every component.
12 GRADING IN PS6
If you’re working in CS6 you don’t have the option to complete the grading process in ACR. You can, however use adjustment layers to manage variables such as colour and contrast. In this example I also added a vignette layer by copying the edge of the image with the Rectangular Marquee Tool (with a Feather of 150 pixels), pasting it into a new layer and changing the blend mode to Multiply.