


Capturing buildings and structures in dynamic ways presents some unique challenges for photographers. Rob Ditessa talks to three architectural specialists to find out how they get their images.
Peter Bennetts is interested in how a building fits into its environment, both physically and culturally, and how it responds and gives back to the city or landscape in which it finds itself, rather than the building as an object. He never works on an assignment as a “cold call”. He says he always finds out as much as he can even before seeing a building, in the same way you would do in preparing for a portrait or documentary shoot.
He asks for plans, and any construction images which might have been taken. Often, his assignments involve people whose work he already knows, and he may do a walk around with the architect. He will walk about “to get a feeling of what’s going on, and then it’s pretty much instinctive and reflective. I obviously follow the play of light across a building’s face, but I think firstly about photographing space, and the occupation of space.”
 Islington Silos by Michael Evans. Canon EOS 1Ds Mk III, 16-35mm f/2.8 L, 331seconds @ f/8, ISO 100.
DIFFERENT APPROACHES
A Melbourne-based architectural photographer of 20 years standing, Bennetts’ images have been published in Conde Nast Traveller (UK), Travel & Leisure (USA), Time, Domus, Frame and Architectural Review. His work ranges from Sydney to Perth, and he can find himself in many different shooting environments. At the time of writing he had just been on a helicopter shoot photographing Melbourne’s CBD. His field is hard work, and there are long days, especially in summer, and at times it can be physically arduous. Nothing happens if you stay at home, and he says young photographers should get out and put themselves in the right place, because fortune most often favours the brave – and hard working!
Another pro, Andrew Krucko, explains his own approach to architectural photography. “There is so much information that I process subconsciously.” After 20 years of professional work and a lifetime of looking at architecture, he says, there is no checklist he works through. It’s now instinctual. Even as a youngster, before he was conscious of design, he remembers paying special attention to the stylish residential buildings along Botany Bay’s Grand Parade in Sydney, when his family drove along it on their annual holiday trip.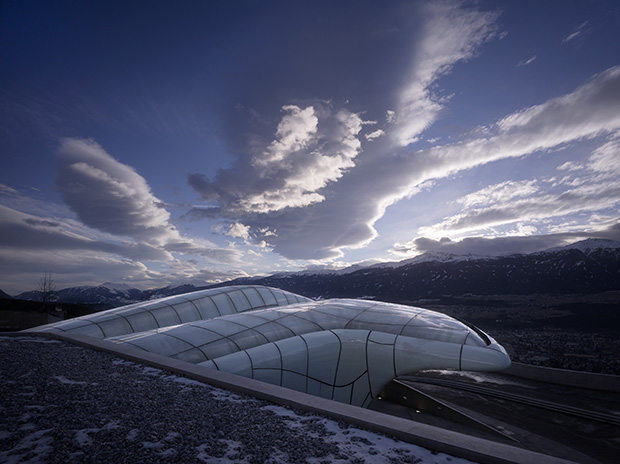 Nordpark by Peter Bennetts. Image made in 2008 in Innsbruck, Austria. Zaha Hadid Architects. ALPA 12SWA, HR Digaron-S 28mm/F4.5 Rodenstock HR, Leaf Aptus 75 Digital Back.
On a project, the first thing he notices is how a building resonates within its space, and his response, which is all to do with the basic rules of composition, and design. He will look for where the structure sits best in its environment, so it will be pleasing to the eye when an image is published. The brain hides many things that do not look right, but the camera does not, and he aims to reduce them. To enhance the look of the composition, he will find the best time of day to take advantage of the light, and use the sun as a compositional device.
Michael Evans fell in love with photography while working as the photo archivist in London’s Fitch and Company, then the world’s biggest commercial and industrial design firm. His first camera was a Nikon F3, and then he bought a Sinar F2 4x5 large-format camera for its quality and tilt-shift capabilities. The projects he has photographed include a Canadian shop selling vodka to the Ukrainians in Kiev, Heathrow Terminal 4, and department stores in Finland. Around 18 years ago he moved to Australia to run a successful architectural photography practice.
He says, “Although this may sound a little clichéd, I am really looking to capture the essence or soul of the building. This really begins with taking a detailed brief from the client, establishing just how the building works and what problems if any that the architect or designer overcame to ensure success. For example, if promoting pedestrian circulation within a space is a perceived issue at the design stage of the building, I will often find myself photographing a ‘hero’ staircase or escalator system at the project’s conclusion. Essentially, I suppose, I see my job as trying to make the finished project look better in print or on the web than it does in real life.” 
AAMI Stadium in Melbourne’s sporting precinct, by Michael Evans. Canon EOS 5D Mk III, 24-105 f/4 L, 2 seconds @ f/8, ISO 100.
TIPS FOR SHOOTING
Before putting the camera to your eye (and assuming you’re not working to a particular client brief) Evans urges a study of the building. He says, “Ask yourself what you like about it, why, and the essence of the building in a close-up detailed image. Just because you can get all of the building in the frame, it does not mean you end up with a better image.
You can get carried away with a building that looks fantastic to the eye and senses, but when you look at the image on the screen you notice the lighting is bland, or there is too much sky, or perhaps the building is now no more than a silhouette. Look for interesting shapes, and most importantly the light. I strongly recommend using an app called ‘The Photographer’s Ephemeris’ when planning an architectural shoot; it gives me the exact light and weather conditions for the site prior to my arrival, allowing me to plan my shot list around the conditions, or if necessary to reschedule.”
Krucko says that because architectural photography takes a lot of precision, shooters should avoid using cheap lenses which have complex distortions that can’t be corrected easily in post-production. Take care with your composition when using a wide-angle lens, because it’s difficult to judge whether your lines are perfect. Waiting for the best light is a big part of the job, as is working on dusk and dawn shoots. He urges newer photographers not to rush their work.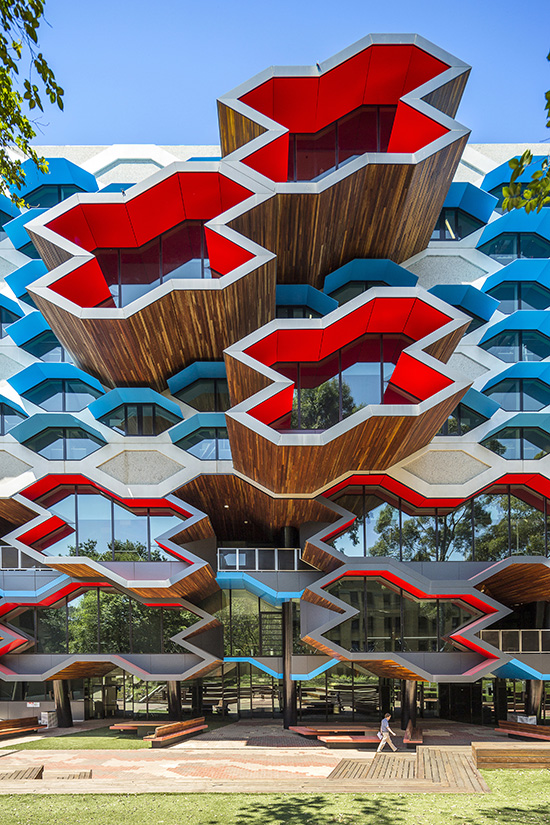 |
|
LIMS Building, by Michael Evans. Canon EOS 5D Mk III, 17mm TS-E f/4 L, 1/160s @ f/8, ISO 200.
Often you’ll see elements like power lines going through the frame, and if they’re distracting, he looks to remove them in post-production. If the image is taken for a competition, or a publication, or to sell it, you don’t want to misrepresent it, but otherwise you want to make it the best that you can, he says. Bennetts says that often a student will show him work where they have made no judgement about the building being photographed. “Photographing good architecture is easier. Do yourself a favour and photograph the best of the built environment,” he says.
STARTING OUT
To start out Bennetts suggests including in your equipment the best tripod you can afford, but nothing fiddly. For lighting, always think about the sun’s angles, the play of shadow and time of day. Timing is paramount. Work with a minimum of gear. He explains that in mountaineering terms, he favours ‘an alpine-style ascent’, taking no more than is self-sustainable, photographing only with what he can comfortably carry for a day, as opposed to a ‘siege-style’ ascent where you take everything with all the support you might need. Be ready to grasp the opportunity when it pops up, for instance, getting access to a rooftop. You need to take yourself there and shoot with a minimum of fuss.
Often an enthusiast will buy a 17mm tilt-shift lens for their architecture work. Bennetts cautions that people should use such a lens carefully because it can distort, exaggerate and distend a building. It’s also manual, and you need to know about metering in a straight axis position and not off axis, and controlling flare. He suggests starting out a fixed 24mm lens, and you can photograph on the street rather than slow yourself down with particular equipment. “It used to be that the only way to correct perspective was with a view camera, and it really dictated when and how you could shoot. You needed a smaller aperture which necessitated longer exposure, and it was very hard to capture any movement”, he reflects.
Krucko’s equipment list for beginners includes any good DSLR with at least 95% frame coverage for more accurate framing. He suggests coupling it with a wide-angle lens without complex distortions, though some barrel distortion is acceptable as any decent RAW convertor will fix it. A tilt-shift lens is a valuable tool, but expensive. A polarising filter will work for any reflections in the glass. A sturdy tripod with a quality head which doesn’t move after it’s adjusted is required, and a step ladder can come in handy. If your camera doesn’t have an inbuilt spirit level, buy one for the hot shoe, he says. For interiors, using hot lights means you can see in real time the effect of the light, as opposed to a bomb flash going off. The idea is to augment the interior lights, and not to overpower them, in such a way that the viewer can’t tell the scene has been lit.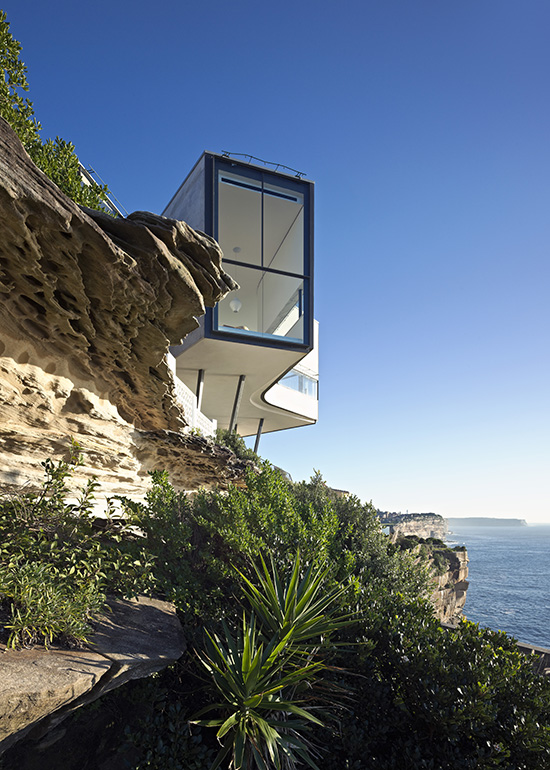
Holman House, by Peter Bennetts. Taken in 2011 in Dover Heights, Sydney. Durbach Block Jaggers, by Peter Bennetts. ALPA MAX, HR Digaron-S 28mm f/4.5 Rodenstock HR, Leaf Aptus 75 Digital Back.
TECHNICAL DETAILS
Evans says he mainly uses the Canon 5D Mk III as his workhorse, with a Canon 1Ds Mk III as a back-up. His favourite lens is the 17mm TS-E f/4, which he says is superbly sharp from edge to edge. While he rarely uses the tilt function, he appreciates the capability. When he finds that space constriction prevents him from fitting all of a building into one frame, by shifting the lens he can panoramically stitch two or more frames together, and create an image of the building as a whole.
“Because I also do a great deal of industrial work in the mining, energy and construction fields, I need the convenience of autofocus and so I also have the 16-35mm f/2.8 L II. I have never found this lens to be particularly sharp in the corners. Indeed it pales in comparison to the 17mm, and I have recently bought the 16-35mm f/4 L IS and I have found it to be a stellar performer. It certainly outperforms the f/2.8 version in terms of sharpness and flare resistance. The other lenses in my kit are a 24-70mm f/2.8 L II, a 50mm f/1.2 L, a 85mm f/1.2 L, a 70-200mm f/2.8 L IS II, and a rarely used 24-105mm f/4 L.”
For filters, he prefers the Lee filter system. Although it isn’t cheap, he has always found it to be versatile and high quality. He explains, “I use the 0.9 Soft-Edge Graduated Neutral Density Filter to hold back the skies, and I often combine this with the 105mm circular polarising filter, although this does cause a degree of vignetting on the 16-35mm at anything below 18-20mm. Trying to use filters on the 17mm TS-E is, of course, a challenge with such a protruding front element. However, the best option I have found is manufactured by Photodiox WonderPana, which allows me to use slide-in filters.”
His main tripod is the Really Right Stuff TVC-34L which he combines with the RRS BH-55 LR Ballhead. He finds this carbon-fibre kit to be very lightweight, but extremely sturdy, particularly as it doesn’t have a central column. He’s found using the central column on his other tripods the cause of soft images. The 5D Mk III includes an internal spirit level which he finds useful. Because in the past he found the hot shoe-mounted bubble spirit level was another piece of kit to carry and lose, he is fond of the built-in version.
With an interest beyond architecture, Evans owns a relatively large lighting kit which he is able to take on location. This includes the Elinchrom Ranger Quadra, and Bowens Monoblocs. “Having said that, I tend to use the Canon Speedlites 600 Ex-RT system when photographing interiors. I love the fact that they produce a reasonable light output in a small, easy to conceal package. I trigger these using the ST-E3-RT transmitter, which does offer TTL capability, although I always find myself using the flashes in manual mode. I also carry a brace of PocketWizard flash triggers which I can use as a backup system if for some reason the ST-E3-RT fails,” says Evans. He uses ThinkTank and Lowepro bags.
CAMERA SETTINGS
Across all his lenses, Bennetts says his default setting is an aperture pretty much between f/5.6 and f/8. Mostly he uses manual exposure and for the Leaf camera he sets ISO 100, while for the Canon 1DX ISO 200, 400, or 800. Krucko says, “I like to shoot auto white balance and use a grey card for post colour neutralisation. I always use the base ISO. An aperture of f/8 works in 95% of situations, but I’ll go to f/11 if pressed, and I bracket the exposure for each shot.” Evans says with aperture, he tends to work in the range of between f/8 and f/11 because he wants the sharpest possible image without the degradation caused by diffraction. When depth of field becomes a problem, he will often shoot single scenes focusing across different points and then blend the resulting images together in Photoshop to produce one that exhibits front-to-back sharpness.
Shooting in RAW, he says, gives him control over the white balance. While he doesn’t bother to set a particular white balance on camera on location, he always uses a colour checker and photographs himself holding it under the light sources as an accurate point of reference. “I make a guess of the initial exposure since the 17mm TS-E plays havoc with the on-camera metering when shift is applied. I work in manual mode anyway, and so I simply adjust the exposure based on my test image histogram. I know some photographers swear by a hand-held light meter, but I have the Sekonic L-308B and I haven’t used it in years,” he adds.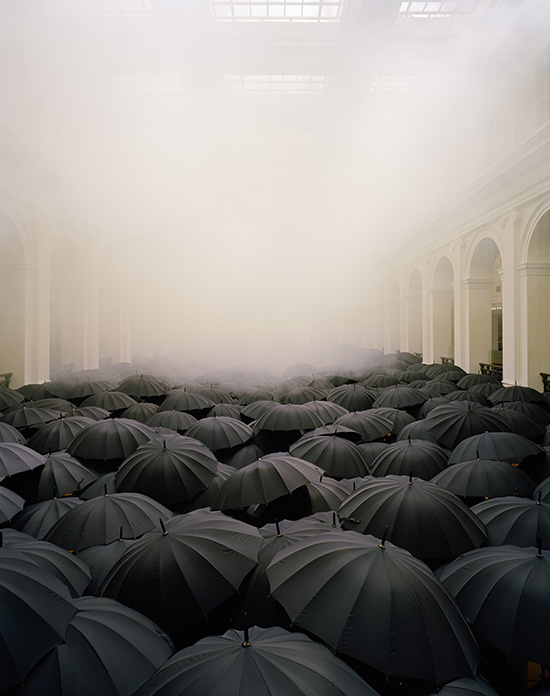
Umbrellas. Image made in 2005 in Melbourne. Matej Andraž Vogrincic collaboration, Peter Bennetts. Sinar P2 4x5in, Schneider 72mm Super Angulon, Kodak Portra 160NC.
STRAIGHTENING LINES
The best way to deal with the issue of perspective when using a tilt-shift lens, says Evans, is always in camera. “I still tweak the image in post-production if necessary using the free transform command, but it’s important to remember that in doing so the software is essentially making up extra pixels in order to alter the image. On a small scale this isn’t a problem, but it is important to be aware that it will ultimately impact on image quality if you apply it too liberally.”
Krucko agrees about the advantages of doing everything in camera, and says having a camera with built-in spirit levelling has been a great advantage. He will tilt up a little bit and then fix it in post production, but if he gets to the point where the amount of tilt will cause the post to get out of hand, he will simply seek another position for the camera. Bennetts sums up, “I’m always concerned with the natural representation of the built environment, and getting it right in camera without overt dramatisation. Perspective should be natural. It needn’t be absolutely correct, but if you’re going for a photograph with one point perspective, get it right in the camera with perspective correction. Don’t rely on post.”
Bennetts reflects, and echoes the sentiments of Evans and Krucko, “It’s an incredible privilege to see what I do on a daily and weekly basis. If you’re photographing in other genres you don’t get to experience private homes like I do, or the opening of an art gallery, or a new building. It’s all I can do. I’ve never done anything else. I always consider myself to be so lucky for the opportunities where I get to see a bit of the wider world, and see the vanguard of architecture and design.”