


When it comes to making the most of your images, pressing the shutter button is just the beginning. Mark Galer shows you how to make your landscapes 'pop' by enhancing colour, tone, sharpness and much more in Adobe Lightroom.
The image in this tutorial was captured at Princes Pier, Port Melbourne, just as the sun was setting (just out of frame). After a mostly clear day the clouds rolled in – as if on order – to heighten the drama of the setting sun. There were plenty of other photographers present, but they were all intent on framing the sun. I was more interested in framing what remains of the old pier. By using an ND 400 filter I effectively reduced the light reaching the sensor by just over eight stops (EV). At f/8 and ISO 100 this extended the shutter speed to 30 seconds, thereby creating a calm surface to mirror the drama unfolding in the sky. (You can watch a Youtube video of me capturing the image here)
Exposing for the sky typically renders the foreground as a silhouette, so the ideal exposure when shooting Raw is to raise the exposure slightly so that foreground detail can be successfully recovered in post. The adjusted exposure should not however clip the detail in the sky. The exposure is therefore a compromise between the optimum exposure for the foreground and the optimum exposure for the sky. A graduated filter can help balance the exposure in these situations but with most modern sensors blessed with a large dynamic range (this image was captured with Sony’s A6000) the highlights and shadows can be optimised in post-production. Read on to find out how.
Software: Lightroom 5
Rating: Intermediate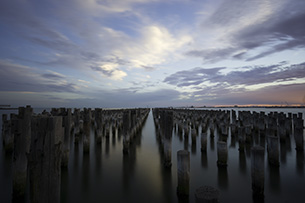
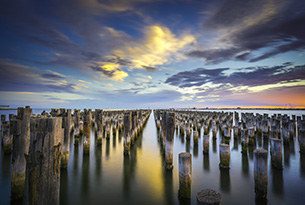
The original image (left) and after processing in Adobe Lightroom.
01 DOWNLOAD
Before we get started, download the free project image here. Take note of where the image is saved on your desktop.
02 LENS CORRECTIONS
Images captured with a wide-angle lens benefit from a quick visit to the Lens Corrections panel to make sure the Enable Profile Corrections and Remove Chromatic Aberration boxes are checked in the Basic tab.
If a lens profile is found, Lightroom will remove any barrel distortion and lateral chromatic aberration (misalignment of colours in the corners).
03 STRAIGHTEN AND CROP
This image is almost straight but, due to the symmetrical framing, any small error will be very noticeable. Click the Crop Overlay icon (below the histogram) then drag the Angle icon onto the image and drag a line along the horizon to make sure it's level.
Press the O key on your keyboard to change the crop overlay. Cycle to the Grid overlay to check the position of the vanishing point. Cropping in a few millimetres from the right hand side will create perfect symmetrical framing.
04 EXPOSURE, TONE AND CONTRAST
To balance the exposure and the sky drag the Highlights slider to -80 and the Shadows slider to +80. Increase Contrast to +20 to add some punch. Increase the Exposure by a third of a stop (+0.33) and raise the Whites slider to +20. This last step moves histogram to the right edge so the image now uses the full tonal or ‘dynamic’ range.
05 PUMP UP THE COLOUR
Increase localised contrast by dragging the Clarity slider up to +20. Now, move the Temp slider up to 6,900°K to restore the drama of the warm colours that were present in the sky.
To pump up the colour even more, increase Vibrance to +50 and Saturation to +20. Normally I use Vibrance rather than Saturation, but often the warmer colours get left behind. Increasing the Saturation as well helps with the yellows and oranges.
06 GRADUATED FILTER: SKY
Let's use the Graduated Filter tool to darken the sky a little. Click on the Graduated Filter icon (below the histogram) and double-click on the word Effect in the top left-hand corner of the panel to 'zero' all sliders. Now, reduce the Exposure slider to -1.30 and the Highlights slider to -40. Click in the centre of the sky and drag down to the horizon line. Hold the Shift key as you go to ensure the gradient is level.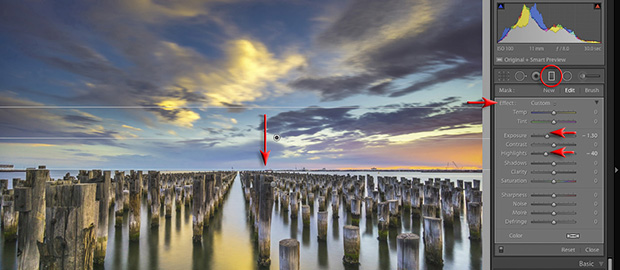
07 GRADUATED FILTER: SEA
The advantage of adding graduated filters in post, is that you are not limited to just one. Click the word New at the top of the panel, double-click the word Effect and then adjust the Tint slider to +16. Drag a graduated filter from just below the horizon to just above the horizon.
You can add additional adjustments after you create a gradient, as long as it’s the active filter. (Clicking a pin makes that graduated filter active.) I added a +10 Shadows adjustment to the second graduated filter to fine-tune the tonality. Click the Graduated Filter icon to exit this panel.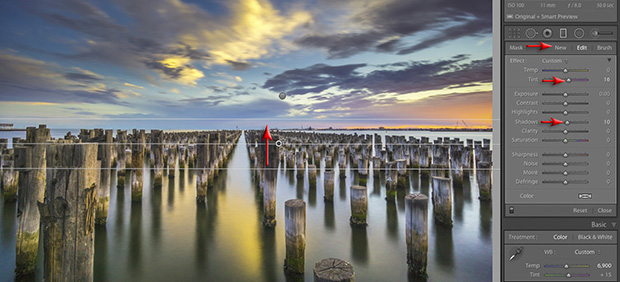
08 WHITE POINT
Back in the Basic panel you can see the histogram has moved over to the left again (thanks to our first graduated filter). To reset the white point, raise the Whites slider to +70. The colour and tone are starting to ‘pop’ now – better reflecting the drama of the scene I saw, rather than the one captured by the camera.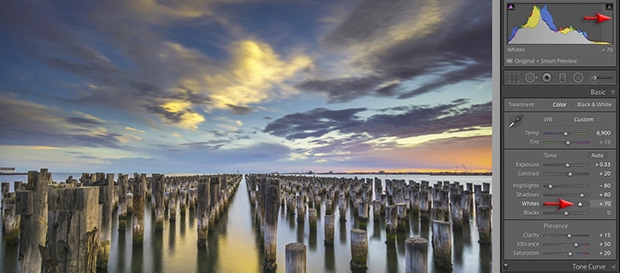
09 NOISE AND SHARPNESS
Even though I took this shot at ISO 100, if you zoom in to 1:1 (100%) you can see there is quite a lot of noise in the smoother areas of tone. This has mostly been caused by our changes to tone and colour. To reduce the noise, go to the Detail tab and raise the Luminance slider to +30 and the Color slider to +50. Raising the Smoothness slider will can help to ensure any transitions of colour are nice and smooth. To sharpen the image choose an Amount of 100, Radius 0.5, Detail 100 and Masking 50. (Note: The Masking slider protects the smoother areas of tone from the sharpening process. Without masking, the noise would become apparent again as you sharpened the image.)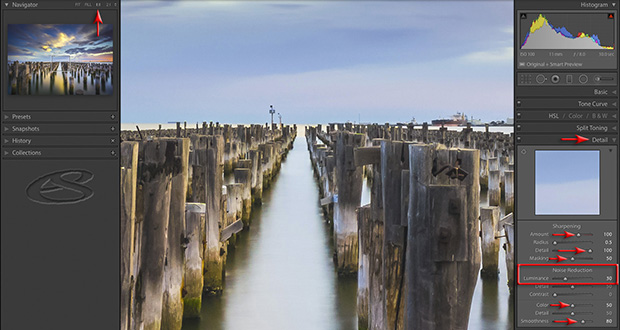
10 PURPLE FRINGE
While you're zoomed to 100%, if you turn your attention to the edges of the image you can see some color fringing along some of the dark edges that are backlit by the bright water (move the location of the 1:1 view by dragging the white box in the Navigator panel). We can correct the purple fringe in the Lens Corrections panel. Click the Color tab then click the Eyedropper tool. Move the eyedropper to one of the edges where you can see the purple fringing. Use the magnified view to help precisely locate the purple pixels before clicking your mouse button to eliminate the problem.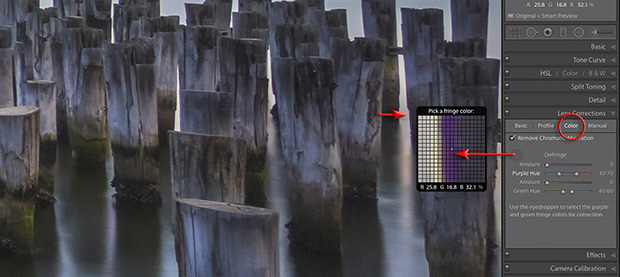
11 VIGNETTE
Let’s increase the natural vignette in the Effects panel. Choose the Color Priority option and reduce the Amount to -15. (Any further and you will start to clip the shadow tones in the corners to absolute black.) Return to the Basic panel and raise the Blacks slider slightly. Holding the Option/Alt key as you move the Blacks slider will show you if there is any clipping is occurring. And that’s it! The final step now is to try this exercise with one of your own images – good luck!