


Long-exposure images require patience and practise but the rewards, for those prepared to try it, are huge. Mick Fletoridis explains how he got hooked on this challenging genre and shares some handy tips for anyone ready to give it a go.
During a photography course at Sydney’s Australian Centre of Photography a couple of years ago the instructor suggested the students needed to find their “thing” – a subject, style or technique to concentrate our photographic efforts upon. As hard as I tried after completing the course that ‘thing’ eluded me. Brief phases shooting different subjects or trying different techniques delivered mixed results, or only held my interest sporadically. Eventually I had the idea to head to the coast around southern Sydney to shoot images of the ocean. A low-pressure system was producing a large swell and angry skies off Cronulla – and maybe, I thought, the makings of some interesting sunrise photos. That morning I found myself at a prime location near a coastal rock swimming pool, just off what is a busy walkway during daylight hours. But it was deserted at 5am. A few years earlier I’d been to the same spot late one day and taken some images with fairly mixed results. I’d hoped to go back and try again.
The main problem I found this time around was getting the exposure right – many images were over exposed above the horizon because I didn’t have an ND filter. There was also an orange glow on all of the shots, courtesy of some floodlights near the location that I hadn’t taken much notice of before! There was definitely a lesson learnt, but there were enough reasonable pics from that shoot to spur me on to try and tackle seascapes more seriously. I left it on the backburner, though, until around a year ago when I started heading out most weekends to shoot at sunrise along the southern Sydney coastline. And while I’m no expert, I’ve found shooting regularly has taught me a lot and produced some good results. If you’re thinking of taking up seascapes, or long exposures more generally, the following tips from my experiences might spur you on to give it a try.
01 MAKING A START
I’d long been impressed by the seascapes featured in the likes of AP magazine, but I hadn’t realised what it took to produce them. The most difficult part I found was bringing all the required elements together. Firstly, nature plays a major part in your success. I’ve been on many shoots where a much-anticipated sunrise has been very disappointing, with little in the way of cloud or colour to help produce a pleasing photo – or make getting out of bed at 4am worthwhile! While grey or dark angry skies can result in interesting images, there’s nothing like a stunning orange glow rising on the horizon to lift a seascape photographer’s spirits.
As I’ve discovered, however, “perfect” conditions don’t come about that often. It can be a numbers game. Since I started shooting seascapes about a year ago I can count on one hand the number of stunning sunrises I’ve been on hand to experience. The more you get out there, though, the better your chances of shooting the magic when it happens. I’ve also learnt it pays to be patient if you hope to produce pleasing seascape images on a regular basis.
Right place, right time! Sunrise, Cronulla, NSW. Canon 5D Mk II, 24-70mm f/2.8 lens @ 24mm, 0.5 seconds @ f/22, ISO 100. Shadows, sharpening adjusted in Lightroom 5.
02 LOCATION, LOCATION
Finding suitable locations to shoot seascapes can be a challenge. Like many amateur enthusiasts I was limited to shooting on weekends and I found it difficult to scout for new and interesting places along the coast. As a result I found myself relying on a couple of spots reasonably close to home – Cronulla and Kurnell – where several consecutive weekends of sunrise shoots produced mixed results. However, there was the occasional image that made the effort worthwhile and pushed me to keep trying. Despite these being interesting locations I soon ran out of ideas.
Thankfully, these days it’s not too hard to research new shooting locations from your lounge room! Google Earth and mobile apps such as The Photographer’s Ephemeris are just two which have proven very handy for this purpose. The latter app has the advantage of displaying the exact direction of the sunrise (or sunset) which makes planning a shoot at a new location a lot easier. Using this technology has since helped me find new and challenging locations for shooting seascapes.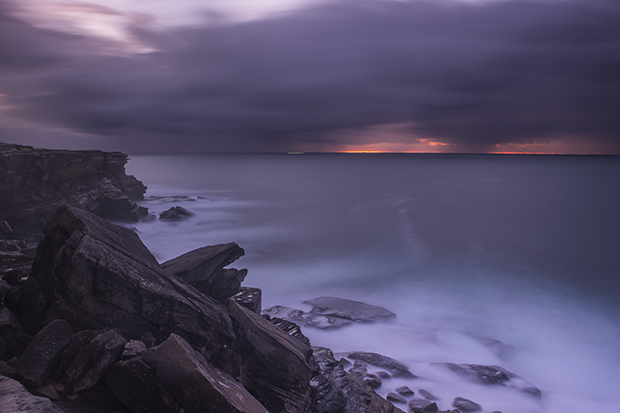
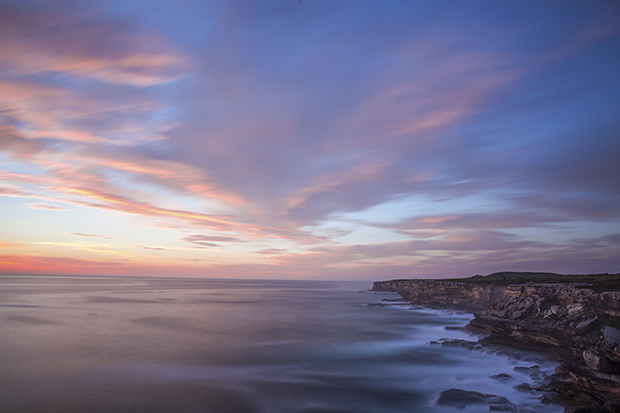
Fire on the horizon, Cape Solander, Kurnell NSW. Sony A7, Metabones adaptor, Canon 24-70mm f/2.8 lens @ 24mm, 127 seconds @ f/11, ISO 50, Lee Little Stopper. Shadows, sharpening adjusted in Lightroom 5.
03 PLAY IT SAFE
When shooting at coastal rock platforms there is an obvious element of danger involved. As well as being risky places to be in times of rough weather and big swells, ocean rock platforms can present a risk to your valuable camera equipment. Saltwater and cameras definitely don’t mix! This is another reason why it pays to do some research before venturing out to a new location. Trying to find your way to an unfamiliar spot in the dark can be risky, especially when you’re weighed down with a tripod and other camera gear. More than once I’ve been caught out when I had been “winging it” by heading to a different spot at the last minute. When I’ve done this I’ve often struggled to find a suitable safe place to shoot from. As a result I’ve ended up moving around frantically trying to find a better position, right about the time the light is the best and I should be taking photos! Not surprisingly, when this has occurred the results have been disappointing.
If you do find yourself heading “blind” to an untried location at least get there very early and give yourself plenty of time to find a suitable safe shooting position. Also make sure you have a quality torch. LED head torches are the best as they provide more than ample light, usually have different light output settings and importantly, leave your hands free so you can safely negotiate your way around. Torches too can help in the creative process when taking photos, by lighting aspects of the image’s foreground such as rocks, driftwood or other points of interest.
When visiting any coastal location you should be aware of any tidal influence that will affect where you can safely shoot from and for how long. While you will have some occasions when you get your feet wet – or often in my case – shooting from locations which can put your life at risk is best avoided. As a keen rock fisherman from an early age I can attest to how quickly a seemingly calm sea can turn into a dangerous swell that can “swallow” a rock ledge without warning.
Cape Solander cliffs, Kurnell NSW. Canon 5D Mk II, 24-70mm f/2.8 lens @ 24mm, 106 seconds @ f/9, ISO 100, Lee Big Stopper. Exposure, shadows, sharpening adjusted in Lightroom 5.
04 GEARING UP
When I started concentrating on seascapes I was shooting with a trusty Canon EOS 5D Mk II and a 24-70mm Canon L series f/2.8 lens atop a Manfrotto 055XProB tripod and I was using a cable shutter release. This has proved to be a solid and reliable ‘go-to’ combination. I also recently started using a Sony A7 with a Metabones adaptor to suit the Canon 24-70mm lens. I trigger the mirrorless Sony with an inexpensive FotoTech wireless remote. The lighter weight of this set up has been a bonus when I have been scampering around rocks.
Initially I shot in Aperture Priority mode with an ISO setting of 50-100 and a closed-down aperture to create a long exposure. This produced some pleasing results and it’s still part of the process I use when I’m shooting at sunrise. While using aperture priority mode gave me some good pictures, it had its creative limitations. I really like the smooth silky look extra-long exposures give to seascape images. As I discovered though, trying to achieve that look was impossible without using lens filters. This led to experimenting firstly with ND filters to combat over-exposed horizons. Unfortunately this also gave me disappointing results. The first set of reasonably inexpensive graduated ND filters I tried produced vignetting which made most of my images useless. I managed to save a few via cropping in Lightroom, but I thought there had to be a better way.
After some internet research I discovered the Lee range of filters was rated highly by seascape and landscape photographers around the world. I went on to buy a Lee 100mm filter mounting kit and lens adaptor, 100 x 100mm, ND9, Soft Grad filter and Little Stopper and Big Stopper filters. The latter filters reduce the amount of light reaching your camera’s sensor by eight and ten stops, respectively. While Lee filters aren’t cheap, they are quality products. Purchasing these filters greatly improved my seascape options and results overnight. Using the Soft Grad filter was immediately effective for helping reduce horizon “blow out” while the Stoppers have quickly become my favourite long exposure tools.
The first time I used the Big Stopper though, it took some getting used to! Firstly, you take an exposure reading sans filter and then refer to a provided chart for the appropriate shutter speed to use with the filter. For example, a reading of 1/15s requires a one minute exposure (in Bulb mode) when shooting with the Big Stopper. I use the stopwatch on my iPhone to time my exposure.
The added difficulty when using these filters is focusing. You can’t focus with the Big (or Little) Stopper in place so your subject has to be focused before you fit the filter. While it took some time to become familiar with using the Stoppers, the results have been pleasing. I especially love the silky smooth water effect using the Big Stopper provides. Another advantage of the Lee system is that filters can be stacked together as I often do with the Big or Little Stopper and the Soft Grad filter. I discovered though that when stacking, the Stopper filter has to be the closest to the lens or weird light leaks can appear on the bottom third of images. While I typically like to use the Stopper filters when the sun is not long over the horizon, they’re great to have in the kit for use at any time of day for shooting long exposures.
It should go without saying that a sturdy tripod and cable or remote shutter release are mandatory for shooting long exposures – the sturdier, the better when shooting seascapes, as saltwater will often flood rock ledges and swirl around the tripod’s legs!
Once I’ve finished a shoot I use Lightroom for processing. As hard as I try to get photos right “in camera” I still have to make some adjustments in Lightroom, although I try to keep changes to a minimum. I generally only spend a few minutes adjusting images in Lightroom. Most adjustments made are for exposure – I find it difficult to get this ‘spot on’ when I’m using filters, especially the 10 stop Big Stopper – as well as shadows, temperature and some occasional cropping.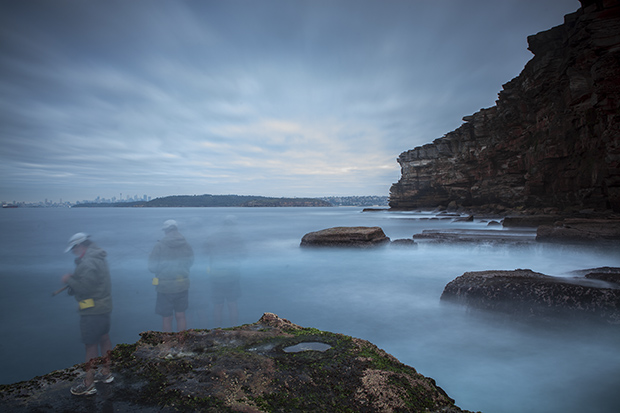
Rock fisherman, Sydney Harbour. Shot during a video shoot for Fishing World magazine. angler John Newbery was too busy getting bites to stay still for the shot – hence the blur! Canon 5D Mk II, 24-70mm f/2.8 lens @ 24mm, 122 seconds @ f/11, ISO 160, Lee Little Stopper. Exposure, shadows, sharpening adjusted in Lightroom 5.
05 NEW HORIZONS
While I’m happy so far with the results I’ve achieved shooting long exposure seascapes, there’s a lot to learn and new things to try, which of course keeps it interesting and challenging. Recently I was also inspired to have a go at long exposure night photography, in particular, shooting images to capture stars. After being inspired by regular stunning night sky images in the pages of Australian Photography and websites like Flickr, I did some research on how to go about it.
With an idea of how to get started I planned to shoot stars when the first opportunity arose. From what I learned, living in a big city like Sydney wasn’t conducive to shooting the night sky, so I had to venture inland to escape the artificial light pollution. Last summer when I travelled to the Snowy Mountains for a spot of trout fishing I found the perfect opportunity for night shoots. One night, after a successful evening’s fly fishing, some mates and I adjourned to our campsite at Lake Eucumbene. It was a still dark night and the stars were out in force. While the others were cooking up a well-earned feed and downing a beer or two, I wandered around in the dark looking for a good location to shoot the starry sky. I found a likely location and with camera on a tripod and with a cable release attached I set the camera to ISO 3200, and the shutter to 30 seconds. I triggered the shutter and stood and waited. Click! The 5D’s LED screen flashed up the image. I stood there amazed. The stars, including the Milky Way, displayed as clear as day. How long had this been going on?
I finished up with several usable images that night. I’ve also since invested in a 14mm lens and shooting stars is now fast becoming a regular part of my long exposure obsession. If you’re still searching for your “thing” in photography, give long exposures a go. You might be pleasantly surprised at the result. Be warned though, it can be addictive!
A church under stars at Hill End, NSW. An early attempt at night shooting produced this pleasing result. While there is lens distortion, I left it uncorrected to add to the image’s eerie feel. Canon 5D Mk II, 24-70mm f/2.8 @ 50mm, 30 seconds @ f/2.8, ISO 3200. Cropping, shadows, sharpening adjusted in Lightroom 5.