


Here’s a question for you. Has the kind of filter you attach to the front of your lens been superseded by the kind of filter you select from a drop-down menu in Photoshop? Not according to Nick Rains who names his favourite filters and explains why these special pieces of glass should be a part of every photographer’s kit.
One question I get asked quite frequently at the various workshops and seminars that I present is, “Do I still use filters and if so, which ones?”
It’s a fair question given that photographic filters, in one form or another, have been around for over 100 years since Frederick Wratten manufactured dyed gelatin filters to be used in front of the camera lens rather than in the enlarging or projection process.
So the short answer to the questions is, “Yes, I still use filters.” The answer to “why, and which ones?” requires more explanation but there’s no doubt in my mind that filters are just as useful a tool as they were 100 years ago.
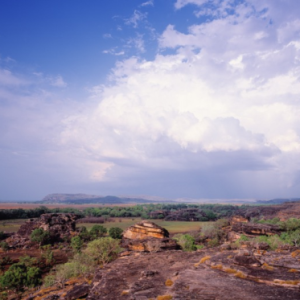
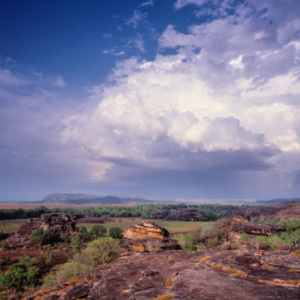
Ubirr, Kakadu. These images show the effect of a graduated neutral density filter. In the image (right) a two-stop grad has been used to hold down the brightness of the storm clouds. While the foreground exposures of the two images are the same, the clouds are blown out and featureless in the other image where a filter has not been used.
What are filters for?
Put simply, a filter physically modifies the characteristics of the light entering the lens.
Capture devices (film or digital) react in specific ways to the different wavelengths of light. Film is fixed in its sensitivity to different colours so, pre-digital, if you wanted your photo (particularly slide film) to look in any way different to the way the film naturally appeared you had to alter the light before it was recorded. Want a warm cast? Add a Wratten 81C filter which has a medium-strong ‘straw’ coloured tint to the front of your lens. To cool down a photo, add an 82B. If you needed to use daylight film indoors use an 80A filter.
Obviously all of these adjustments can now be done either in-camera by changing the camera’s white balance setting, or you can easily do it in-post if shooting raw. So in the case of colour correction filters, no, I do not use these any more since there is literally no point.
Having said that, physically modifying the light before it hits the film (or sensor) has certain other advantages which do not have a post-processing analogy. These include:
• Changing the amount of light entering the lens – Neutral Density (ND) filters.
• Reducing the amount of light from the top of the picture relative to the bottom part – Graduated NDs.
• Reducing the levels of polarised light entering the lens – Polarising Filters.
This is the key to thinking about filters – should you modify the light first or modify the capture afterwards?
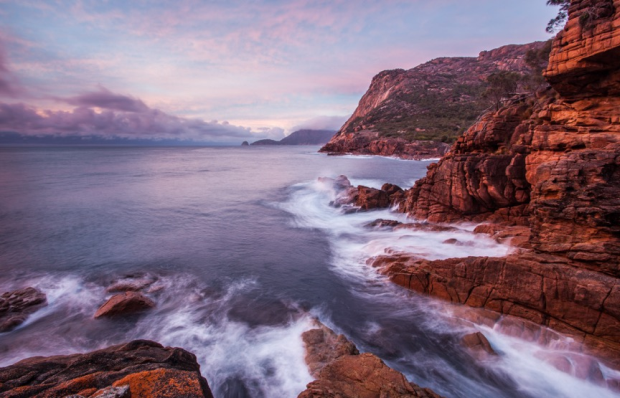
A mid-strength four-stop neutral density filter allows the water to blur just the right amount. Canon EOS 5D Mk II, 17-40mm f4L lens, 3.2s @ f/16, ISO 100.
Neutral density filters
Neutral density (ND) filters are designed to absorb light and extend exposure times. They come in various strengths – one stop (x2 or 0.3), two stops (x4 or 0.6) etc. For extremely long exposures you can buy strong ND filters that absorb 10 (ND400) or even 16 stops of light so you can shoot very long exposures in daylight for creative effect.
Really long exposures are excellent for blurring slowly moving subjects like clouds and water. Normally you need to wait until it gets dark to be able to use long enough exposures so that the movement is recorded, but using a strong ND can allow you to ‘force’ long exposures even in full daylight. For example, a 10 stop ND will change the exposure from 1/60s at f/16 (full sunlight) to 15s at f/16, long enough for water to go nice and blurry.
There is no way to precisely emulate the effect of genuine long exposures in-post. It is possible to get close using Stack Modes on multiple shots in Photoshop, but it’s never quite the same.
There is another use for ND filters that makes them almost indispensable, and that is controlling depth of field for video.
If you want that lovely cinematic minimum focus look you need to use a wide aperture. However, in bright sunlight you would have to use a shutter speed of 1/2000s to use an aperture of f/2.8 or 1/8000s for f/1.4.

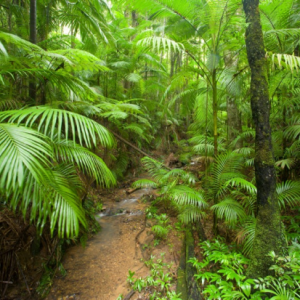
Mt Glorious, Qld, showing the effect of a polariser (right) on green foliage on a cloudy day. Note the reduced highlights on the leaves which allows the ‘greenness’ to show through. Canon EOS 5D, 17-40mm f/4L lens @ 17mm, 20s @ f/11, ISO 100.
So what’s the problem, you ask. Well, to avoid that harsh ‘video’ look it’s usual to shoot what’s known as ‘180 degree shutter’ which is 25fps at 1/50s or 50fps @ 1/100s so that frames actually blur slightly into one another and give a smooth look to movement. 1/50s at f2.8 will be totally overexposed in full daylight unless you reduce the amount of light entering the lens – cue the ND filter. An ND16 (4 stops) will allow you to shoot 1/60s @ f4 in sunlight, or using an ND64 for 1/60s @ f1.4.
The movie industry has been using NDs in this way for pretty much ever; in fact many decent video cameras even have built-in ND filters so you can set your shutter speeds and apertures almost independently of how much light there is.
Be aware that the cheaper ND brands can show a colour cast, often towards the green. The better brands tend to be more genuinely ‘neutral’ in colour.
I always carry a 10-stop and 4-stop ND filter with me when out shooting – you never know when you might need them.

Lusancay Islands, PNG. A polariser has made the water wonderfully translucent. Canon EOS 5D, 17-40mm f4L lens @ 17mm, 1/250s @ f9.5, ISO 200.
Graduated filters
Graduated filters or ‘grads’, as they are also known, are half clear and half filtered with a smooth transition from the clear part of the filter to the shaded area. They work best with slide-in square filter holders because they need to be adjusted up and down, or rotated, for best effect.
The most frequently used grads are Neutral Density grads (ND Grads) which allow you to darken the sky but leave the foreground unaltered, thus reducing the overall contrast of the scene. Like normal ND filters they come in a variety of strengths measured in one stop increments. I find the most useful ones are the 2-stop and 3-stop ones, less strength has little effect and more looks quite artificial.
Some photographers love to use these filters, preferring to see and capture the effect in-camera. Other photographers, including myself, prefer to shoot two images at different exposures and combine them later in Photoshop. The latter technique is undoubtably more accurate (the filter only has a straight line transition) but is more time consuming and requires an basic level of skill in Photoshop masking.
You can also get coloured grads so you can change one half of the photo to a different colour. For example a tobacco or orange grad makes a bright sky look more like a sunset without altering the foreground. Personally I prefer to do any image adjustments like this in post production but some people swear by their grad filter collection.
I rarely use ND Grads, but I do find them essential for two things. One, time lapse images and two, video.
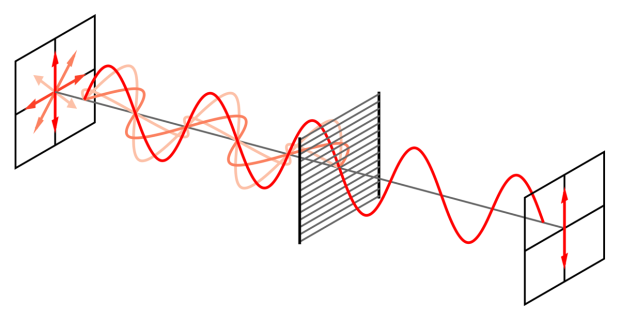
A polarising filter limits the passage of light to a single waveform orientation.
Whilst you can shoot time lapses in raw and control sky brightness using local adjustments in a raw processor, it is terribly time consuming. I shoot JPEGs and use a two-stop ND Grad to darken the sky a bit. For most video the same applies and, like solid NDs, Grad NDs are a fixture in the gadget bag of all videographers.
Polarisers
Light reflecting off shiny surfaces such as glass or water becomes ‘polarised’ which means the random vector oscillations of the wave-properties of light become limited to a single plane. A polarising filter blocks polarised light when it’s oriented at 90 degrees to the plane of oscillation. In addition to reflections, light passing through the atmosphere can also become polarised, thus the effect of polarising filters on blue skies which adds contrast and emphases white clouds (which makes them quite effective at making skies look more dramatic).
Cutting the polarised reflections off the water’s surface makes it look more translucent, excellent for photos of tropical beaches with vividly blue clear water lapping over the white sand.
Polarisers are almost always round screw in filters because they need to be rotated to get the best effect. Looking through the camera you turn the filter until you can see the image change. You don’t need to always use the maximum effect either – at high altitudes the sky is already a very strong blue and polarising it further can be a case of ‘over-egging the pudding’.
Because polarisers work to physically reduce reflected light there is no post-processing ‘analogy’ like there is for colour corrections or graduated filters. You cannot, for example, replicate in Photoshop the effect of removing the shine from leaves in a rainforest and thus adding to the sense of lushness. It’s for this reason that I always carry a polariser – sometimes it’s just the right tool for the job and nothing else will do.

Protective filters
Putting a sheet of glass between your expensive camera lens and the harsh elements of the real world can be an excellent idea. Far better to wipe spray or dust off a removable glass filter than to keep rubbing at the front element of your lens. Many people use a basic Ultra Violet (UV) reducing filter and have one for each lens. The UV cutting characteristics of such filters is pretty much irrelevant for digital capture since modern sensors are not very sensitive to UV light – the haze-cutting benefits of a good UV filter are largely restricted to film users.
Be aware that saving money here can be a false economy – match the filter quality to the lens quality as much as possible.
One word of caution, if you like to shoot images at night, particularly lit-up cityscapes, beware of leaving filters on the lens unnecessarily. It’s not uncommon to see a double image of bright lights against a dark background, caused by internal reflections within the filter itself. The better the filter quality the less apparent this will be but it’s still a potential problem.
I tend to only use protection filters when I know there is a danger of lens damage such as on a windy day on the beach with sand and salt spay in the air.
Using filters
Filters generally fit onto the front of the lens either as a round screw-in type (which needs to match the size of your lens) or bigger square filters which fit into a filter holder which can be adapted to any lens size.
The benefits of the latter system are obvious – you only need one filter to fit on any lens but one drawback is that it takes time to fit the filter holder system to the lens and it’s something else to carry. Examples of filter systems of this type are the consumer grade Cokin range and the more ‘pro’ grade (and expensive) Lee and Nisi systems.
Screw-in filters on the other hand are quick to use and take up less space but they need to fit the lens you are using. One way around this is to use ‘stepping rings’ to adapt a big filter down to a small lens. You buy a filter for the biggest lens you own, and then a set of stepping rings to fit that filter to all your other lenses – this is the approach I take personally – I buy 82mm filters and use a variety of stepping rings from 39mm up to 77mm.
Filters are still an essential part of your camera kit. My recommendation would to be to buy one good quality UV filter for each lens you own to act as a barrier against damage and dirt, a top quality circular polariser to add punch to blue water, blue skies and forest scenes and, optionally, a 10-stop (ND800) filter for long exposures.
Linear vs circular polarisers – what’s the difference?
A linear polariser passes through light that is polarised in a particular orientation. Camera autofocus and metering systems can mis-read polarised light causing incorrect exposures or focus – this depends on your camera brand and design.
A circular polarising filter is much the same thing but has what’s known as a ‘quarter-wave plate’ glued to the back which, to put it simply, ‘unpolarises’ the light again. It still reduces the intensity of polarised light entering the filter and is used in exactly the same way, but will not effect the autofocus (AF) or metering of your camera. If in doubt – buy a circular polariser.