


In the first of a new three-part series, professional wildlife photographer and tour leader Michael Snedic, shares his best tips for shooting stunning wildlife images.
Wildlife photography is as challenging as it can be rewarding. While wild animals are naturally interesting photographic subjects, they are also cunningly elusive and difficult to photograph!
For most wildlife photographers, the road to success follows thousands of hours of practise. That said, there are a few things you can do to accelerate your development. In this series, I'll take a look at some of the things I've learned over the years that can help you quickly improve your wildlife results; from learning to anticipate the behaviour of the animal you're shooting, to making sure your camera is setup to deliver sharp, well exposed images.
See part two of 'How to shoot stunning wildlife shots'.
See part three of 'How to shoot stunning wildlife shots'.
01 WATCH AND OBSERVE
Even before you pick up a camera, take the time to sit and watch the animal you want to photograph. Getting to know your subject gives you a much higher chance of 'nabbing' the shot. In a lot of cases you will see a pattern emerge. It could be a specific movement the animal makes just before jumping away or flying off. Or it could be the fact that each day, at a particular time, the subject (or subjects), turn up briefly at one spot to feed, preen or perform a courtship display. If you know the animal's habits, you'll have a better chance of being there, with a camera to your eye, when the best moments happen!
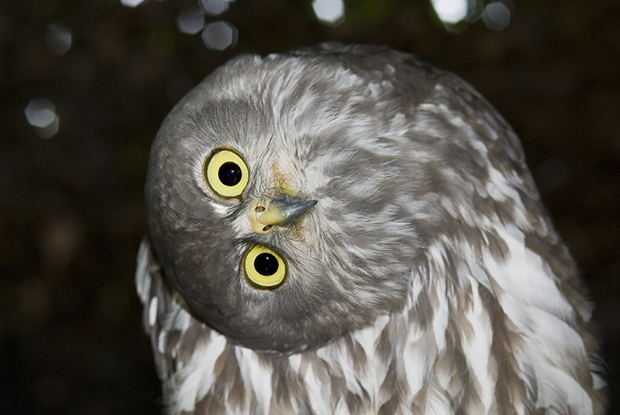
It's not often that an unusual behaviour occurs with a sitting bird of prey. From time to time, this Barking Owl turned its head completely to one side. As Snedic had seen this behaviour happen a number of times before, he anticipated it happening again and was ready with to take the shot when it did! Nikon D200, 105mm lens @ 105mm, 1/60s @ f/6.3, ISO 100, hand-held. Diffused flash on hot-shoe.
02 USE APERTURE PRIORITY
I strongly recommend aperture priority for wildlife photography. That way you are in control of aperture and depth-of-field while the camera takes care of shutter speed.
Keep in mind that if you want to photograph a moving animal, you'll need a faster shutter speed. In aperture priority, this can be done by increasing the ISO, which in turn increases the shutter speed.
Another option is to use aperture priority with 'Auto ISO' so you have one less thing to think about. In the Auto ISO settings some cameras will allow you to specify a minimum shutter speed, say 1/2000s, and a maximum ISO, say ISO 6400. That way, the shutter speed will not drop below your specified minimum, and you can stop the camera from selecting an ISO that introduces an unacceptable amount of noise.
Yet another option is to set your camera to manual, choose the aperture and shutter speed you require and select the auto ISO option. By doing this, you are in control of both the depth-of-field you require and the minimum shutter speed, while letting the ISO change accordingly.
When these three baby cheetahs sat on a mound, all in a row, it made for a perfect composition. Since they were parallel, Snedic was able to get them all in focus using a wide aperture, while still blurring out the background. Nikon D800, 70-200mm lens @ 200mm, 1/2500s @ f/4, ISO 250, hand-held.
03 IT'S ALL ABOUT THE EYES
When I started out in wildlife photography some 20 or so years ago, one of the first things I learned was to focus on the eyes. If the eyes are out of focus the image is ruined. One of the things you cn do to help get the eyes in focus is to choose the single focus point and move it around until it is on the animal’s eye. Another option, when using the camera's single focus point, is to focus on the eye using the central focus point. Then, half-depress the shutter button, and while keeping your finger on the button move the camera to recompose as required.
Snedic was fortunate to have this Greater Glider look directly at the camera, enabling him to focus on its eyes. This is a very important part of photographing wildlife. Nikon D700, 80-200mm lens @ 200mm, 1/145s @ f/3.2, ISO 1600, hand-held.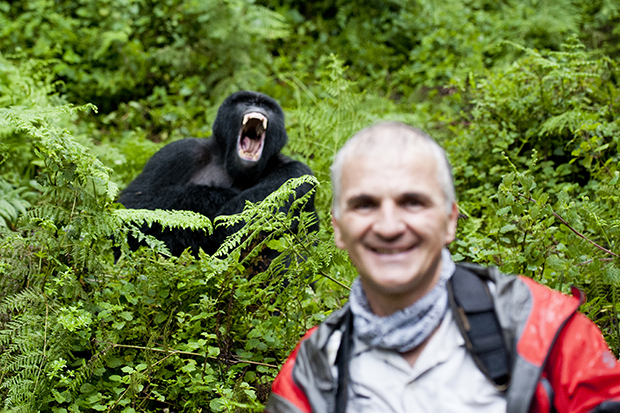
Gorilla photobomb! Author Michael Snedic's guide was about to take a shot of him in front of a resting Mountain Gorilla, when it decided to 'photo bomb' the shot with this great expression!! A classic moment. Nikon D700, 80-200mm lens @ 70mm, 1/500s @ f/4, ISO 3200, hand-held.
See part two of 'How to shoot stunning wildlife shots'.
See Part three of 'How to shoot stunning wildlife shots'.
Michael Snedic is a professional wildlife/nature photographer and professional photographic tutor. He is owner of WildNature Photo Expeditions, specialising in quality photography workshops and tours across Australia and overseas. His aim is to show participants the most amazing subjects and locations, while at the same time teaching the best techniques for photographing them.