How does depth of field work and how can you use it to take better photos? Peter Burian shares some useful tips.
People starting out in photography generally find depth of field (DoF) to be one of the most difficult concepts to master. While some of the ideas may be a little abstract, when you get the hang of it you will discover a new world of creative options.
In simple terms, depth-of-field refers to how much of a picture appears in focus. As a photographer you have the power to make a scene appear sharp from front to back, or have one obvious point of focus, say the eyes in a portrait, while the rest of the image appears soft and blurry.
Photographers use depth of field as a way to emphasise certain details, hide distractions and control the way people view and respond to their pictures.
The basics When you focus on a subject, you will generally find that there is a ‘zone of acceptable sharpness’ that takes in the subject itself and an area behind and in front of the subject.
While only the focused plane in any photo is truly sharp, objects in front of and behind that plane will appear ‘acceptably sharp’ to the viewer’s eye. Naturally objects in the extreme foreground and the distant background will appear less sharp.
For a portrait, you might want the subject to be framed against a soft wash of blurred colours, while for a landscape you may prefer that all elements be reasonably sharp or distinct.
Photographers use depth of field as a way to emphasise certain details, hide distractions and control the way people view and respond to their pictures. In these pictures (above and below) the photographer has moved the focal plane to change the emphasis of the story.
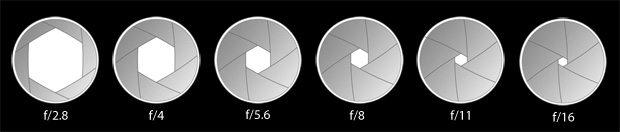
The “right” aperture Depth of field can be controlled by changing the camera's aperture setting. For a very small (shallow) range of sharp focus, set a wide aperture (or small f/number) such as f/2.8 or f/4. Conversely, for a large (deep) range of sharp focus set a small aperture (a large f/number), perhaps f/16 or f/22.
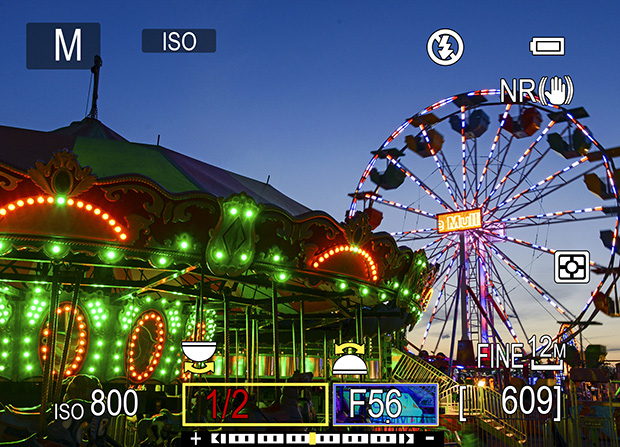
The easiest way to control aperture on most cameras is to set the exposure mode to Aperture Priority. Using this setting, you choose the aperture while the camera chooses the best shutter speed to balance the exposure.
Keep in mind that if the camera chooses a slow shutter speed you will need to put the camera on a tripod (to prevent camera shake) or increase the ISO to allow a faster shutter speed.
(It's also worth remembering that apart from depth of field considerations, most lenses produce their best optical performance at f/8, f/11 or f/16.)
Aperture settings from f/2.8 to f/16.
Depth of field preview Many digital SLRs are equipped with a depth-of-field preview button, usually on the front of the camera near the lens. This control stops the lens diaphragm down to the actual “working” aperture selected. The preview is necessary for visually estimating depth of field, because without using this DoF (stop-down) button, you always view the scene at maximum aperture. (If your camera isn’t equipped with DoF preview, take the same photo at several apertures; examine them on the LCD screen and decide which aperture setting provides your intended background sharpness or blurring.)
Focus on a nearby subject and press the DoF preview button while viewing the scene at f/4, at f/11 and then at f/22. Watch the image through the viewfinder to determine how blurred or sharp the background is at each aperture. Keep in mind that when you use the DoF preview button at small apertures, the focusing screen will darken, becoming almost black by f/22. That’s normal. Previewing the DoF shouldn’t be a problem in bright light, and even in low light your eye should soon adjust to the dimmer view. If you prefer to compose images on the LCD screen using Live View, and if your camera provides DoF preview on the LCD, try this. In a dark location, set the screen brightness (a menu item) to a high level in low light. This will provide a brighter display, which is useful for critical viewing of background sharpness.
The “right” depth of field depends on the photographer’s intentions. In some situations it’s best to make an image with shallow DoF, blurring a cluttered background that would interfere with a viewer’s appreciation of the subject. Move close to the subject and/or use a telephoto focal length and a wide aperture (or small f/number) to achieve such effects.
What effect do different lenses have? Anyone who has used a number of different lenses will probably have noticed that wide-angle lenses seem to produce very sharp images from front to back while telephoto lenses will often put the subject in sharp relief but not much else. In fact, depth of field does not change with different focal lengths – it’s an optical illusion. The range of acceptable sharpness actually depends on magnification: the size of the subject in the frame. With a wide-angle lens, we usually include a very broad scene in an image. Because any specific element is not magnified very much, the depth of field will be great, rendering an extensive range of acceptably sharp focus even at a wide aperture. With a telephoto lens however, we tend to fill the frame with a single subject (using high magnification), so the background is more likely to be blurred even at a small aperture.
When the subject is highly magnified, as in macro (close focus) photography, depth of field is very shallow even at f/22. Keep these concepts in mind when deciding which focal length and focus distance to use for a certain type of scene.
Hint: When shooting extreme close-ups (as in macro nature photography) depth of field will likely be less than a centimetre. Position the camera so the back (sensor plane) is parallel to the subject plane – perhaps the wings of a butterfly. If you compose the scene with this in mind, you won’t have to stop down to a minuscule aperture such as f/32 to keep the important subject areas acceptably sharp. As a bonus, if you can shoot at f/11 or f/16 instead of f/32 the lens will provide higher resolution, as most lenses deliver the sharpest results at intermediate f/stops.
Focus at optimal distance At common shooting distances (not extreme close-ups) DoF extends about one third in front of the subject you are focussing on, and about two thirds behind it. If you’re looking for acceptable sharpness from the foreground to the background in landscapes or city scapes, then set focus manually at a point roughly one-third of the way up from the bottom of the frame when you photograph a vast scene. That’s only a rough rule of thumb, of course. If you’re more demanding and want to know the exact focused distance which will provide maximum depth of field at any aperture, you will want to know the “hyperfocal” distance. Calculate the hyperfocal distance and focus manually at exactly that point and you’ll get maximum depth of field. But how can you determine the focused distance you should use? That’s a bit complicated since it depends on the aperture (f/stop) selected and the focal length of the lens.
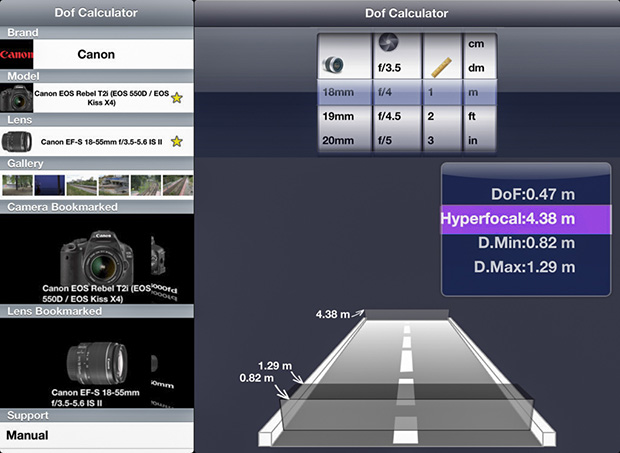
You can find charts listing the hyperfocal distance with a Google search. If you own a smartphone, you can acquire a suitable app such as DOFMaster or DOF Calculator from the app store. Use the app by entering data about the lens focal length and aperture you want to use as well as the distance to the most important subject. The app will then provide the hyperfocal distance. Focus at that distance for the maximum range of acceptable sharpness.
Many cameras feature a "depth of field preview button" that stops the lens aperture down so you can see which areas of the image will be in the 'zone of acceptable sharpness'.
The bottom line When combining all of the practical information about depth of field, you can decide how to achieve the desired effect in any specific situation. For a lion in a zoo setting, you might want to blur extraneous elements in the background, which would compete for the attention of a viewer. In a classic landscape scene, you might want to maintain sharpness in a fence in the foreground, horses at a mid-range distance, and snow-covered hills far off in the background. Experiment, make notes and review the photos in the field to confirm you’re on the right track. If the concept of creatively controlling depth of field appeals to you, there are many books which can provide more specifics about the advanced technical issues. You can become intimately familiar with ‘circles of confusion’, the differences in perspective at various camera-to-subject distances, and the other more complex concepts. But the extra effort will pay off because depth-of-field control is one important aspect which separates the serious photographer from the snapshooter.
Smartphone apps like DOFMaster and DOF Calculator allow you to work out precise hyperfocal distances.