


Resizing an image is about finding the perfect balance between file size and image quality. If you are planning to enter australianphotography.com's Photographer of the Year competition, or the monthly photo comp, an important first step is to make sure your images are not too big or too small.
So what is the ideal image size for our competitions? For optimal image quality and upload speed, we recommend you resize your images to 1000 pixels on the longest edge. In other words, 1000 pixels wide for a horizontal image or 1000 pixels tall for a vertical image. At that size your images will look great and won't take too long to upload to the site.
If you’re not sure how to resize an image, the following tutorial explains how to do it in Photoshop Lightroom, Photoshop CC, Photoshop Elements and Apple Preview. Other imaging software programs offer similar options for resizing.
HOW TO RESIZE AN IMAGE IN LIGHTROOM
01 CLICK EXPORT
Open Lightroom and, in the Library module, locate the image you want to resize. Click the Export button.
02 CHOOSE LOCATION
In the 'Export Location' panel, choose where you want to export the file to. I used the Specific folder option and created a new folder called 'Comp Entry' on the Desktop.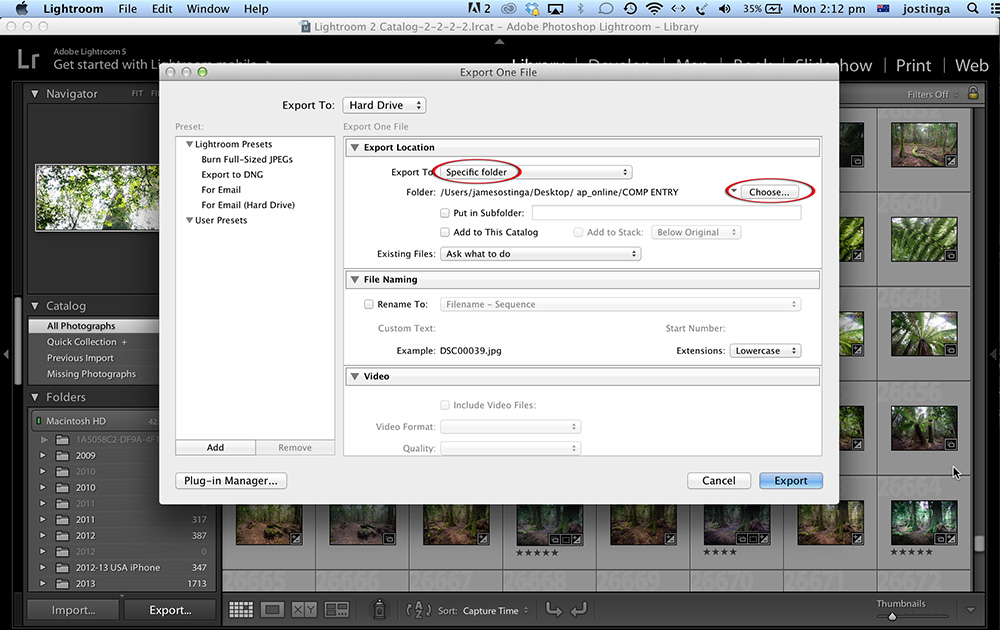
03 CHOOSE FILE NAME
In the 'File Naming' panel choose a new name for your image. Lightroom lets you automate naming conventions so you can export a batch of images with a sequence of related names.
04 FILE SETTINGS
Scroll down to the File Settings panel and choose: Image Format JPEG; Quality 80; and Color Space sRGB. (Make sure the 'Limit File Size To' checkbox is not ticked. 
05 SIZE OPTIONS
In the 'Image Sizing' panel choose 'Resize to Fit: Long Edge' and select 1000 pixels. Also, make sure 'Don't Enlarge' is ticked. With these settings, Lightroom will reduce the size of the new file to 1000 pixels on the longer edge. By choosing 'Don't Enlarge' you are telling Lightroom not to 'upsize' the image if it is smaller than 1000 pixels on the longest edge. We do that because upsizing almost always produces a drop in image quality. If your original image is 800 pixels on the longer edge, you'd be better off entering it at that size rather than upsizing it to 1000 pixels.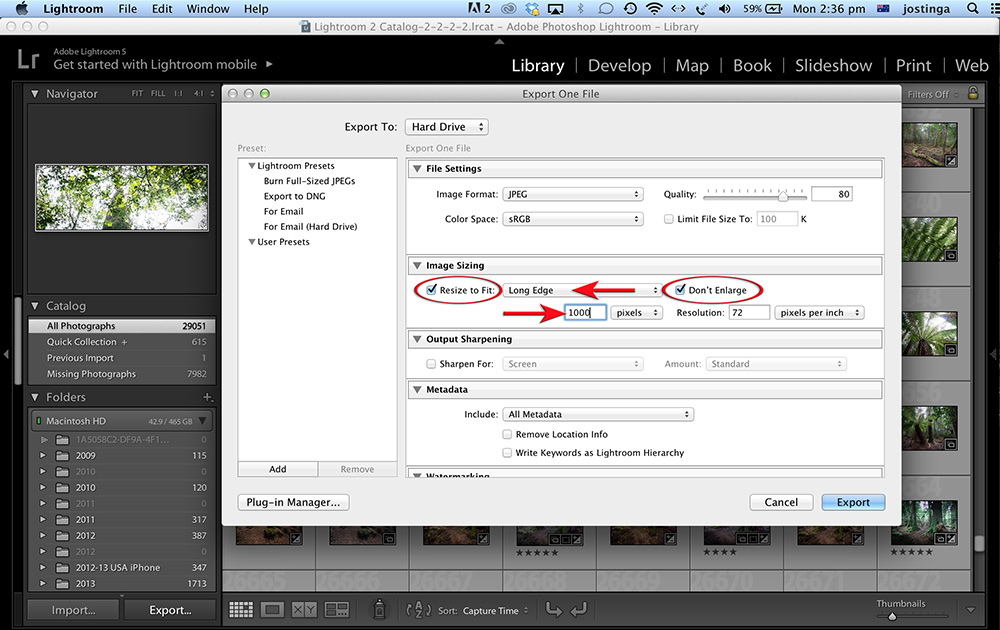
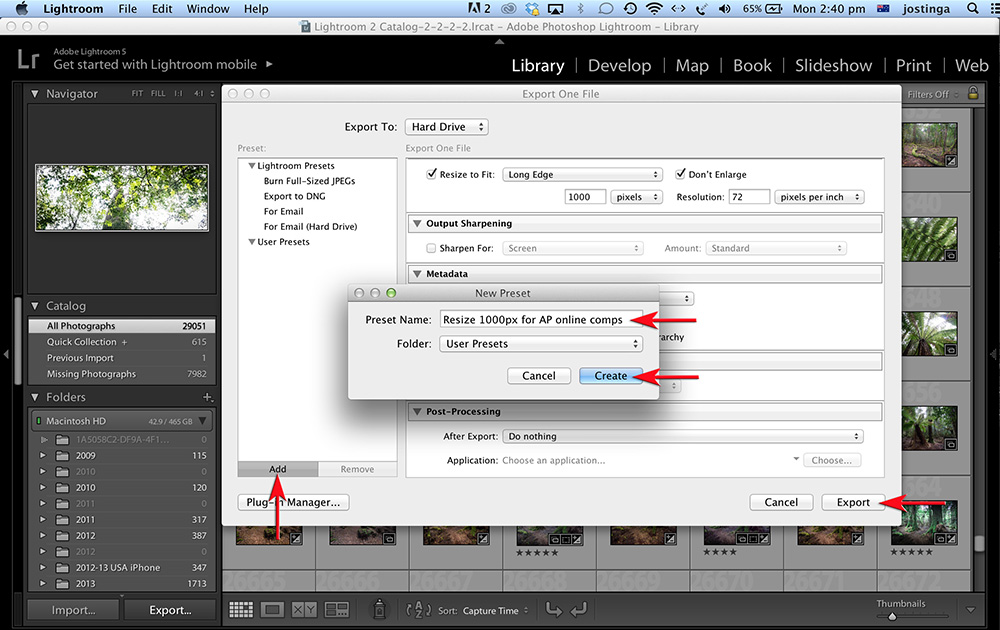
06 CREATE PRESET
To save time next time you go to resize an image for the competition, click the 'Add' button in the Presets panel. This will store the settings you've just created in a new preset, so you can resize future images with one mouse click.
To finish, click the 'Export' button.
HOW TO RESIZE AN IMAGE IN PHOTOSHOP CC
01 SAVE AS
Open the image you want to resize and go to File > Save As to generate a new file and ensure you preserve the full-size original version. In the Save As dialogue box, change the name of the file to something that indicates that this is a smaller version of the file, for example “Filename_1000px_wide” or “Filename_small”. Make sure the JPEG file format is selected.
02 JPEG OPTIONS
At this point, Photoshop will bring up the JPEG Options dialogue box. Choose a
Quality setting of 9 or 10 and click OK.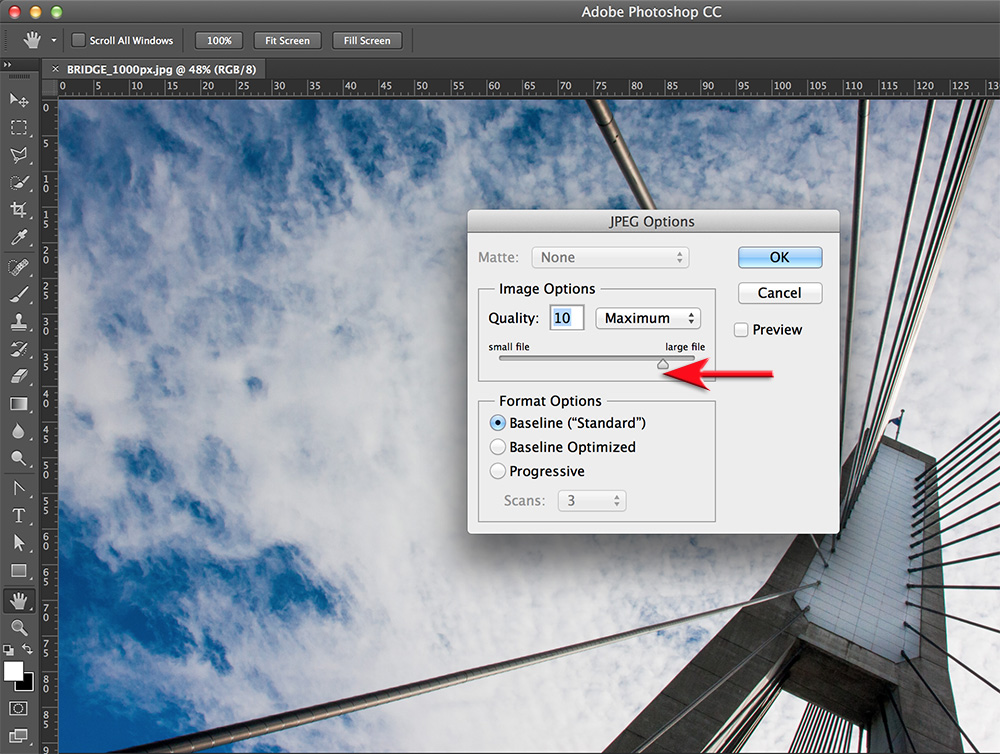
03 RESAMPLE IMAGE
Now let’s resize the image. In the main menu go to Image > Image Size. This opens the Image Size dialogue box.
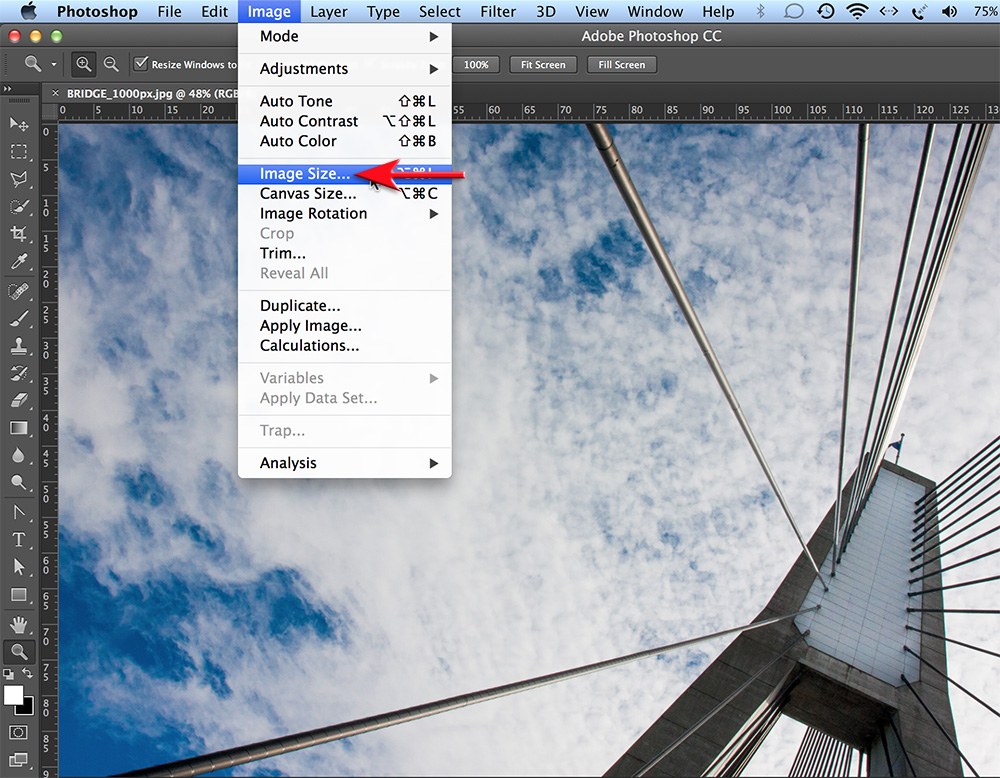
04 RESAMPLE IMAGE, CONSTRAIN PROPORTIONS
Before we change the size of the file, first make sure Resample is ticked, and Automatic is selected. By default, the proportions of the image will be maintained as you change width and height but you can toggle this feature on and off by clicking the 'link' icon between the width and height values. (If you are using an older version of Photoshop make sure the Resample Image, Constrain Proportions and Scale Styles checkboxes are all ticked. Below the check boxes, choose the Bicubic Automatic option.)

05 NEW SIZE
If you are working on a horizontal or square image change the Width to 1000 pixels. If you are working with a vertical image, change the Height to 1000 pixels. (Note that the other dimension automatically changes to retain the proportions of the image.) Click OK.

06 SAVE AND CLOSE
In the main menu go to File > Save, then File > Close. Your image is now ready to be uploaded to the competitions page.
HOW TO RESIZE AN IMAGE IN ADOBE PHOTOSHOP ELEMENTS
01 SAVE AS
Open the image you want to resize and go to File > Save As. This step will generate a new file,
ensuring you preserve the full-size original version.
02 RENAME
In the Save As dialogue box, change the name of the file to something that indicates that this is a
smaller version of the file, for example “Filename_1000px_wide” or “Filename_small”.
03 JPEG OPTIONS
At this point, most programs give you the option to select an image format. Select JPEG from the
drop-down list and click Save or OK. This will bring up the JPEG Options dialogue box. Choose a
Quality setting of 9 or 10 and click OK.
04 RESAMPLE IMAGE
Now let’s resize the image. In the main menu go to Image > Resize > Image Size. This opens the
Image Size dialogue box.
05 RESAMPLE IMAGE, CONSTRAIN PROPORTIONS
Before we change the size of the file, first make sure the Resample Image, Constrain Proportions
and Scale Styles checkboxes are all ticked. Below the check boxes, choose the Bicubic Sharper
(best for reduction) option.
06 NEW SIZE
If you are working on a horizontal image change the Width (in the Pixel Dimensions box) to 1000
pixels. If you are working with a vertical image, change the height to 1000 pixels. (Note that the
other dimension automatically changes to retain the proportions of the image.) Click OK.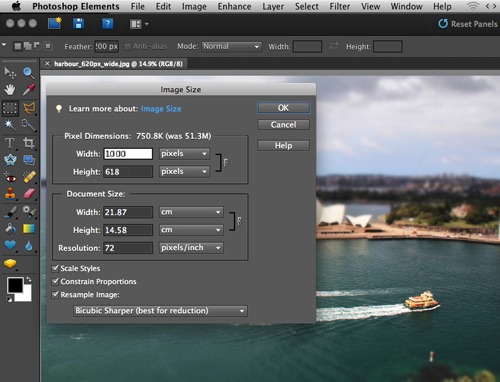
07 SAVE AND CLOSE
In the main menu go to File > Save, then File > Close. Your image is now ready to be uploaded to
the competitions page. 