Modern retouching workflows often require you to switch between several programs to make the most of different editing features. In this tutorial, Mark Galer shows you how to switch between Lightroom and Photoshop in order to take control of colour and tone. Download the start image and follow the steps.
Software: Lightroom 5 and Adobe Photoshop CC
Rating: Advanced

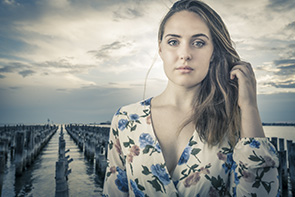
The original image (left) and after processing.
The start image for this project was shot late one afternoon at Princes Pier in Port Melbourne with a Sony A6000 and an off-camera flash fired through a white umbrella. The image was underexposed by 1.3 stops, but the final image has failed to capture the ideal tonal balance between the model and the background. That’s okay because the tonal information in the Raw file sits comfortably between the goal posts of absolute black and white, so there’s plenty of room to redistribute the highlight and shadow information in Lightroom before we move the file into Photoshop CC to complete the retouching and grading process.
Note: This workflow requires you use the same version of Camera Raw in Photoshop CC and Lightroom 5. Unfortunately, because we’ve used Radial Filters in Lightroom, and Camera Raw as a Smart Filter in Photoshop CC, you can’t complete this tutorial using Photoshop CS6 and Lightroom 4.
01 DOWNLOAD START IMAGE
Before we get started, download the free project image here. (Note: Some internet browsers are better at downloading raw files than others. If you are having trouble downloading the file, right-click the link (Ctrl-click if you're on a Mac) and choose the 'Download Linked File..., Download Linked File As... or 'Save Link As...' option.
Take note of where the image is saved on your desktop. In Lightroom, make sure you’re in the Library module and, in the main menu, choose File > Import Photos and Video... Find the image you downloaded, make sure the box next to the image is ticked and choose Import.
02 DEVELOP
Click the Develop tab or press D on your keyboard to enter Lightroom’s editing module. As Lightroom is a ‘non-linear’ editing program it doesn’t really matter where you start. I usually start with what annoys me the most and finish with what annoys me the least. First, reduce the Temp slider to 5650°K. Now, move the Exposure slider up to a setting closer to +1.
03 CROP
Click the Crop Overlay icon (it’s just below the histogram) and click and drag just outside any the corner handles to rotate the image so the horizon is level. Press the Enter/Return key on your keyboard to apply the crop.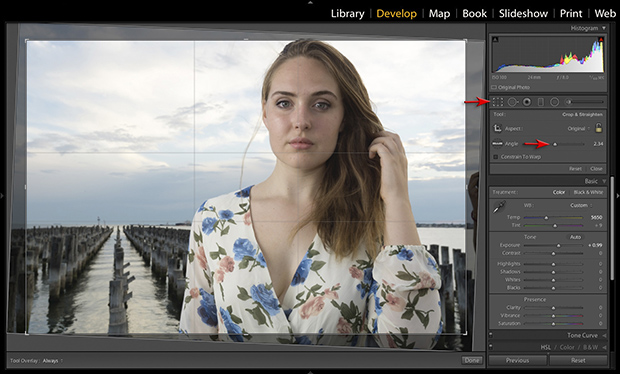
04 FIRST RADIAL FILTER
The next step is to even up the lighting of the model and the background. Click the Radial Filter icon (below the histogram) then double-click the word Effect to zero the sliders. Reduce the Exposure slider to -1EV, raise the Saturation slider to +40 and lower the Sharpness slider to -100. Make sure the box Invert Mask is is not ticked. Now click and drag a Radial Filter from the model’s chin down towards her elbow. You can see the background now looks more dramatic and is not as sharp as it was before.
05 SECOND RADIAL FILTER
Click the word New to generate a new Radial Filter and double-click Effect to reset the sliders. Change the Exposure to +0.5 and the Shadows to +20. This time, check Invert Mask to ensure the effect is applied inside the ellipse. Click and drag the second Radial Filter from the bridge of the model’s nose down and out, so the ellipse covers her head. You’ll notice that the top of her forehead is still a little dark – don’t worry, we’ll fix it in the next step.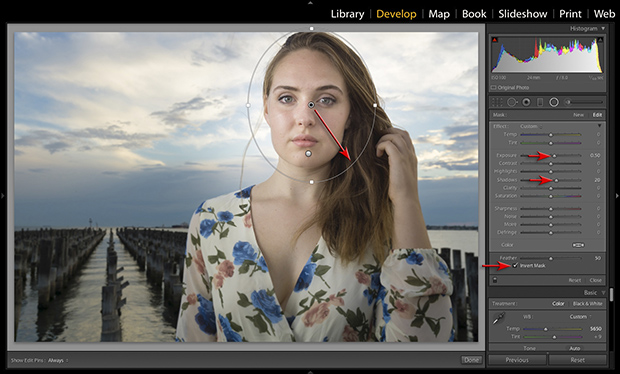
06 ADJUSTMENT BRUSH
Select the Adjustment Brush icon below the histogram. Move the Exposure slider to +0.5 and make sure the Feather, Flow and Density sliders are set to 100. Paint over the top of the model’s forehead. The transition should be nice and gradual with the Feather set to 100. If you want to see the mask area, tick the box Show Selected Mask Overlay (it’s below the main image window). If you want to erase anything you’ve just done, hold down the Alt/Option and paint over the area. Alternatively, if you reduce the Density slider to +50 and paint over the mask it will soften the effect of the adjustment.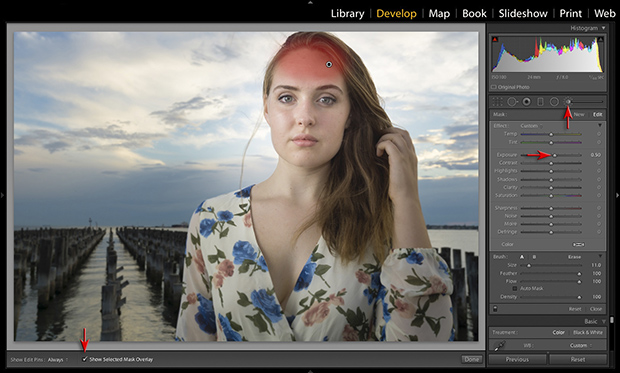
07 VIGNETTE
We can keep viewers’ eyes locked on the centre of the image by darkening the edges of the image slightly. Scroll down to the Effects panel and choose Color Priority in the drop-down menu. Now, reduce the Amount to -25. Note: The Color Priority slider is less likely to clip shadow tones in the corners of the image compared to the Highlight Priority style.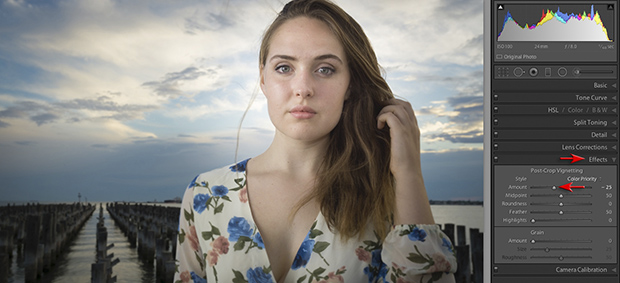
08 SHADOWS AND HIGHLIGHTS
Before we take the image into Photoshop, let’s check the Whites and Blacks on the histogram. First, click the two clipping warning triangles above the histogram – with these selected, you will be able to see if you are losing detail in the highlights or shadows. Raise the Whites slider to +35 and and the Blacks slider to +20.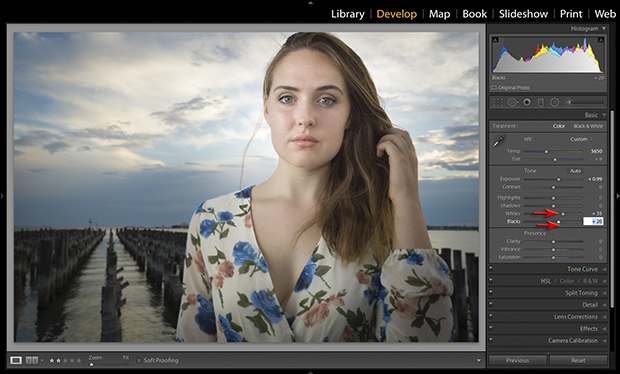
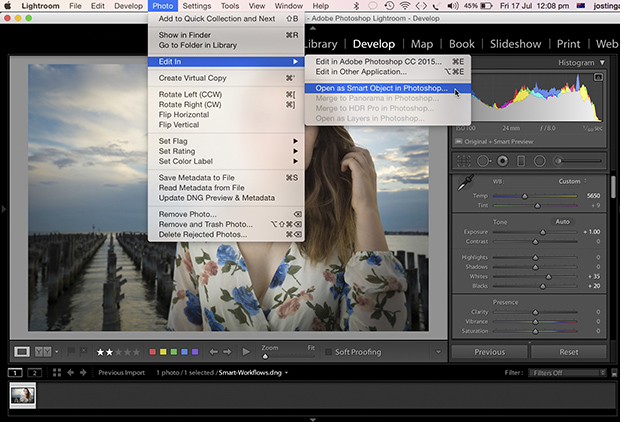
09 OPEN IN PHOTOSHOP CC
For the next stage of the editing process we need to take the image into Photoshop CC. Before we do, in the main menu, go to Lightroom > Preferences and choose the External Editing tab. Because Lightroom has done most of the heavy lifting in the tonal adjustments department, it’s overkill to export the file in 16-bit format and with the oversized ProPhoto colour space. Chose TIFF, Adobe RGB (1998) and 8 bits/component and tick the Stack with Original option to catalog the file with the original Raw file. Close the Preferences window and in the main menu go to Photo > Edit in... > Open as Smart Object in Photoshop. (The Smart Object option allows us to keep our editing options open in Photoshop CC as we will be able to return to the file’s raw adjustments at any time.)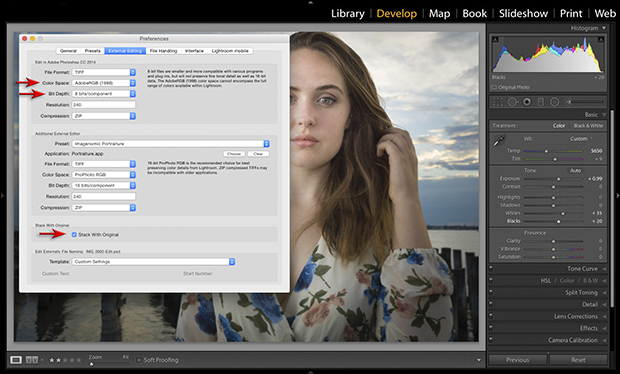
10 SMOOTH SKIN
At this point I’ve used a technique called ‘Frequency Separation’ to smooth the model’s skin. It’s a great technique but it’s a subject worthy of a tutorial in its own right so I’ll leave it for a another issue to cover in detail. In the meantime, if you do want to have a go at it, there’s a good explanation on YouTube at https://youtu.be/ldhG9fmgC7o. Otherwise, skip to the next step without worrying about retouching the model’s skin.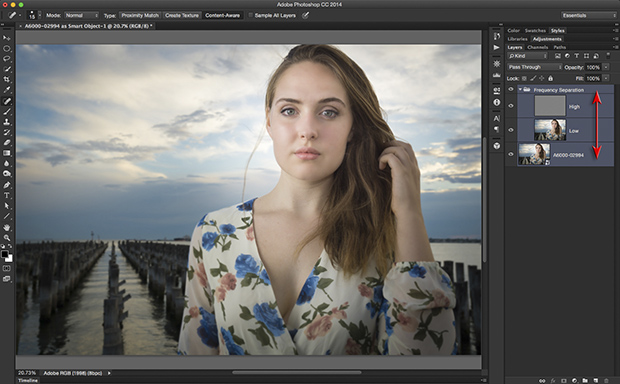
11 CAMERA RAW FILTER
If you have completed the Frequency Separation process from step 10, select all the layers in the stack (shift click to select multiple layers) and in the main menu go to Filter > Convert for Smart Filters. Now choose Filter > Camera Raw Filter. If you didn’t do step 10 and you just have the one layer in the Layers panel, just select Filter > Camera Raw Filter. The advantage of using the Adobe Camera Raw filter as opposed to double-clicking the Smart Object to open the Raw file, is that all the settings are zeroed.

12 COLOUR AND TONE
Rather than optimising the tonal and colour values of the image I’m more interested in creating a stylised, illustrative version of the image. In the Basic panel dragging the Highlights slider all the way to the left and the Shadows slider all the way to the right. Now, up the Contrast to +50 and the Exposure to +0.50. Reduce the colour palette by dragging the Vibrance slider to -60 and the Saturation slider to +20. This has created a rather distinctive colour and tone. We can take it a step further using the Split Toning panel.
13 SPLIT TONING
Click the Split Toning icon (below the histogram) to bring up the Split Toning panel. Change the Highlights to a hue of 50° with a Saturation of +30 and the Shadows to a hue of 220° with a Saturation of +40. Move the Balance slider to +10 to move the emphasis towards the warmer colours.
14 VIGNETTE
Click the Effects icon (below the histogram) to bring up the Effects panel. Under the Post Crop Vignetting header choose an Amount of -15 and select Color Priority. This step will render the peripheral parts of the image darker so they will take on more of the Teale colouring.
15 WHITES AND BLACKS
Let’s go back to the Basic panel and check the Whites and Blacks. The point of this step is to make sure the aggressive toning adjustments we’ve made have not caused too many problems. You can extend the tonal range of this image slightly by lowering the Blacks slider to -20. Click the OK button to apply the changes and return to Photoshop.
16 SAVE AND CLOSE
To return the processed file to Lightroom go to File > Save in the main menu and close the file. By default, the location for saving the file is the folder where the original Raw file is located. Lightroom monitors this folder (as we asked Lightroom to open one of its catalogued files) and will automatically import and stack this file with the original (as per our Preference setting in step 09).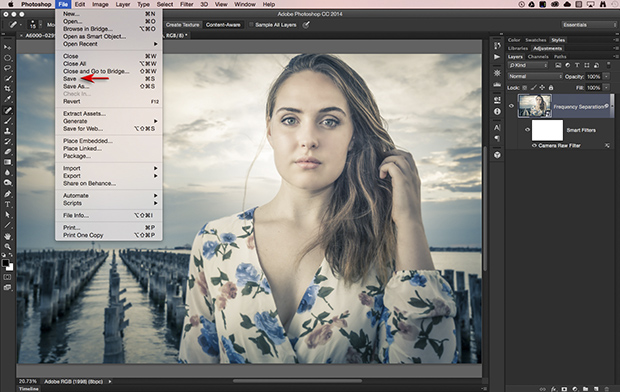
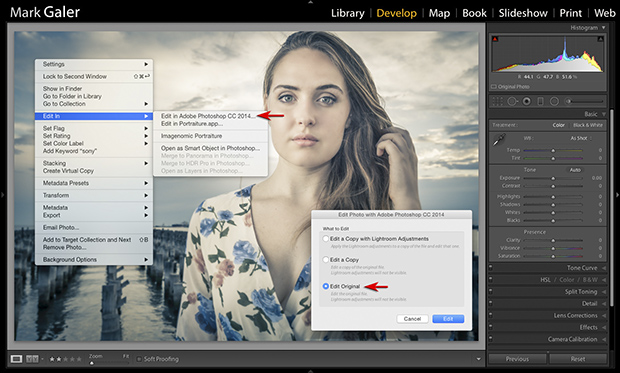
17 BACK TO PHOTOSHOP CC
If you are in Lightroom and you want to reopen this file in Photoshop CC (with access to the Smart Filters and embedded Raw file), you need to select the Edit in Photoshop option (Ctrl-E Windows, Command-E Mac) then choose Edit Original from the Edit Photo dialog box. Any changes made to this file will be updated in Lightroom as soon as you save and return.