


The search for the perfect perspective is the great dance of photography writes Anthony McKee. He explains the finer points and shows you how to gauge the strength of a scene from different angles.
I have always considered photography to be a dance. Seriously! Whenever I pick up the camera and approach a subject I know there is usually just one viewpoint from where the subject, the background and other significant elements in the environment come together to create the perfect photo. Finding that perspective involves walking around the subject, moving forward and back, and gauging the strength of the scene from different angles. When I find that place, making the photo usually becomes the easy part of the process.
Of course the tempo of the dance is determined by the subject. If I’m stuck in a studio or wandering a landscape at noon there’s usually no rush to find the right viewpoint. But if I’m photographing a wedding or portrait, or even a dynamic commercial or editorial situation, then things move a bit faster. Often as I move the subjects and myself around in search of the best perspective, I joke that we are doing the photographer’s waltz, but I also know that the right perspective is critical to a good photograph.
Some of you might be thinking that the search for perspective is just an occasional trick that professional photographers use to improve an image, but the fact is, perspective is everything. Regardless of light and moment, if you’re in the wrong place for a photo, nothing else matters. And it’s a process that’s more complex than you might think. Putting aside light, which most experienced photographers know can be managed and manipulated in a variety of ways, finding the right perspective for a photograph can be a complex and engaging process.


We can get close enough to most subjects, man or mountain, to manage the perspective in the image. There are some exceptions though, like a full moon. In this scene the moon was just starting to rise as I was making a photo of this Alberrie Creek artwork on the Oodnadatta Track, SA. The first photo (left) was made with a 30mm equivalent lens, but after I noticed the moon rising I realised there was a more interesting photo if I moved back about 100m and made the photo with a telephoto lens. This photo was made with an 80-200mm lens set to about 150mm. Ideally I would have liked to have used a longer lens so that I could have made the moon appear even larger in the image, but there was a problem with this plan. Because I was slow to realise the moon was rising, and not fast at running 100 or so metres across stony terrain, the moon was too high in the sky to include both it and the aircraft. This is where good planning comes into play! Given another chance I would have the line and the length of the shot planned out before moonrise so as to be ready for the photograph.
Unlimited options
To appreciate just how many options there are in any shooting situation, imagine a checker board, the 8 x 8 board you play checkers or chess on. Imagine that this is a big checker board with each square being one metre wide. Now, for argument’s sake, put this checkerboard on a location like Bondi Beach, that iconic strip of sand on Sydney’s coast. Imagine a portrait subject is standing in the centre of this board, and as you walk around all 64 squares on the board, the subject keeps turning to face you. Start by imagining you’re walking around the four most central squares. As you move from one square to another you are literally walking 360-degrees around your subject. At just one metre from the subject you can make the portrait with a wide-angle lens and at the same time encompass a lot of the background. From one square you will have the sea in the background, in another you will be looking along the beach towards other bathers. From the third square you’re looking up towards the apartments and one end of the beach, and in the last square you will be looking in the direction of cliffs at the other end. In all of these shots the wide-angle lens is going to make the background appear rather distant and the subject will appear rather close, although this is not a big concern, particularly if you’re taking a story-telling approach to the image.
Having walked around the subject on those four most central squares, now step one metre back onto the next ring of squares. You now have 12 squares in this ring that you can walk around, and each square will again give you a different perspective. You have now doubled your distance away from the subject, and you have a choice; you can continue to use the wide-angle lens, although the subject will be half its original size in your frame while the background will actually maintain the same appearance. As an option, you can double the focal length of the lens (perhaps to a “normal” lens) and make your subject appear about the same size in the frame as they did in your original photos. Of course, in doing this you will include less of the background, although it will now appear closer. The important thing to consider for now is that you are still near the middle of the checkerboard, and yet you have already explored 28 different perspective options for this photograph, including 16 options with the wide-angle lens, and 12 with the normal lens.
If you step back another metre there is a ring of 20 squares and if we step back another metre again (to the edge of the board) there are 28 squares around the perimeter. From these 48 squares you could make photos using the wide-angle lens, a normal lens or a short telephoto lens. That gives you 144 perspective options and if you add that to those 28 options from near the middle of this playing board, that’s 172 options that we have from an eight-by-eight metre square!
But wait, there’s more! One variable we have not considered is the height of the camera. At every position on the checker board you can choose to have the camera low, at eye-level or high (standing on a small step ladder). Add that to the mix and there are 516 perspective options, all from this one situation.


An understanding of perspective can be useful, particularly when you want to try and convey a sense of scale to a scene. These two images of kayakers at the foot of the Serena Glacier in Patagonia were photographed from another kayak on the lagoon. In the photo on the right I used a 20mm wide-angle lens to capture as much of the scene as possible. Because I was just a few metres away from the other kayakers, and they were about 200 metres in front of the glacier, they appear moderately large in the picture while at the same time we can include a lot of the surrounding landscape. In the second photo I wanted to convey the difference in size between the ice face and our kayaks. To do this I used a 300mm telephoto lens from a distance of about 100 metres back from the glacier while our kayak guide paddled within 20 metres of the ice face.
Line and length
Perspective is more than just an exercise in aesthetics. For experienced reportage and documentary photographers, along with many clever advertising and illustrative photographers, finding the right perspective often has more to do with psychology and how an audience will interpret a photograph.
Let’s take a closer look at what is actually happening in the checkerboard exercise. For a start, as we walk around the subject we’re looking for a visual line which connects the subject with a relevant background. In the Bondi Beach example we had the choice of including the sea, the cliffs, other people on the beach or the apartments on the hill; as a photographer, you have to decide what background is most relevant to the story you want to tell. Remember, in some instances you might want to include more than just one element of the background, like the beach and the apartments.
Having found the line, the next step is to consider the length of the shot, as in the distances between your camera, your subject and the background. In many instances the length of a photograph can be paired with your choice of lens for the photograph, but don’t assume this is always the case; photographers who make this mistake are often the ones who become transfixed on a single element within the photograph, and fail to see other opportunities in the scene, or the bigger picture. A more important consideration is the apparent sizes of the various elements in the photograph, and how making one element larger or smaller than another within the frame might affect the significance of a photo.
With the Bondi Beach exercise we started off just one metre away from our subject and at that distance the subject dominated the scene. We then moved back to four metres away and this move made the subject appear around a quarter of the original size. At the same time, the background, which for argument’s sake might have been 100 metres away, hardly changed at all.
In just a few metres we made a noticeable change to the scale and relationship between our foreground subject and the background. Now, if we were to move back 100 metres, all of a sudden our subject is lost in the crowd and the buildings and structures that were 100 metres away are now 200 metres away. These buildings will now appear half the size they were a moment earlier. If we ask our subject to come and stand one metre in front of us again, we have made them dominant again, and yet we have made the background smaller. And if we ask our subject to move back another metre, they are in proportion again with the background as it was in our original photo. Moving our camera forwards or backwards along the line, and even moving the subject forward or backwards, changes the apparent size of elements and their significance within the photograph.
The choice of lens for the photograph does not actually control the relationships of size within a photograph; all a lens does is control the field-of-view. Of course, this is important too. If we use a wide-angle lens for the photograph we capture lots of the environment surrounding the subject; if we zoom in with a telephoto lens we are removing a lot of that background clutter and instead concentrating our attention on the key elements.
As you keep cropping in with a lens there is one really useful rule of thumb worth knowing: if you double the distance between you and a subject, you can actually double the focal length of the lens to keep the subject roughly the same size in your viewfinder. A subject photographed at one metre with a 24mm lens will occupy a similar area of the frame as the same subject shot at two metres with a 50mm lens, four metres with a 100mm lens, eight metres with a 200mm lens, 16 metres with a 400mm lens and so on.
This becomes useful when you’re trying to photograph a subject against a background that you are never going to get close to, like a full-moon rising at sunset. The only way to make the moon look large in a photograph is to put on a long lens, but if you want to include other elements in the photograph, you will need to move backwards to include them in the photo too. If you are photographing a model against a moonrise, chances are you might need to move back 20 metres or more to include them in the photo. If you want to make a city skyline look good against the moonrise, you will need to move back several kilometres. And this is where many experienced photographers understand the importance of planning the line and length of a photograph. When you’re working in kilometres, you want to be certain you have clear lines and achievable lengths for the photo, otherwise you could be scrambling to try and find the right location for a shot.
Working elevation
Having determined the line, the length and lens for the shot, one final element to think about is elevation. Most photographers usually make photos at eye level and often forget to get low or get high with the camera, and yet these options can dramatically change the context of a photograph. Getting low can do a variety of things, from bringing textures into the picture, to eliminating visual clutter from the foreground and background. Alternatively, getting the camera up higher, even if it is only by a metre or two can help add scale to a scene. Your decision to photograph a subject from a low level, eye level or a high level can also imply psychological or social attitudes towards that subject. Looking up at someone or something is to put them on a pedestal, to look down is to think less of them while to look at someone, including a child, from eye-level is to treat them as an equal. The elevation of the camera gives you the choice of treating someone as a hero or a victim; or making a landscape tactile or spacious.
A game or a dance?
The checkerboard exercise is a simple example of just how many potential perspective options there are within any one situation. What is even more important to remember though, is that this idea does not just apply to portraiture; it applies to nearly every genre of photography, from macro images on a table top, where a few millimetres can make a big difference to a photo, through to landscape and aerial photography where one or two kilometres – or in some cases 50 kilometres – can dramatically change a photograph for the better.
The important part about all of this though, is that it really does remind us of the scale and potential of any given shooting situation. Of course, every photographer will approach these situations in their own unique way. Many photographers will plan out the line and length of every photo they take, while other photographers will simply rely on serendipity; that luck of walking around a corner to see a great scene on a day when they just happen to have their camera with them. But for photographers like me, there are also those dynamic situations where the music is happening, the crowd is moving and you need to be constantly moving as well to find the important elements within the scene. I am still looking for the line, length, the lens and the elevation within the photograph. But when everything is moving around, that’s when it feels more like a dance for me.
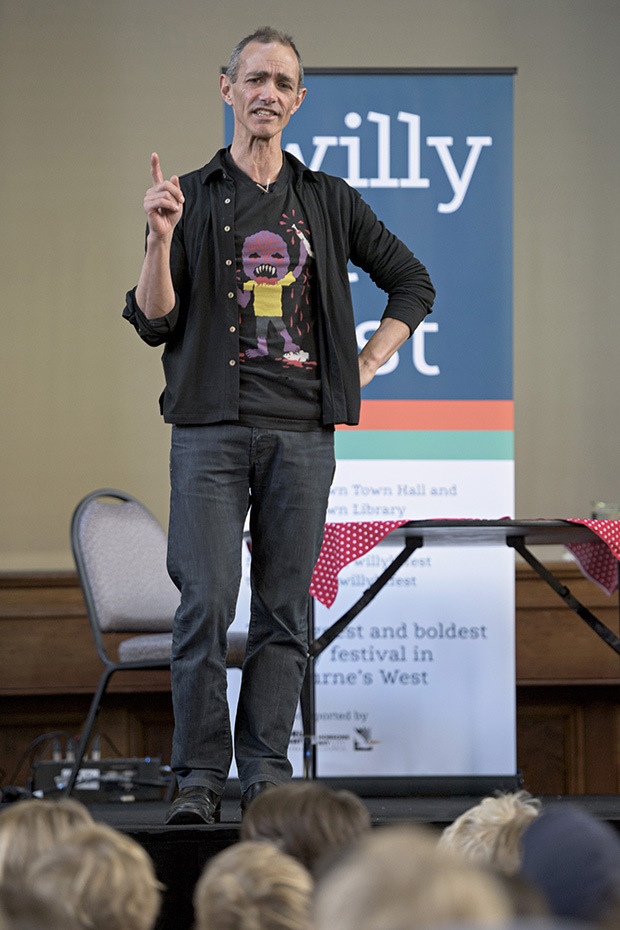

Perspective is not a tool to be pulled out when you’re stuck for ideas; it’s a fundamental consideration which photographers should apply to every photo. Here are a couple of images of writer Andy Griffiths entertaining a group of children at the recent Willy Lit Fest (Williamstown Literary Festival) in Melbourne. Both photos were made from the same line and the same length – in other words, the same location. The difference is that for one photo I got down low to include the heads of the children and I used a telephoto lens to make Andy appear large in the photo (left). In the other photo (right) I put the camera on a monopod, put a 20mm lens on the camera, and then held the monopod and camera above my head while the self timer captured the photo. Same location, two very different images.