


Australian photographer Peter Solness is a master of night photography. Using torches and long exposures he creates images that change the way we see and interpret the landscape. Here, he shares seven great tips to help you create amazing light paintings of your own.
01 PLAN
Use the daylight hours to scout potential locations. This is the best time to think about composition and get the lay of the land so you don't trip over anything in an unlit area. It's seventy per cent pre-planning and thirty per cent making it up as you go," says Solness.
02 QUALITY NOT QUANTITY
"One great shot is better than 100 ordinary ones," says Solness. "Just because you can take lots of photos, doesn't mean you should! Enjoy constructing your own unique image. This will take time, but that's OK. It really comes down to how much energy and faith you want to invest in a single image to make it the best it can be. As a general rule, it's best to aim for quality not quantity."
03 WATCH OUT FOR STRAY LIGHT
"Always be aware of any stray light which might impinge on your images," says Solness. "Even if you do a daylight visit beforehand to a particular location it's often hard to anticipate the effect of street lighting or other stray lights which pop up at night. It may mean you have to reconsider your composition, so be prepared to think on your feet once you arrive at your chosen location."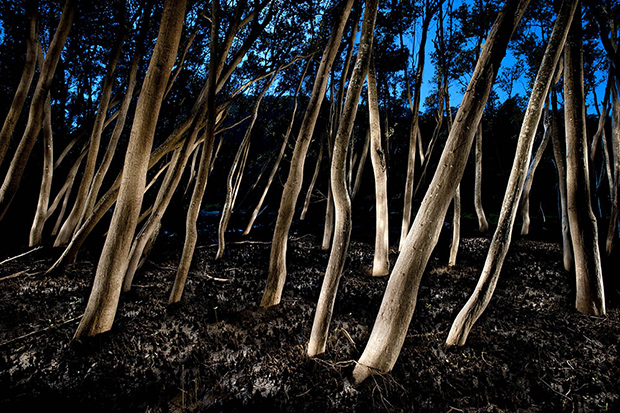
Mangrove forest #2, Hawkesbury River, 2010. I had to kayak into this spot on the Hawkesbury River and camp overnight. I hand-lit the forest. It took about two hours and many exposures of about 30 seconds. Nikon D3 at f/8, ISO 400. Images merged using Photoshop layers and painted through.
04 ESTABLISH EXPOSURE
Set up your tripod and camera and shoot what Solness calls an "establishing exposure" to work out how bright any ambient light in the sky might be. Then shoot 30-second exposures at apertures like f/8 and f/11 with the ISO set between 200 and 800 ISO. Experiment with different settings to get the results you want.
Aboriginal engraving series No. XII, Bundeena, 2009. This is part of a successful series I began in 2007 to capture the spirit of these fading rock engravings around Sydney. I used a Mini-Maglite torch with the bare bulb exposed and walked around the engraving over a 90-second period. I then painted other areas of the scene using various torches to fill in the details. Nikon D3X, 30 seconds at f/6.3 and ISO 400.
05 WHICH TORCH?
A torch with a wide beam of light is helpful for illuminating large objects within the landscape such as trees and, while a concentrated beam, facing towards the camera, is ideal for drawing lines and tracing around objects. Coloured gels are used to modify the colour of the light. These days, Solness uses torches by LED Lenser.
06 KEEP IT SIMPLE
Apart from basic necessities like water, clothing, food, etc, Solness carries just one camera, one zoom lens (a 24-70mm), one medium-weight tripod, and a small bag of torches. "The more you carry into the bush at night the more things you will certainly drop, break, lose or fall over!" he says.
06 Watch out for stray light
"Always be aware of any stray light which might impinge on your images," says Solness. "Even if you do a daylight visit beforehand to a particular location it's often hard to anticipate the effect of street lighting or other stray lights which pop up at night. It may mean you have to reconsider your composition, so be prepared to think on your feet once you arrive at your chosen location."
Squiggly Scribbly Gum, 2009. This image was a spontaneous idea. By standing behind the tree and passing a small torch around the trunk I could get the effect I wanted, but it wasn't until I hand-drew the many scribbles of light (to replicate the pattern of the scribble marks on the tree itself) that this image really came to life Nikon D3, with several 45-secon exposures at f/8, ISO 200. Mini-Maglite with exposed bulb.
07 SAFETY FIRST!
"The problem with hand lighting landscapes is you have to be able to get close to the subject to apply the light," says Solness. "If this means balancing on the end of a 30 metre drop in the dark to reach that great tree that is hanging off a cliff, you may have to ask yourself the hard question – is it really worth it? Be realistic about such challenges and always put a priority on your own safety! If you are "going bush" you must take proper precautions. Speaking from personal experience, you shouldn't leave the responsibility for your own safety to a rescuer! Twelve months ago I had to be carried out of a remote location in the Royal National Park by two burly men late at night after a heavy fall on slippery rocks. I ended up on crutches for a week with a suspected broken leg. Now I carry an EPIRB location detection device, a mobile phone, a whistle and a first-aid kit!"
Edited excerpt from "Light up the night", first published in Australian Photography + digital magazine (November 2012).