
Photo tip of the week: Setting up an iPad photography workflow
It was only a matter of time before the processing power and hard drive storage of tablets were fast enough and large enough to accomodate the needs of some travelling photographers. The primary advantage of using a tablet rather than a laptop computer is of course weight – or the lack of it. The 10.5 inch iPad Pro weighs in at just 477 grams or 1.05 pounds. The MacBook Air in comparison weighs 1,350 grams or 2.96 pounds – that’s a weight saving of 873 grams or 1.92 pounds.
The weight saving is equivalent to a Sony A6500 with an 18-135 lens or a Sony A7RIII with FE 2.8/25 ZA (both of these camera options are actually a fraction less than the weight saving). The iPad Pro 10.5 inch with a 512 GB capacity is also 20 to 35% cheaper than a MacBook with the same 512 GB hard drive capacity (something you need in order to be able to store all of the photos from an extended location shoot).
The A10X Fusion chip with 64‑bit architecture of the iPad Pro makes light work of photo processing using image processing apps such as Adobe’s Lightroom CC Mobile. Lightroom CC Mobile is a free app but if you are a Creative Cloud member you also get access to all the Premium Features. This includes the ability to edit Raw files, add ‘Selective adjustments’, such as the Linear and Radial Gradients plus adjustments via the Brush tool. Creative Cloud members will also find that any images edited on the tablet are then synchronised with Lightroom on their other devices including their mobile phone, desktop and laptop computers.
Mobile Imaging Workflows
I have just returned from a 2-week location shoot in Tasmania using the Sony A7RIII and A9 cameras where I shot approximately two and half thousand, or 90 GB, of Raw images which I then transferred to the iPad Pro over the course of the trip.
I chose to transfer the images to the iPad via a Lightening to SD Card Camera Reader with transfer speeds listed as being ‘up to USB-3 speeds’ when using the new iPad Pro. With Sony’s newer E-Mount models that feature a USB-C port, the USB-C to Lightening Cable may also be an option for transferring images directly from the camera to the iPad (but I have not currently tested this option).
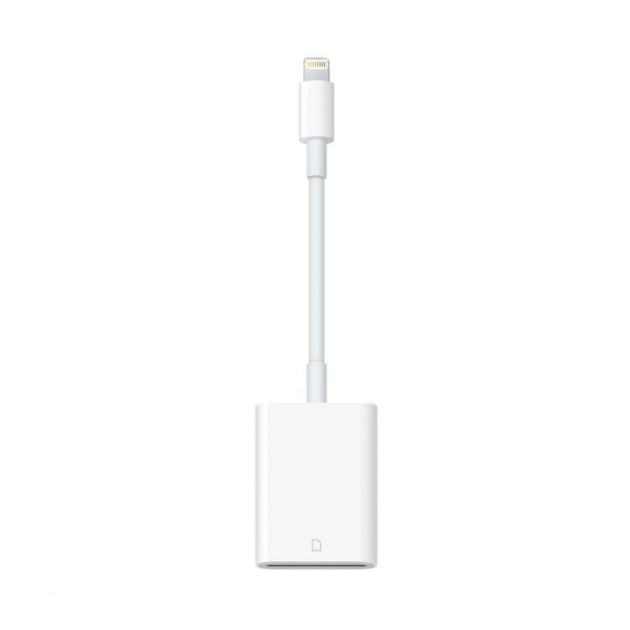
When the SD card is connected to the iPad, Apple’s ‘Photos’ App opens and invites you to import the Raw images. You then get the option to either Delete or Keep the images on the SD Card. As I always wanted to ensure I had at least two copies of my images I elected to choose the ‘Keep’ option with the intention of filling the entire 64 GB card and then formatting the card only when the images were archived on my LaCie RAID storage device at home.
With 2 x 64 GB cards in both the A9 and A7RIII I was pretty confident I wouldn’t have the need to reformat the cards while travelling. I am using SD XC II cards in Slot 1 of each camera and these have a write speed of 299 MB/s and Apples’ Photos App imported the images quickly, although I noticed the Uncompressed Raw files from the A7RIII took noticeably longer than the compressed raw files from the A9.
I did not, however, consider the import unreasonably slow. When I reinserted the card a second time I chose the option to ‘Skip Duplicates’ so the images already imported would not be imported a second time.
Managing your Mobile Data
Probably the most important advice I can give to anyone wanting to try this workflow is to Switch off Mobile Data for Apple’s ‘Photos’ app and ‘Lightroom CC’ in the iPad Settings. As we are dealing with huge amounts of data when shooting Raw it is quite feasible you could blow your mobile data allowance in a single session if these are inadvertently left on.
If you have not purchased a generous amount of storage on Apple’s iCloud drive (more than you intend to shoot while you are on location) then you also need to switch off the iCloud Photo Library option, the one that wants to ‘Automatically upload and store your entire library in Apple’s iCloud’.
This is a great option if you have enough available iCloud storage and you will have the option to use a fast Wi-Fi connection at some point during your travels. This would mean that if your camera (complete with memory cards) and iPad Pro were lost or stolen while travelling you would still have all of your images that were uploaded to the Cloud. I switched the iCloud Library back on while travelling when I stayed at a Motel with fast Wi-Fi.

Unexpected Cloud Activity
One thing I had not considered in this new workflow was that I own an older iMac, currently being used as an office computer (book keeping, but not image processing). The iCloud Library on this computer was switched on in the Cloud preferences (probably the Default option), so on my return from my travels this computer attempted to download the 90 GB of Raw files.
Being an older computer it did not have enough hard drive storage to download this much data – but this did not stop it from trying. This led to the iMac developing problematic behaviour and then having difficulty starting up after shutting down. The computer would not run smoothly until the iCloud Library was switched off and the raw files deleted from the computers iPhoto library. The computer was so unstable until this action was carried out that just logging in and navigating to these options was problematic.

No such thing as a free lunch
The idea of paying for Cloud Storage to run this mobile centric workflow may be a deal breaker for some photographers. It is, however, possible to run the workflow without uploading originals to either Apple’s iCloud or Adobe’s Creative Cloud but many of the benefits of this workflow would be removed.

Advantages and Disadvantages of an iPad Pro imaging workflow
The first minor disadvantage to the iPad workflow is that images have to be imported into Apple’s Photos and then added to the Lightroom CC Catalog. This does not duplicate the images but the extra step is one that doesn’t exist when using Lightroom on a laptop computer. Once the images are in Lightroom CC, however, the editing experience is enjoyable.
I like the tactile approach to editing images, e.g. brushing adjustments with your fingers rather than a mouse. The high resolution of the iPad screen provides enough detail for precise editing (2224 x 1668 resolution at 264 pixels per inch). The screen can also utilise the larger P3 colour gamut (larger than sRGB).
The extended battery life of the iPad Pro also means that you do not need to be looking for power points in your motel room or on a long International flight. The iPad Pro also has the benefit of being able to be recharged via a portable charger.

Lightroom Mobile: Is it up for it?
Lightroom Mobile has come a long way since it first arrived on mobile devices a few years back. It is, however, only a lighter version of the Lightroom Classic edition you may be using on your desktop or laptop computer. What this means is that a few features that may be part of your exisiting workflow may be missing on the current version of Lightroom CC for mobile.
Although I found editing a single images was fast and efficient, a couple of the features that were noticeably missing were the Spot Removal tool and the Transform panel that I use to ‘Keystone’ or correct the images that were captured with my ultra wide-angle lens. These missing features will probably make an appearance in future updates, but this was the state of play while travelling in March 2018.
Perhaps the single step that I really missed was the ability to copy the settings from an edited image and apply them to multiple images in the Catalog. You can apply Previous settings and ‘Copy’ and ‘Paste’ from one to another, but not paste to multiple images. This would be the feature that makes me think twice before my next trip. I am hoping this is a feature that, when introduced, will patch the gaping hole in this workflow.

Step by Step – I was really surprised to find out how many steps there were!
Here are the steps to my own iPad Pro Imaging Workflow. This is a relatively new workflow for me so I strongly suspect it may change over time as I try to streamline the workflow or that I may have made the workflow more complex than it needs to be.
1. Subscribe to extra Cloud Storage with Apple and Adobe Creative Cloud. I have currently subscribed to 200 GB with Apple and 100 GB with Adobe. Note > Any files backed up to the Cloud on a trip will be most likely be temporary and removed when I have backed these files up on my RAID device after I have returned home.
2. Go to Settings > Mobile Data on the iPad Pro and switch off the mobile data for Lightroom CC and Photos (syncing Raw files with anything other than fast Wi-Fi is not a good idea). I had uploaded 16 GB of Raw files before I had even found this option.
3. Go to System Preferences > iCloud > Photos. Click on the Options button and uncheck the iCloud Photo Library option on any computer that you don’t want your Raw images from your iPad to end up on.
4. Download Lightroom CC to your iPad Pro and Sign in to your Creative Cloud account.
5. In Lightroom CC go to Settings > ‘Cloud Storage & Sync’. Check the ‘Use Cellular Data’ is switched off (an extra precaution to prevent you from blowing your monthly mobile data allowance in one editing session).
6. I also click on the Cloud icon in the top right-hand corner of the screen and choose ‘Pause Syncing’. I click on ‘Resume Syncing’ when an editing session is complete and I am left with just the hero images from my shoot.
7. Insert SD card from camera into a Lightening to SD Card Camera Reader
8. Import Images into the Photos App on the iPad Pro
9. Create a new ‘Album’ in Lightroom CC and give it a name, e.g. your current location
10. Open the Album and then click on the Add Photos icon in the bottom right-hand corner of the screen. Choose ‘Camera Roll’.
11. Select all the images you want to edit and then hit the Add Photos in the blue bar at the bottom of the screen.
12. Review, Edit and Rate the photos in the Album (Reject any images that you do not want to keep in the Lightroom Catalog). Remember that Lightroom will sync any file left in the Album when your resume syncing to your Creative Cloud account (if you have a Wi-Fi connection).
13. Use the Filter icon to show only the Rejected Files. In the Options choose Delete (they will be removed from the Lightroom catalog but will remain on the iPad and can still be accessed via the Photos app.
14. When you have returned home connect the iPad Pro to your computer and import the Raw files into Photos.
15. Go to File > Export > Export Unmodified Originals.
16. Import images into Lightroom or Archive to an External Drive/RAID (remember that the edited images that remained in your Lightroom Catalog on your iPad will automatically be shared/downloaded to Lightroom Classic on your computer. Just remember that the default location for these Raw images controlled in Preferences > Lightroom Sync
A Bug in the System
At the time of writing this article I found a bug in Adobe’s mobile workflow. There is an option to share any image from your Lightroom Catalog to Social media. If I selected an image to share with Facebook and the recommended size of 2048 px resolution (the largest image size supported by Facebook) the size of the image that was then uploaded was 960 px. The resulting images shared then looked pixellated when viewing them full screen on the iPad. The workaround to this problem was resolved by first saving the image to the ‘Camera Roll’ and then to Facebook from Apple’s ‘Photos’ and not from Lightroom.
Conclusion
The good news is that the workflow works. I was, however, slightly surprised that I hadn’t thought through how the workflow would work before I started this test run. I found myself scratching my head a few times as things were not as obvious as I expected them to be. Crashing my office iMac was certainly one aspect I hadn’t considered because it was not directly used in the workflow.
I am not sure whether this review will encourage you to dive in and use the workflow yourself or just put you off the idea. For users who are very comfortable with Cloud workflows I am sure this is all manageable and nothing to be feared. The idea of not having to carry another two pounds of glass, metal and plastic may be all the encouragement you need.
About the author: Mark Galer is a seasoned professional photographer, educator, and author, a former contributing editor for Australian Photography magazine, an Adobe Ambassador and Photoshop Guru. See more of his work at markgaler.com, on Facebook and instagram. This post originally appeared here and has been republished with permission.