
Photo tip of the week: Patagonia from a landscape perspective
As a sparsely populated mountain region shared by Argentina and Chile in South America, Patagonia has long been an attractive place for mountaineers, hikers, tourists and photographers.
On the Argentina side, Los Glaciares (LG) National Park forms the largest national park in the country covering 7269 square km, while on the Chile side, Torres del Paine National Park forms the other major part. In 2016 I spent 40 days on the Argentinian side, chasing the light and seeking out photo opportunities whenever I could. Here's what I learned.

Don’t rely on online
Unlike photography from an easily accessible location, photographers are usually constrained, both by time and by physical demand, for their photography options in a vast mountain or remote wilderness environment such as Patagonia.
It’s for this reason that establishing good knowledge of a destination’s geographic features, before actually going into the field, is particularly important. Various online sources usually provide a starting point, but an up to date topographic map and a trekking guidebook of the region will usually contain additional information that is not covered online.

With my trip, because topographic maps contain so much more details of the mountains that we could not find online, I purchased a topographic map and a trekking guidebook of LG National Park and studied them carefully.
LG National Park has two major clusters of mountain peaks – the famous Fitz Roy and Cerro Torre that also form the most iconic feature. Around these peaks, there are four mountain lakes: Laguna Piedras Blancas, Laguna de los Torres, and Laguna Sucia are under Fitz Roy peak, and Laguna Torre is under Cerro Torre peak.
After I arrived in El Chalten, I paid several visits to the park visitor centre and further confirmed two remote mountain locations that I planned to visit. I learned that one track on my map did not exist due to a recent glacier sliding. So an alternative pass was suggested to me by the staff at the visitor centre.
Go beyond the golden hours
In many mountain and wilderness places, the weather is usually quite unpredictable, and dramatic light conditions may occur after sunrise or before sunset. Taking advantage of special weather conditions is the key to extraordinary shots. So when one takes photographs in such places, trying to stay longer after sunrise and coming earlier before sunset is vital. In some situations, extreme weather such as snow, windy or rain may appear at anytime during a day, and create surreal atmospheres. Don’t miss the chance to photograph these!

As in all other places, sunrise and sunset are the two golden periods for taking photos. In particular, since Fitz Roy and Cerro Torre peaks face east, in proper weather and with fine light conditions, these peaks light up beautifully and glow red in the rising sun.
That said, I found that going beyond the golden hours was often necessary as Patagonia’s weather could change dramatically at any time during a day, and quite often such unstable weather condition offers a special photography opportunity.
As an example, I took an image of De Agostini campsite one afternoon, far before the sunset golden hour arrived. It had rained for couple of hours and the sky was covered with thick clouds. But just in a moment, the sky suddenly opened up and the sunlight shined the valley while the rain still continued to fall.
Don't forget to shoot at night
Capturing the night sky has always been an important element in my landscape photography. Camped near Laguna Capri one night the sky was crystal clear, full of blazing stars, and the lake was smoothing and still. In front of me was the Fitz Roy peaks: Perfect conditions for a star trail.


I set up my Nikon D810 on the tripod and connected it with my Nikon MC-36A Multi-Function remote shutter release. I set the shutter speed to 3 min, ISO 640, focal length 32mm and an aperture of f/5.6. Finally, after carefully checking all setting parameters and the tripod’s stability, I took two experimental shots. For the next one and half hours, I let the camera automatically expose for 24 frames successively.
When the camera completed the last exposure, I was surprised to notice the last shot showed Fitz Roy glowing brightly in the dark! I lifted my head up to the sky and saw the peaks still translucent in the night. At the same time, the moon was rising behind me. I realised that I had captured an amazing natural occurrence – glowing Fitz Roy peaks under moonlight.

The Milky Way is one of the most interesting elements in night photography. Using proper apps can help you get relevant information about the moon phase, the Milky Way position and the twilight period, from which you may set an accurate plan.
It should be noted that an appealing composition with a strong foreground is essential and should not be neglected during the planning process. Also note that most likely, different exposure times and ISO settings are needed for the sky and foreground, respectively, in order to avoid a significant under exposure for the foreground.
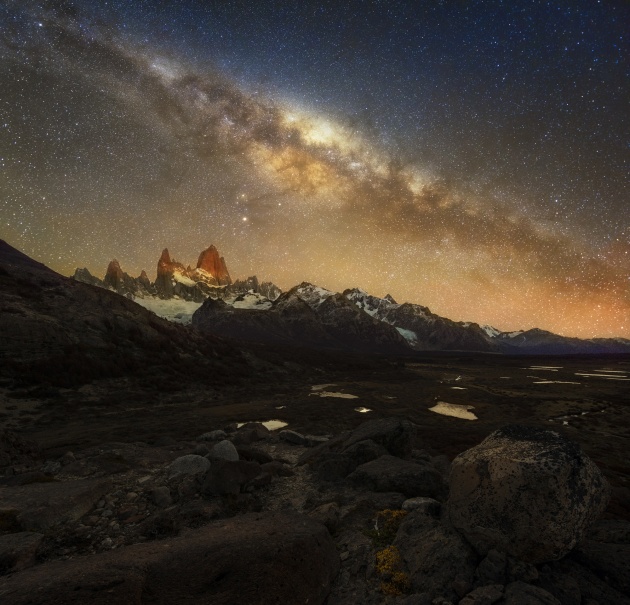
Even before this trip, I’d been intrigued by capturing the Milky Way over the mountain peaks. After I arrived I carefully chose my shooting location and time and after extensively scouting the park, I finally identified a primary location. Located 6 km away from the town of El Chalten along the track towards to Poincenot and Rio Blanco campsites was a place where one could view the Fitz Roy peaks closely along a hidden creek.
The next critical factor was deciding on my shooting time. With the assistance of the App PlanIt! for Photographers, I was able to precisely calculate when the Milky Way would appear closely over Fitz Roy and at the same time avoid moonlight interference in the night sky.
Through the App, I knew that the morning of 10 May 2016 local time would be an ideal moment to shoot the Milky Way. I noted that it would be a moonless moment, and the Milky Way centre would move down towards the Fitz Roy peaks around 7:30am when the twilight was just about to start.

Think outside the frame
In addition to the embedded 2:3 ratio frame for DSLRs, either in landscape or portrait format, shooting a panorama is an effective way to capture vast landscape scenery.
In Patagonia I discovered many complicated scenarios with interesting elements spreading from the foreground, to the middle ground and to the background. In these instances a larger square composition was the best option compared to a traditional 2:3 landscape or panorama format. For me, cropping an ordinary frame into another frame ratio is not feasible as I do not want to lose resolution and detail from the original shot.
I took the following image from an unknown location 10 km outside town El Chalten. From a vantage point, I could view both Fitz Roy (right) and Cerro Torre (left) peaks at the same time and a zigzagged river down the gorge forming an impressive leading line towards the mountains.
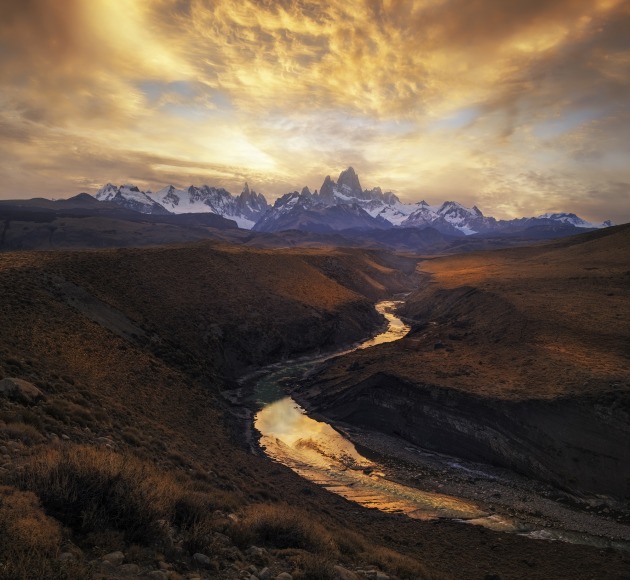
To create my shot, I initially focused on the foreground and mountain peaks with a bit less than 1/3 of the frame space to include the sky. However, when the sun lowered, dramatic cloud formations appeared.
As I did not want to eliminate any details of the foreground elements, i.e. the grass and river line, nor the upper part of the sky with beautiful cloud patterns, I decided to shoot in square format by combining two separate single landscape format shots from the bottom to the top. By the end, the final combined image captured exactly what I had hoped to express at this amazing moment.

My suggestion is to not be constrained by the normal DSLR frame ratio format. Using a square frame for example needs to be creative in composition, because not every location is suitable. Generally if a scene contains appealing foreground and middle ground, together with a large part of the sky appearing to be interesting, e.g., the Milky Way, a burning sky, etc, then such a scene is perfect for square format.
Choose the right equipment
Gear on a photography trip needs to be well balanced, and especially so if you’re going to the mountains. Getting rid off heavy telephoto lenses from your backpack may significantly reduce unnecessary weight and help you move easier. However, a stable tripod and ballhead are critical to make quality shots in extreme mountain weather- they should not be comprised.
Because Patagonia is well known for its strong windy conditions, it is not uncommon that wind in the mountains may quickly reach a hurricane force during bad weather, especially in summer. For this trip, I brought my Benro C2980T tripod and the biggest Really Right Stuff ballhead BH-55. Through various difficult weather and terrain, they were both excellent for stabilising my camera in challenging conditions.

Circular Polarising Lens (CPL) and Neutral Density (ND) filters are essential for shooting scenes involving water elements like waterfalls. I usually used both CPL and ND filters to cut out unwanted leaf and rock reflections and reduce the overall shutter speed. In my opinion, these two types of filters should definitely not be neglected if you’re heading into the mountains.
For this trip, I brought three Nikon lenses, a 14-24mm f/2.8, 24-70mm f/2.8 and 70-200mm f/2.8. But I never got a chance to use the 70-200mm f/2.8 lens because all the major mountain peaks were so close. In hindsight, the 70-200mm f/2.8 lens would be the first one I would remove. In general, I believe two lenses covering the 14mm to 70mm focal length, e.g. a 14-24mm f/2.8 and 24-70mm f/2.8 in my case, is sufficient.
I hope these tips are enough to get you thinking about your next trip. Plan, take the right gear and think about what you’re shooting, and chances are you’ll come away with great images. ❂
About the author: Yan Zhang is a Sydney based passionate landscape photographer and an outdoor and mountaineering enthusiast. Yan’s photographs have been published in professional photography, geographic and travel magazines such as Practical Photography, Popular Photography (Chinese), Landscape Photography Magazine, New Zealand Geographic and Colours. Yan is also an editor and regular contributor to the e-Magazine of 1x.com – the world’s largest curated online photography gallery. See more of his work at yanzhangphotography.com.