
Photo tip of the week: Landscape photography 101
Have you ever wondered how to take your photography into to the next level? or want to increase your chances of producing stunning photographs sooner rather than later? You’re in the right place! I’d like to share with you a few of my tricks for landscape photography that are sure to improve your chances of furthering your craft. These are not rules that you must live by, but rather a loose checklist to speed up your process and learning curve. Let’s get started.
1. Come Prepared
Being prepared is incredibly beneficial. There’s nothing more frustrating than arriving to an incredible spot that you have not been before, with only 93 seconds to find, compose and fine tune your camera, while the sky is exploding with colour all around you! If it has ever happened and you’ve missed an opportunity, you know how bad it burns.
To prepare myself before I head out in the early morning or late evening for a shoot, I like to have scouted the spot beforehand, earlier in the day or on other trip. I find my composition when I have plenty of time to really assess all options and get my composition dialled in perfectly. It’s at this time that I can attempt to predict when the light will be ideal and the best time for any other conditions to occur I may want in the shot. Things such as time of year (autumn colour, sun position), tides, swell, moon phase, Milky Way position etc. This may mean returning later, but doing so can improve the odds of my photograph going from a nice image to a stunning one. Now, when I arrive later that day, or return on a separate trip, I know exactly where I need to be and once setup, all I have to do is wait with fingers crossed that mother nature throws something my way.
But of course nothing may come of your planning. There will also be times when you simply stumble across something stunning when all the elements have aligned. There is always a bit of luck involved!

2. Know your equipment
I have seen it before and I am sure I will see it again. People scrambling around their camera equipment while the light is peaking, trying to figure out how to make simple adjustments. This is so easily avoidable! Your camera is a tool and one you need to be proficient with in order to reach your desired result. That is all it is, a tool. So learn how to use it!
Cameras can do all sorts of funky things these days, most of which I have no idea how to use, nor do I need to. What I am urging you to know inside out is which dial adjusts aperture, which adjusts shutter speed, which one adjusts ISO, as well as how to accurately focus your lens. It isn’t crucial to know where to find the WiFi settings in your menu to share your photos instantly to Facebook.
Practice all of this at home when you have plenty of time and are under no pressure. Know which apertures are sharpest for your lenses. Evaluate the limitations of your equipment. At what ISO does noise become an issue? What kind of dynamic range can your sensor handle? Knowing all of these things and not having to figure it out on location will mean you are focused on what’s important, and that is effectively and efficiently recording light with artistic flare.
3. Immerse Yourself
Now that you are in nature with your camera ready to make photographs, it is time to settle in and really immerse yourself in the scene. What is it that talks to you about a location? What is it that gets your heart racing and makes you feel inspired? It is these things that will reflect in your imagery and showcase a little bit of you in your work.
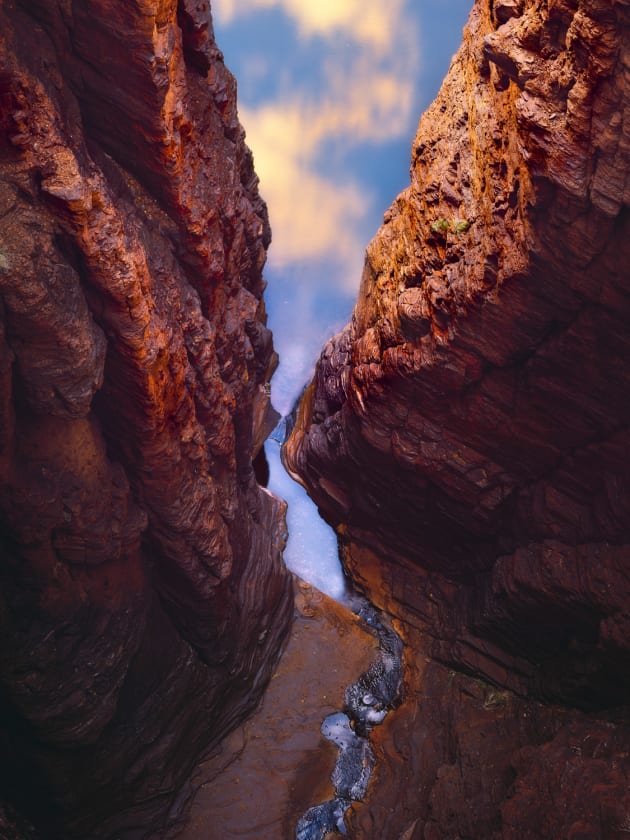
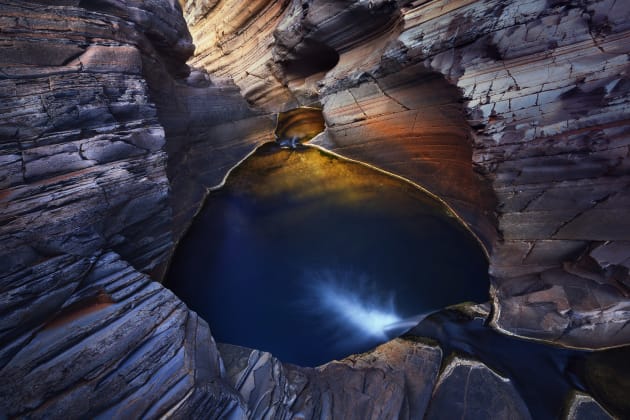
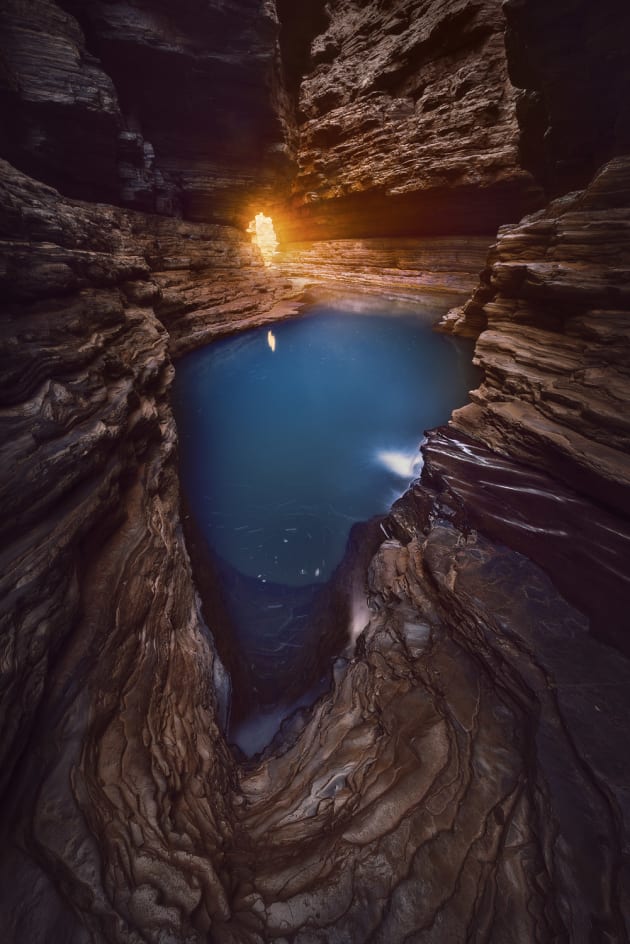
You may be attracted by the textures of the water in a river cascade, the colour of the glowing reflected light deep inside a gorge, or the patterns of sand dunes through you long lens. What is that you love about it?
There will also be times when you are at a beautiful location but nothing jumps out at you. It is times like these that I might not even get the camera out. Don’t try and force creativity.
4. Live Review
It is so simple to review and access your composition on digital cameras so why not critique yourself before everything is said and done? Once you are set up and before the light arrives, take some test shots, then ask yourself some questions. Is the composition strong? Does your eye lead through the frame but not out of it? What shutter speed will give the desired affect for say, water movement? Once you have a clear idea, adjust accordingly.
5. Collect Data
The process of making a photograph with a digital camera is simply recording data, or light. So with that in mind, I want to record as much data (light) as possible that I can then take back to my lab. Doing so allows me to have recorded as much information as I could to ensure that I will have detail in my shadows and highlights. I also want to do this as simply as possible while producing the cleanest file that I can.
A useful technique known as ‘Exposing to the Right’ is worth knowing. It simply refers to exposing your image so that the majority of the pixels are towards the right hand side of your histogram but not clipped. This allows you to capture as much light (data) as possible. Your image will look and will technically be overexposed however you can pull that back down in your RAW processor. This will produce a far cleaner, more detailed image than the other extreme, underexposing and having to push light into your shadows.
Where necessary other more advanced techniques such as exposure blending may be used for more extreme situations or you may implement focus staking for pin sharp images front-to-back.
6. The Art Comes First
This is incredibly important. Having just mentioned some more advanced techniques above, I believe that they should only be implemented when absolutely necessary. Don’t get caught up in techniques such as exposure blending for dynamic range, focus stacking for sharper images, or stitching purely for resolution, but end up missing the best of the light, or fudging your composition. All you will be left with is a technically great image that is creatively boring. Always place importance on the art. Is your composition dialled in? Is the light peaking right now for a split second? Don’t risk missing a great shot just for technical gain that may only be splitting hairs anyway. A technically brilliant photograph is not necessarily a brilliant photograph!
7. Steady On
Today’s you beaut cameras might be able to do some pretty amazing things, but replicate what a solid set of legs can do is still not one of them. A sturdy tripod is an absolutely essential piece of equipment in landscape photography. Without one, you risk coming home from an amazing shoot when all those elements aligned only to realise on the big screen that all of your images are blurry. Flimsy legs will easily be moved when shooting in windy conditions or moving water. These movements may not be noticeable while you are shooting but any movement during your exposure will ruin your photograph and don’t start to think that Photoshop can fix it! I have seen it many times before, top of the line cameras and the best glass available sitting on top of a sub par tripod. A 40mp camera with movement through the exposure will render a useless file, while a 16mp camera on sturdy legs will produce stunning results. Food for thought.
8. Pre-conceived idea or an open mind?
So when you are planning a shoot, should you have a preconceived idea of what you are looking for or not? For locations you know well, of course a pre-planned idea is fine, however at new locations it may hamper your results. I am guilty of going to a new place with my mind fixated on one idea, and then actively hunting out that image. This can be counter-productive in landscape photography because you risk missing the opportunities around you. You might have walked past a stunning composition and simply not noticed because you weren’t open to exploring the possibilities. At new locations I much prefer to go in with an open mind. I like to just take my time to walk around. This allows more options to present themselves and for me to be more open to considering them.
9. Any excuse to get away…
We all like to take a break from our day-to-day routines so here’s another excuse to get away more often. More time spent with your photography brain switched on with no other worries, will assist in making better photographs. I find that if I have at least a few days (ideally more) to spend in an area it allows me to settle in and really explore. Not only will I find things that would have been missed on a one night stop over, but I also have the luxury of returning to spots that interest me if I am waiting for favourable conditions. The luxury of time allows me to get into my groove.
10. No failures, just stepping stones to success
Your attempts on occasion will fall short of your own expectations. Great images (and I mean truly great images) are rare. The ones that stop you in your tracks for more time than it takes to double tap on Instagram. There is plenty of really beautiful imagery out there but it’s not everyday that an image commands your attention and draws you back again. These will be rare. You can of course improve your chances by getting out as often as you can, understanding your vision and style and actively pursuing it. However be prepared to mess things up. You might visit an epic location and have all the elements align and completely fluff it. But that’s all part of the process and it happens to the pros too! As with everything though we learn from our mistakes and it helps our craft grow.