Photo tip of the week: How to get great shots of Vivid Sydney
With many of Sydney's best-known landmarks once more dressed up in laser light, we asked AP intern and Vivid enthusiast Will Pembroke to share his best tips for shooting this iconic event and to name a few of his favourite shooting locations.
Vivid is back and judging by the crowds over the first few days, the annual event is more popular than ever. For photographers, the sheer number of people jostling for the best vantage points can make shooting difficult, but you can still get some great shots if you know the best spots and take the time to plan your visit. Here are seven simple tips to help make your Vivid experience as rewarding as possible.
1. Location
Locations are an important part of taking photos and it’s also the thing that’s going to set you apart from other photographers. Unfortunately the thing with Vivid is most of the locations in the inner city are packed full of people. But If you know where to look you can find spots that not many people know about. I've listed three of my favourite shooting spots below but it's worth doing your own research. Instagram and google maps are useful tools for scouting new locations.

2. Getting there
Once you have identified some promising locations make sure you know how you’re going to get there . Remember, it's going to be crowded and getting around is not easy. The goal is to spend as much time as possible shooting, not working out how to get to your next shooting location!
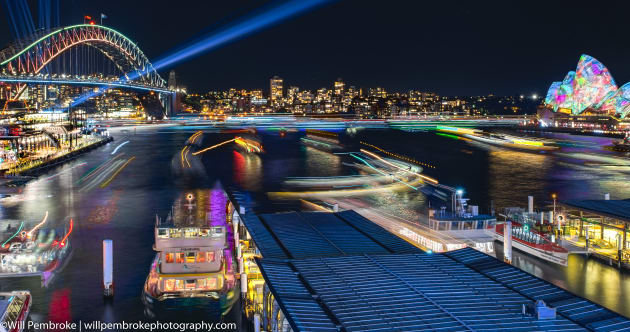
3. Plan your shots
Think about the kind of photos you want to get, and what you need to do to get them. One of the shots I wanted to take last year was an image stack that would transform the moving boats in the harbour into brightly coloured light trails. Knowing what I’d need to capture in-camera helped make my image editing process quicker and easier when I got home.
4. Avoid weekends
The best and least crowded nights to go are from Monday to Thursday, especially Monday night. So if you’re planning to go to a spot like the Royal Botanical Gardens where it can be extremely busy at times, then I recommend going on a week night and if you want it to be less crowded. Heading out when it’s raining is also a good idea.

4. Spare battery and cards
It sounds obvious but make sure your batteries are charged and your memory cards have plenty of spare capacity before you head out. Long exposures and cold nights will see your battery discharging at a faster rate than usual so it's worth bringing a spare. With night exposures you're better off shooting RAW too, so keep in mind that's going to take up a lot more space on your card compared to shooting JPEG.
5. Work the scene
Make sure to work with the scene and if it’s crowded find a way to include or exclude the crowds depending on the type of image you want to take.
When you’re at the location make sure to look around too. Maybe go behind the spot you are at or look for vantage points up high or down low. Explore. You never know, you might find a spot that no one has thought to shoot from.

For example, in 2016 I went to an amazing spot looking towards the Opera House on top of the Overseas Passenger Terminal in Circular Quay. Last year I went back to the same spot and decided to have a look around at the back of the terminal. I ended up finding a couple of locations and took a few nice shots there.
6. Experiment
Getting interesting photos that haven’t been taken a million times before can be a real challenge especially with an event as huge as Vivid. One way to get around this is by experimenting and being creative with rarely used techniques. For example, try something like zooming into the photo while doing a long exposure (below).

You could also try using a lens ball (below), available online, to ‘invert’ and soften the light and create an interesting effect.

7. Editing
Stacking photographs with HDR (High Dynamic Range) can be a good way to pull more detail out of your photo and create a more interesting scene, something that can lead to striking shots at a brightly lit event like Vivid. I understand it might not be everyone’s taste but it’s worth a try.

Will’s favourite Vivid locations
Cremorne Point
My favourite spot from this year would have to be Cremorne Point, I went to this spot to get a wide perspective of the city, getting the whole skyline and many of the installations into the photo.

Sydney Harbour Bridge
Although it’s hard to get a stable shot on the bridge, if you put the camera on the ledge of the bridge you can minimise the shake. It’s a great spot to get the ferries and other boats going into Circular Quay.

Cahill Expressway on top of Circular Quay train station
You can get to this spot by going up an elevator that is located past the station on the eastern side behind the wharves. This spot is popular with photographers but you can usually find a good spot to capture the boats coming in and out of the wharf.