
7 brilliant tips to help you shoot amazing slow-shutter-speed photos
Travel photographer Drew Hopper shares seven great tips to help you capture stunning slow-shutter-speed photos on the street.
Long exposure photography has become very popular over the past decade, particularly among landscape and astro-photographers looking to add a more surreal mood to their pictures. However, this is doesn’t mean that long exposures are limited to those specific areas of photography. With street photography, people often think of the ‘typical’ black and white, static and candid captures that freeze the action. This may be popular, but it’s also great to break the mould and apply some creative uses of slower shutter speeds. After all, street photography is about anticipating and capturing a moment before it’s gone, which often requires the photographer to react within a split second of a moment unfolding in order to grab it. Adding a slower shutter speed shutter can help add drama to street photographs, in fact there are many different times when a longer exposure may be beneficial in bringing out the essence of a street moment.
Here are my seven tips to inspire and hopefully give aspiring photographers some insight into how they can add a sense of motion to provoke their street shots.
01 PRE-VISUALISE
Just like all types of photography it’s important to have some kind of image pre-visualised in your mind in order to best understand what it is you are trying to communicate. This could be as simple as deciding on a location, time of day, subject matter or even how you want your viewer to feel when they view your image. By pre-visualising your shots you’ll be able to work out what length of shutter speed is required to more accurately capture the image you have in your mind. For example, if you want to capture a sense of motion as someone passes by your camera, you will probably need to be side-on so that when the subject passes through your frame you can track or pan with them to grab your shot. You’ll also be able to determine what length exposure will work best depending on the available light.
02 EXPERIMENT
Experimentation is the key to learning new things in photography, and it should be something you do from time-to-time. Not only will it help you stay passionate, the more you experiment, the more opportunities you will discover. Long-exposure street photography is a great example of this kind of experimentation.
Go out shooting during the early hours of the morning or late afternoon on dusk when the light is low. Adjust your camera settings to increase or decrease the amount of light on your sensor. Take a mental note of what settings are favourable for the ambient light. Your shutter speed might be too long for the image you want to capture; as a result you may need to increase the sensitivity of the sensor by boosting the ISO, wait for a time when there is more light, or add light to the scene artificially.

03 LIGHT AND MOVEMENT
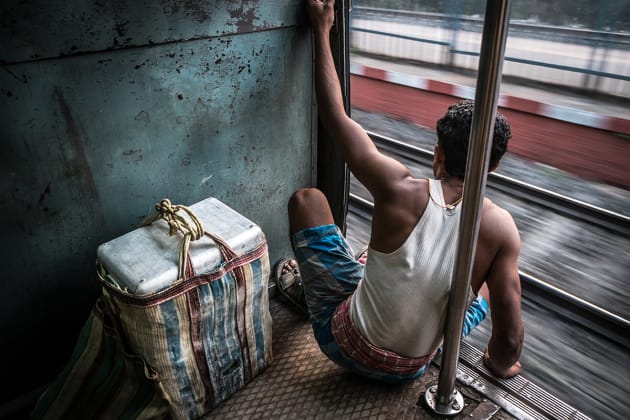
Busy crowds and streets are always interesting with slower shutter speeds. By slowing your exposure you are able to add a sense of motion and isolate certain elements in the scene, which can be extremely useful in focusing attention on certain parts of a frame. Shooting on an overcast day, early morning or afternoon is often the best time because the light is not intense – that means you can drop your shutter speed down significantly. You may also want to invest in some neutral density filters (ND filters) to aid in increasing your exposure time for the desired effect when the light is brighter or more direct. Again, the key is to experiment with settings and different situations to find out what works best.

04 ANTICIPATE THE EXPOSURE
This is a basic technique that street photographers use regardless of whether they’re shooting long shutter speeds. The only difference, and one thing to remember when you start using slower exposures, is that you have less time in-between shots due to the shutter speed remaining open for longer. This is why it’s a good practice to be alert and time the shot to capture the most interesting moment. It’s a fairly basic practice but it’s worth perfecting to heighten your photography opportunities on the street.

05 PRACTISE PANNING
In short, panning is a technique applied by moving your camera to track a moving subject. Done right, you’ll end up with a nice sharp subject and a blurred background. Sometimes, getting the best results is down to sheer luck, but like anything you can improve your ‘hit rate’ the more you practise. Either way it’s fun to do and a fantastic way of giving a shot a feeling of movement and speed.
Try different shutter speeds to see what gives the best results. There are a number of factors that can make or break a good panning shot including the speed of the subject, your position relative to the subject, the lighting and, of course, the shutter speed. First, you need to activate your camera’s auto-focus function and half-press the shutter button to lock it onto your subject. Once locked, aim your camera and pan with the moving subject. The key is to allow the pan to continue after you’ve fully pressed the shutter.
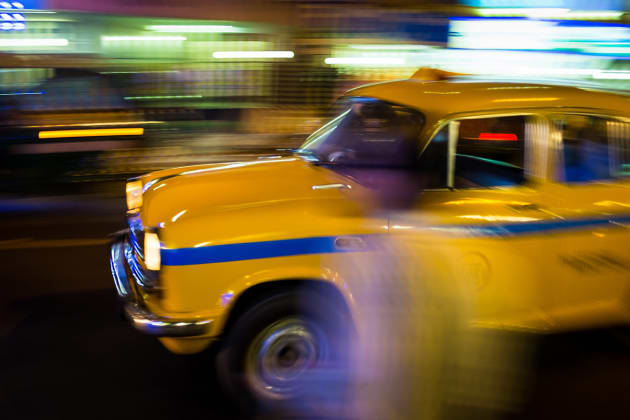
06 ZOOM AS YOU SHOOT
Another great effect for creating a sense of motion is to add a slight zoom blur, also known as “zoom burst”. It’s fairly easy to do and can give some incredibly dynamic results. Zoom can be added either by adjusting the zoom on your lens or, if you are using a prime lens, by travelling on a moving vehicle while shooting with a slow shutter speed. I’ve found anywhere between 1/15s and a couple of seconds is usually long enough to achieve a nice clean zoom effect. The result gives subjects increasing radial blur around the edges of the frame, while the centre appears sharp or less blurred. It’s a great way of drawing attention to a specific element within an image to make the viewer feel as if they are moving through time.
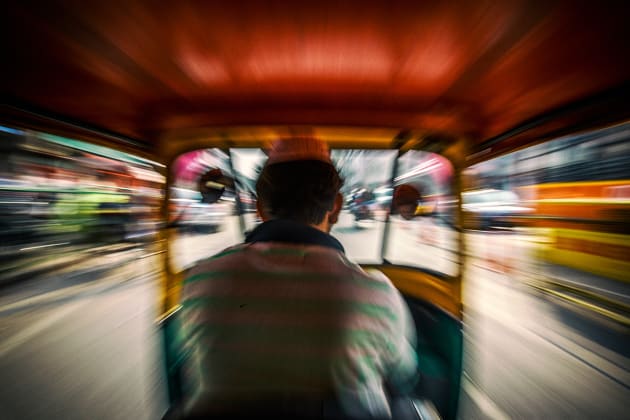
07 SHAKE IT UP
Camera shake is often frowned upon, but it can be desirable in some cases. Intentional camera-shake can induce an artistic and unique feel to an image, especially on the street when there’s a lot of clutter around. An exposure between 1/30s and one second is usually enough time to give a nice blurred effect while handholding the camera. This effect will allow you to have complete creative freedom to move around and paint motion with your camera during the exposure. Just as with panning, it will require a few attempts to master, but when perfected your images will stand out from the crowd.

Edited excerpt from 'Beauty of Blur', first published in Australian Photography magazine, March 2017.