
The power of RAW on iPhone
I take a lot of photos. Usually, I pack either a Sony a7R II or a Leica M — two cameras with massive sensors and brilliant lenses. But lately, I’ve been shooting exclusively with the iPhone X, and have found it absolutely excellent.
I am the design half of the team that makes the iPhone app Halide, which is a camera app with manual controls and, most importantly, RAW capture.
RAW is a file format that holds an incredible amount of information. We’ll get into the details later, but first, let’s show what you can do with it.

RAW affords you editing freedom. Absolute freedom to change the colors and white balance of a photo, or recover too-bright highlights and too-dark shadows.

However, as awesome as RAW is, it’s important to know RAW isn’t a magic “enhance” button. Some of our users sometimes reach out with confusion about their RAW images looking worse than a regular capture from the stock camera app.
It’s helpful to understand how a RAW file is fundamentally different than JPEG, to fully understand the tradeoffs.
So What’s a RAW File?
Think of the process of taking a photo as three steps:
1. A sensor captures light
2. Software translates detected light values into an image
3. The image is saved as a file, like JPEG

Step 1
When you take a photo, light from the camera lens shines through several optical elements and falls on a small, smaller-than-a-pinkie-finger sensor behind the camera lens. The sensor has small individual spots that capture light, with small filters on them to capture the colors red, blue and green.

To understand RAW files, you need to know that what your camera sensor sees is very different than what makes it onto the screen. A RAW file just saves the values it measures on this sensor. If we took a look inside the file, it would look something like this:

That’s not very useful to us as humans. Here’s where the next step comes in.
Step 2 and 3
The data is passed to the imaging processor, a chip that takes what your sensor ‘saw’, does some magic (we will get to this later) and instantly converts it to a JPEG (or HEIC) file, finally storing it on your phone.
This is processing, a hardware and software process that translates those individual red, green, and blue patches into this:

…and discards the rest of the sensor data. Voilá: your photo.
That’s the process for a JPG. Processing RAW files is a lot of work, so that’s why Apple saves the processed file as a JPEG or HEIC. These require much less space, and they’re much faster to load.
However, they do this by throwing out information that your monitor doesn’t need, and details that your eyes can’t see.
When you shoot JPEG, you really need to get the photo perfect at the time you take it. With RAW and its extra data, you can easily fix mistakes, and you get a lot more room to experiment.
What kind of data? RAW files store more information about detail in the highlights (the bright parts) and the shadows (the dark parts) of an image. Since you often want to ‘recover’ a slightly over or under-exposed photo, this is immensely useful.

It also stores information that enables you to change white balance later on. White balance is a constantly measured value that cameras try to get right to ensure the colors look natural in a scene. iPhones are quite good at this, but it starts to get more difficult when light is tinted.
Here’s an original RAW file:

And here are two different white balance settings (an edit like this is impossible with a JPG!):

Many of us have felt disappointment when we photograph a beautiful sunset only to find it looking entirely unlike what our eyes see. With RAW, you can change the image afterward to make it resemble what you actually saw. A JPEG capture essentially commits to the white balance the camera estimates was accurate when the photo was taken.
In essence, the stock camera app decides how to process RAW files for you, making choices like ‘What is the most natural white balance?’. Sometimes it’s wrong; sometimes you want to go in a different creative direction. Processing photos is just as much art as science.
So, Should You Always Shoot RAW?
No. RAW isn’t always the best choice. Because RAW files can’t use lossy compression, they’re about 10 megabytes, while the humble JPEG is under three megabytes. If you’re taking a photo of where you parked, RAW is probably overkill.
But there’s a more serious issue: a lot of people turn on RAW, and they’re confused at photos looking kind of… bad. What’s going on?
RAW Caveat 1: Always Check for RAW Support
We’re not just talking about the app you use to take the photo: only load RAW files in apps you know support RAW files. This is very confusing because RAW files look like regular image files to most apps.
Remember how we said RAW files are really slow to load? It would be annoying to flip through a folder, trying to find a particular photo, and have to wait a few seconds for every file to load.
That’s why RAW files also contain a very low resolution preview image. It isn’t designed for editing, just finding your photo. This preview is only half a megapixel, while the real image inside is over twelve megapixels.
Now this is where most people get confused: apps that don’t support RAW will still load the image. However, they just load the low-resolution preview instead of the full-resolution image. And they won’t warn you. Believe it or not, the built-in iOS Photos app doesn’t support RAW, and that’s why you see this:

Most of our bad reviews mention blurry images. Our top support requests are the same. As iOS still doesn’t inform users in the Photos app that an image is a RAW file, we recommend you edit RAW files in Darkroom, Snapseed, VSCO, or Lightroom. As soon as you do this, the problem is solved.
It’s easy to blame users for being ignorant, but honestly, we were just as surprised by how iOS handles RAW files—and we build a camera app!
We’ve found a solution: in our next big update, we’ll save both a RAW and a Processed image in your camera roll. It’ll look like a single image, so it won’t clutter your camera roll. Apps that support RAW will know how to access it, while apps that don’t will fall back to a full resolution, preprocessed image. This will be much less surprising to people.
We’ll have an option to opt-out of this if you want to save a little storage space. In this situation, we’ll only save RAW, and no accompanying JPEG.
RAW Caveat 2: RAW Skips Apple’s Magic
Apple’s stock camera app does a lot of cleanup behind the scenes. This is ‘magic’. Yes, magic. The imaging processor in every smartphone and camera does some magic. This is the kind of stuff that is a closely guarded secret.

On the left is raw data from the sensor, and on the right is what the photo looks like after the “magic” is applied. There’s a lot going on here: advanced noise reduction (hardware-based in your new iPhones 8 and X!), merging several exposures to get more detail in the highlights and shadows, and picking the sharpest frame in a set of photos to reduce the movement of your hands.
Sounds wonderful, but this isn’t always great. Sometimes the noise reduction is aggressive and destroys fine detail; other times the grain can be pleasant.
I find that the new iPhones have a type of noise that isn’t always bothersome. In some shots, it can almost look like film grain.
However, if you’re shooting in very low light, where the grain can get extreme, you may benefit from noise reduction.
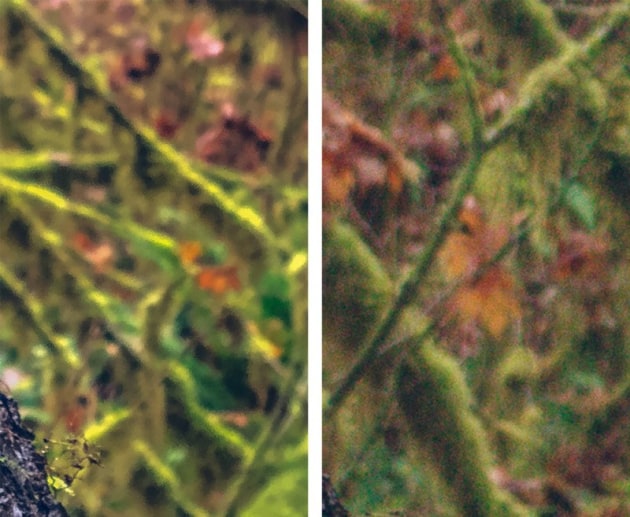
This photo has full iPhone X noise reduction:

This photo is a RAW without noise reduction:

The second photo has far better highlight recovery, but the noise is colorful and bothersome in the shadows.
Mind, you could do this noise reduction yourself: there’s plenty of noise reduction software to chose from, but Apple’s is really quite great, and it would further complicate your editing workflow.
RAW Caveat 3: Portrait Mode
You also lose “Portrait Mode.” When shooting in this mode, iOS is taking two photos simultaneously and measuring their differences to figure out the depth of objects in scenes. While in this mode, RAW capture is unavailable.
(Depth maps, which are created by measuring this difference, do look cool though—and we can capture them, just not while also shooting in RAW.)
We don’t know Apple’s precise reasons, but we do know calculating depth-maps is very taxing on your phone. We wouldn’t be surprised if it is just about performance. Hopefully, someday they’ll unlock the ability to capture RAW while in portrait mode.
Conclusion
When you’re informed about its benefits and drawbacks, shooting in RAW on your iPhone can lead to some spectacular results!
P.S. We’re working hard on Halide 1.6 to ease some of iOS’ quirks when it comes to RAW support. We think it’ll help a lot of users that are confused about RAW, and we have a few more tricks up our sleeve to make it an awesome release. Stay tuned!
About the author: Sebastiaan de With is a photographer, freelance designer, and the designer of Halide. The opinions expressed in this article are solely those of the author. You can connect with him on his website, Twitter, and Instagram. This article was also published here, and is published here with permission.