


It’s one of the most commonly asked questions in digital photography – how do I reduce the file size of an image without noticeably reducing image quality?
Generally speaking, the most effective way to reduce the file size of an image is to save a version of the image in the JPEG (.jpg) format.
RAW formats (such as .crw, .nef, .dng and .orf) produce notoriously big file sizes. In some cases upwards of 20 or 30MB straight out of the camera. Likewise, TIFF and PSD are image formats produce very large files.
That's not to say those formats don't have their advantages – they do. For one, they contain more image data than JPEG files and that can be useful when editing, particularly if you want to, say, bring out more detail in the shadows or highlights of a photo.
But once an image is edited, there is very little to be lost and a lot to be gained by exporting an additional JPEG version that can be easily emailed or uploaded to the web.
Most photographers are familiar with the process of converting a file to the JPEG format. In most image-editing programs, the process is as simple as selecting File > Save As in the main menu, choosing JPEG (or .jpg) from a list of different formats, and then selecting a compression-quality setting between 1 and 10, 1 and 12, or 1 and 100%. (Settings of 8/10, 9/12 and 80% generally produce the best balance between file size and image quality.)
While the File > Save As command certainly does a good job of reducing file size, there is another option which offers more control, smaller files and excellent quality.
An increasing number of programs offer dedicated "Save for Web" commands and they often do a better job of compressing JPEG images than the conventional File > Save As option.
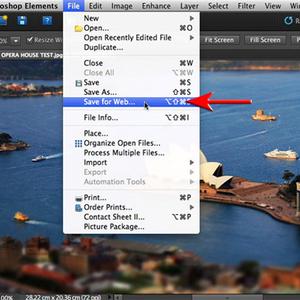
If you're preparing images for the web, and you own a copy of Photoshop Elements 9, the best option is to use File > Save for Web, rather than File > Save As. (Photoshop CS5 has a similar command, Save for Web & Devices.)
As a test, we saved two JPEG versions of a 25MB TIFF file. Both images were resized from 3500 pixels wide to 750 pixels wide, and both given a JPEG quality setting of 75%. One version was saved using the File > Save As method the other with the Save for Web command. Save As got the file down to 205KB, Save for Web shrunk the same image to 111KB – almost half the size. You might expect that the smaller image would not look as good, but the difference in image quality is imperceptible.
So, how do you do it? Here's how to make the most of Photoshop Elements' Save for Web command in six easy steps...
01 SAVE FOR WEB
When you’re ready to save your image go to the main menu and choose File > Save for Web. This step brings up the Save for Web dialog box.
02 ZOOM IN TO 100%
You can now see two versions of your image. The version on the left is the original image. The image on the right is the new image. You can compare the images to check image quality. Note that the file size of the images is displayed below the previews. Use the drop-down box in the bottom left corner to zoom in to 100 or 200%.
03 JPEG, GIF OR PNG?
The drop-down menu near the top-right gives you the option to save your file in one of four image formats: JPEG, GIF, PNG8 and PNG16. Each format has its advantages but JPEG is the most widely used.
(interactive03.jpg)
04 QUALITY
The Quality setting controls the amount of file compression. The lower the number the smaller the file size. If image quality is important to you, don’t use a setting below 70/100. In this example, we used a setting of 75 (equivalent to 9/12 where you use Save As option).
05 PROGRESSIVE
The Progressive option changes the way the file loads – with progressive checked the image will be blurry when it first loads then become clearer. Non-progressive images load line-by-line. We generally choose progressive even though it means marginally larger file sizes.
06 WIDTH AND HEIGHT
If you need to adjust the size of the file, use the Width, Height or Percentage boxes near the bottom of the panel, and make sure Constrain Proportions is ticked. When you’re done, click OK. This brings up the Save Optimized As dialog. Give the file a new name, choose a location and click Save. Your file is now ready to upload to the web.
Article first published in the April-May 2010 issue of Digital
Photography + Design.
Can you pick the difference? While the two JPEGS below look the
same, the image on the left comes in at nearly twice the file size of the image
on the right. Click the thumbnails to see full-size images. (Actual images resized for this article.)