


Creating your own custom modes, which can be accessed at the press of a button, can make you a better photographer. Adventurer, photographer and photo tour operator Chris Bray shares his favourite custom modes and shows you how to do it.
It happens fast – too fast – and then it's gone. All you're left with is a photo of an empty branch where a fraction of a second earlier there was perched a spectacular bird. We've all missed shots because we've been too busy scrolling in the right camera settings – at least I used to, until I learned about using 'Custom Modes' or 'User Modes' which enable you to jump directly to pre-saved settings.
Many cameras can save everything from the camera mode (such as aperture or shutter priority), focus mode, focus points, exposure compensation, drive mode and even default ISO and shutter speeds all into a whole new camera mode. It's the perfect secret weapon for the next time you're shooting birds in flight or any other scenario which you know the basic settings for, but which take a while to set up.
With custom shooting modes, you'll (almost) never miss these shots again! Not all cameras have custom/user modes, and you shouldn't confuse them with 'Custom Functions' (which are for altering defaults and configuring details of your camera's operation), but most DSLRs do have 'Custom Shooting Modes' or 'User Settings' (or something similar). Different brands call them different things. Sometimes they're saved in different ways, and some let you save more than one – but if you do indeed have access to such a feature in your camera, then read on, and you'll soon be nailing those tricky shots almost every time. It's a trick we often show our photo safari guests, and they absolutely love it.
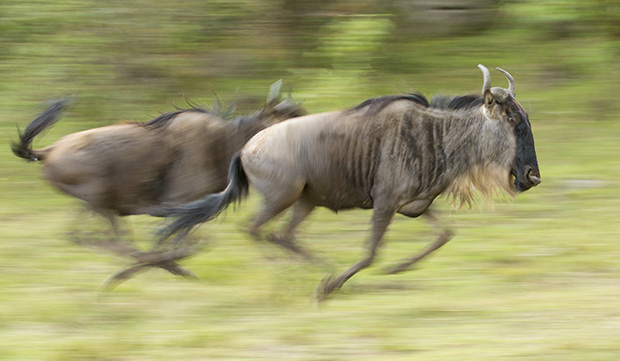
Photographing the endless motion of millions of wildebeest in the annual Great Migration across Kenya and Tanzania is a great photo opportunity. Panning using a slow shutter speed can create a great sense of movement, but the settings are so polar-opposite to normal photos that it takes a while to dial them in, unless you have them pre-saved as a custom ‘panning mode’. Canon EOS-1D X, 200-400mm lens @ 200mm, in-built 1.4x extender, 1/30s @ f/11, ISO 1000, handheld. Curves, levels, minor cropping & sharpening adjustment in Lightroom CC.
USEFUL CUSTOM MODES
There were many scenarios where my safari guests and I used to find ourselves having to dial-in the same bunch of settings every time. For example, trying to capture birds in flight, dolphins and breeching whales, particularly slow photos for panning, or fast ones to avoid shake when shooting from a vibrating, doors-off plane or helicopter. It saves a whole lot of effort and – crucially – time, to pre-save these into their own custom modes. Of course you're free to save whichever set up you use most often, but for what it's worth, here are the settings I often use for my custom modes.
BIRD MODE
Whether our safari guests are trying to track and snap an African Fish Eagle in flight as it swoops down to snatch a fish from the lake, a hummingbird buzzing around a flower in the cold forests of the Andes, or waiting for a perched lilac-breasted roller to launch itself into the air for that spectacularly colourful 'wings-out' shot, the camera settings are essentially the same.
'Bird Mode' is my most-used custom mode. The key thing for photographing birds in flight is using a fast shutter speed to freeze the bird's wings, otherwise it's just going to be a blurry mess. So switch to Tv mode (Canon) or S mode (non-Canons) and dial up perhaps 1/2000s for your shutter speed. Set your ISO to 'Auto' so it will do whatever it has to do so that you can get that shutter speed, even in lower light. Birds against the bright sky often come out under exposed, so to combat this, dial up your exposure compensation to perhaps +2/3 (this is assuming Evaluative Metering, but use whatever you like and adjust accordingly).
Set your focus-mode to 'AI Servo' ('AF-C' 'continuous' for some brands). This means that while you hold your shutter button half-pressed, the camera is always updating/tracking the focus, so as the bird flies closer or further from you it will always remain in focus. This differs from 'One shot' (or 'AF-S' mode), which means the camera will only focus once (when you first half-press the shutter button).
Next, it's hard to keep just the centre AF point (which is all I use in normal situations) trained exactly on a bird that's flapping past, so I'd also suggest enabling more than just that centre AF point (some cameras let you use the middle five AF points, the whole middle zone, or perhaps just turn them all on).
One last thing – set your camera's 'drive mode' to continuous drive (or even 'high speed continuous' if it's available) so that when you hold the shutter button all the way down, the camera just keeps rattling off photos as fast as it can, one after the other, until you let go. Continuous shooting is perfect for getting a sequence of the bird in flight, which can be cool, and it also improves your odds, as you can select the best shot from the set later – the one where the wings are perfectly spread, not half obscuring its face!
Bird Mode Tip: When asking for a fast shutter speed like this in Tv (or 'S') mode, your camera will usually automatically select your lens's smallest 'f' number (or the largest aperture hole, to let as much light in as possible). This creates a small or 'shallow' Depth of Field (DoF) which gives you a wonderfully blurry background and foreground, but sometimes, particularly with long lenses that go down to a small 'f' numbers (like f/4), you may find that the DoF is too small which results in only part of the bird being in focus with the far wing perhaps being 'too far away' and no longer sharp. Another reason why this small DoF can sometimes be annoying is that with multiple AF-points enabled (rather than using the single, centre AF point), you lose precise focus control. The camera may, for example, choose to focus on the wing, rather than the bird's head, resulting in the same dilemma of only part of your bird being in focus! In these situations it'd be nice to be able to dial up your 'f' number a bit to give yourself a slightly larger DoF, but being in Tv mode, we don't have control over our 'f' number - or do we? Well, we kind of do - via the ISO setting. Left on 'Auto', your ISO will only be lifted just high enough to get the shutter speed you've requested (using the smallest 'f' number). When setting up to shoot a given scene, if you note what ISO the camera is auto-selecting, and instead dial in a higher ISO value, thus making the camera more sensitive, then the camera will respond by closing the aperture hole a bit (lifting its chosen 'f' number), giving you a bigger DoF! That's much quicker than heading back over to Av mode and dialling in a bigger 'f' number and also then having to manually select an ISO that gives you a fast enough shutter speed.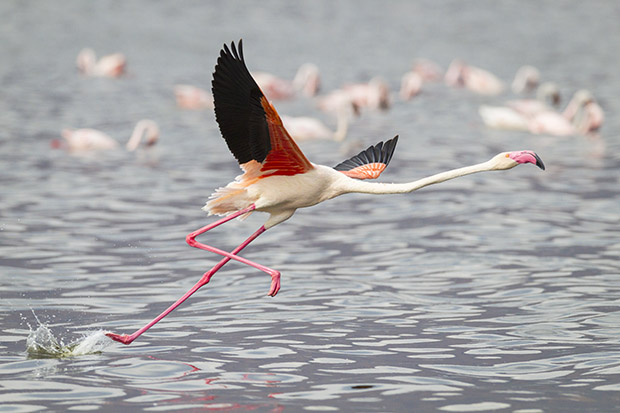
A Greater Flamingo scampers across the surface of Kenya's saline Lake Bogoria, leaving behind a trail of splashes like those of a skipped stone. My tripod was being used elsewhere, so I resorted to handholding my hefty 600mm f/4 lens! Canon EOS-1D Mk IV, 600mm lens, 1/3200s @ f/6.3, ISO 800, hand held. Curves, levels & vignetting adjustment in Lightroom 4.
PANNING MODE
Deliberately using a slow shutter speed while tracking a moving subject can produce beautiful results where the leopard (or whatever your subject is) appears sharp (because tracking it as it walked means you've kept the subject in the same part of the frame for the duration of the photo), but the background behind it has streaked-out from movement blur (of course, because you panned the camera during the photo). Panning is a great way to capture a feeling of movement in an image and a great technique to embrace when the light is fading in the evening and everyone's struggling to get fast photos, but the problem is the settings required are completely opposite to the camera settings you'd normally use, and by the time you've dialled them in, the moving subject has long since gone! Not any more, though, if you set this 'panning mode' into a custom mode like I do!
The key point here is you need a slow shutter speed to capture that blurry background movement. It's a balance – too fast and the leopard won't have moved far enough to give you any streaky background; too slow and it'll be impossible to accurately track the leopard the whole time, resulting in it coming out a bit blurry. It depends how fast your subject's moving, and how long your lens is. You'll get a feel for it, but a good starting point for birds and animals with a telephoto lens could be about 1/30s.
So switch to Tv mode (S mode for non-Canons) and dial your shutter speed down to 1/30s. Again, set your ISO to 'Auto' so that it'll do whatever it has to do to give you that shutter speed irrespective of lighting conditions (it'll usually pick the lowest, ISO 100 - or even ISO 50 if you can enable that in your camera's Custom Functions). Again, set your focus-mode to 'AI Servo' (aka 'AF-C') so it'll track focus on the moving subject, and again, perhaps enable more than just one centre AF point (so you don't have to be so pedantic about making sure you don't accidentally slip the one focus point off the subject as you track it). Similarly again, set your camera's 'drive mode' to continuous so you can just hold the button down and rattle off a whole series of photos, concentrating on trying to pan smoothly. Hopefully you will have managed to do just that on at least one of the shots. Smooth panning does take a little practice, but it's not really as hard as you might think it looks.
Panning Mode Tip: Because you're asking for such a slow photo, you may well find - especially in bright light during the middle of the day when using a very slow shutter speed like 1/10s or longer - that the camera can't help but over-expose the photo. To the untrained eye, you'll likely notice that your photos are coming out inexplicably bright. If you're observant though, you'd have also noticed that when looking through the viewfinder before you took the shot that the 'f' number it was automatically trying to use (likely the largest possible) was flashing, or was even replaced with the words 'hi' or 'low' on some brands. This is warning you that the camera can't stop the lens down enough to give you such a slow photo without overexposing. Then you'll just have to scroll up your shutter speed up a bit faster until it can cope. Don't try to solve the issue by dialling down your exposure compensation to make the photo darker – that won't help. Accept that you're going to have to use a higher shutter speed and get less streaky movement in the background. On the up side, it'll be easier to keep the subject sharp as you don't have to track it for as long!
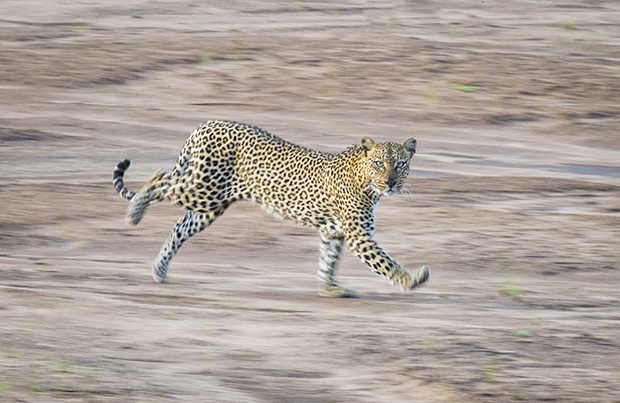
Panning using a slow shutter speed can create a great sense of movement like in this distant leopard running across a dry river in Kenya. Here I simply ratcheted up the ‘f’ number (closing the aperture down) to give me a slow shutter speed for a basic panning shot, but 'panning mode' would have provided me better settings (with a lower ISO, continuous drive mode, tracking AF, etc) and more quickly. I keep it saved in my ‘custom modes’ now. Canon EOS-1D X, 200-400mm lens + 2x extender @ 800mm, in-built 1.4x extender not engaged, 1/100s @ f/29, ISO 3200, handheld. Curves, levels, cropping, vignetting and noise-reduction adjustment in Lightroom CC.
CAR/AIRCRAFT MODE
Photographing from a 'doors-off' plane or helicopter is not only incredibly exciting, but that aerial perspective can produce amazing photos, proving you have the right settings. We take our photo safari guests up in aircraft over Iceland, Kenya, Tasmania, Kangaroo Island - wherever we possibly can - and the trick is to get a fast enough shutter speed that you don't get blurry photos from all the movement and vibrations. Just how fast a shutter speed you need to use depends on how much everything's moving and how much you're zoomed in, but from a buffeting, doors-off helicopter, I like to shoot at around 1/2000s. Shooting from a car with a standard range lens, you can often get away with perhaps 1/500s. Set it up just like 'bird mode' above, but you probably don't need the pre-set overexposure, the continuous drive mode or the multi-point focus as you should still be able to select your
subject accurately.

Photographing from a light aircraft with the door removed is a great way to photograph nature's patterns and landscapes, but the vibrations can make sharp photography a challenge. This is Horseshoe Bend in the Gordon River,Tasmanian Wilderness, shot from a doors-off floatplane we charter for our safari guests. Canon EOS-1D X, 24-105mm lens @ 24mm, 1/1000s @ f/5.6, ISO 1600. Curves, levels, clarity, graduated filter & vignetting adjustment in Lightroom CC.
DOLPHINS AND WHALES
I know they don't look the same, but as far as I'm concerned, when shooting from a boat, dolphins (and breaching whales) are basically birds! They move fast, they can appear from anywhere at any time, and if you're a fraction of a second late, they're gone. With this in mind, I pretty much use my 'Bird Mode' as explained above, to shoot dolphins. I find you can usually even leave the exposure-compensation cranked up a little, as the water and splash are usually bright like the sky.
In a boat surrounded by breeching and sail-slapping Southern Right Whales in Patagonia, it was hard to know where to look, let alone aim my lens. Focusing on and freezing the spray and tail against the sunset is another common photography situation made easier by the use of a custom mode. Canon EOS-1D X, 24-105mm lens @ 105mm, 1/3200s @ f/11, ISO 1600, handheld from boat. Curves, levels, cropping & vignetting adjustment in Lightroom CC.
SAVING CUSTOM MODES
Once you've set up your camera in the normal way, with the correct mode (for example, Tv mode) and all the settings you want to save, go into your camera menu, find 'Custom Shooting Mode' or 'User Settings' or a similarly described location. Again, note that this should not be confused with 'Custom Functions' which are for altering defaults and configuring details of your camera's operation. After finding it, you can then select 'Register/Store/Save Settings' (or similar), and that's it. If your camera lets you store more than one custom mode, you'll then be asked which slot to save it into, such as 'C1', 'C2, or 'C3'. It's pretty straight forward.
Tip for using multiple Custom Modes: If your camera lets you save several custom modes, and they're accessed by rotating the camera's big mode dial on top, it's a good idea to save your most common custom mode into the last space (often C3). Why? Because then you don't even need to look at which mode you're selecting when you need that mode - just twist the mode dial all the way around until it stops! I keep 'bird mode' on my C3, because it's the situation that demands the fastest set up time. Normally I don't find myself climbing into a helicopter at split-second notice, so my 'shooting from chopper mode' is in C2.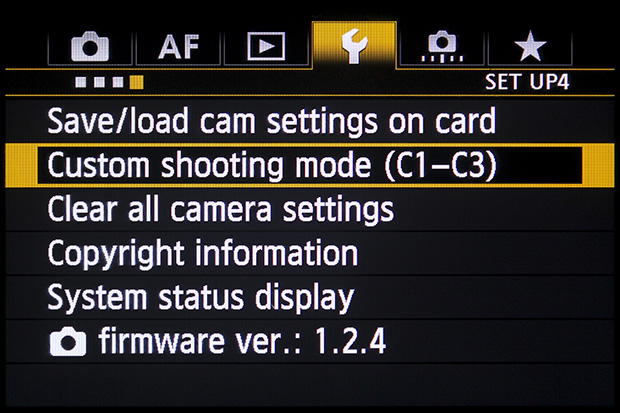
Saving a custom mode is simply a matter of setting your camera up how you like, then going into your camera's menu, finding the 'user mode' or 'custom mode' option, and then 'registering' or 'saving' everything into the camera's memory. This example is on a Canon EOS-1D X, which allows you to save several different user modes, so on the next screen it asks which slot on which you can save the settings, C1 to C3.
USING CUSTOM MODES
Once you've got your favourite settings saved into a Custom Mode, whenever you switch your camera's mode from say Av mode over to your new 'Bird in flight mode' (selected via the usual mode-selection dial/button), everything will jump to those pre-saved defaults, regardless of the settings you're using at the time. The camera will then behave exactly as if you'd laboriously changed to the appropriate camera mode (ie; Tv) dialled in your settings, and swapped to the right drive mode, focus points, and tracking focus. If the particular scenario you're shooting today requires you to tweak things a little (like overexposing a little more, or using an even faster shutter speed), then you can just go ahead and adjust variables as usual, but safe in the knowledge that when you leave 'bird in flight mode' and return to it later, all the settings will revert to those original, 'saved' bird settings. It's easy and it really works!
Chris Bray is an award-winning Australian Geographic photographer who runs Chris Bray Photography which leads small groups of photographers to Alaska, Antarctica, the Amazon, Galapagos, Patagonia, Kenya, Iceland, Greenland, Tasmania, Kangaroo Island, Christmas Island and more. His team also runs highly successful one-day photography courses at zoos and botanical gardens around Australia. Check out www.chrisbray.net for details, and follow him on Instagram at @ChrisBrayPhotography.
Author Chris Bray in Alaska.