


Lightroom’s new lens correction controls can be used to correct all manner of photographic ills, from wonky perspectives to pesky colour fringing. Mark Galer has the details.
Software: Lightroom 5
Rating: Intermediate
All cameras and lenses suffer from varying degrees of optical distortion. Convergence (where vertical lines appear to lean in on each other), vignetting (darkening in the corners of the image), and colour fringing (edges appear with strange colours) are just some of the distortions that will be present in almost every photo you shoot. The good news is that the latest versions of Lightroom and Adobe Camera Raw make it easier to fix these errors than ever before. Read on and we’ll show you how.
01 DOWNLOAD
First, download the three project images (below).


Click the images above to download the high-res start images.
Save the images and take note of where they are saved on your hard drive. In Lightroom, use the File > Import Photos and Videos command in to bring them into the program. Click the photo of the people sitting under the umbrellas and choose Develop.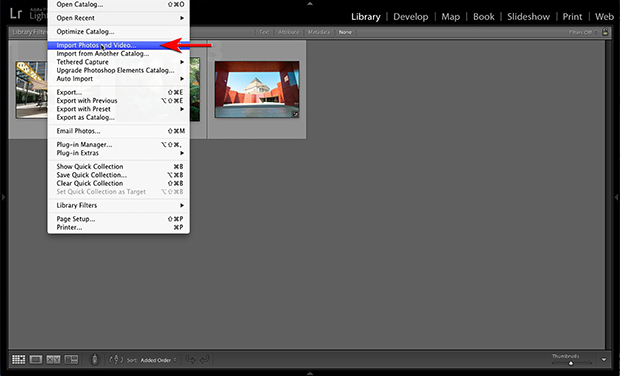
Importing images into Lightroom. 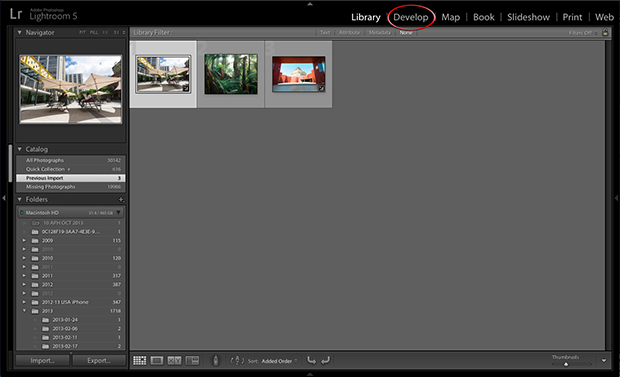
Use the 'Develop' tab to access Lightroom’s editing features.
02 ENABLE LENS CORRECTIONS
Scroll down the panel to the right of the image until you see the Lens Corrections section. If you are planning to automate your edits, the Lens Corrections section should be your first port of call, before you adjust tone, colour, sharpness or anything else. Choose the Profile tab and select the Enable Profile Corrections checkbox. In the example image you can see the software has detected that the image was shot with a Canon digital camera and Canon EF 16-35mm f/2.8 L USM lens. With this information it can automatically correct some of the more obvious distortions – in this case some barrel distortion and vignetting.
Note: If you are using an unusual camera-lens combination, Lightroom may not have a built-in lens correction profile to suit. If that’s the case you may be able to find a custom profile online. The best way to find and download profiles is with Adobe’s free program 'Adobe Lens Profile Downloader'.
]The software detects which camera and lens were used and automatically corrects barrel and pincushion distortion as well as any vignetting.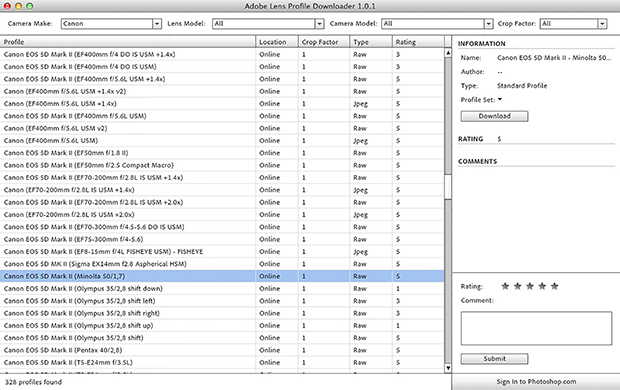
Adobe Lens Profile Downloader lets you download custom profiles for all sorts of strange camera-lens combinations. Is that a Canon EOS 5D Mk II with a Minolta 50mm f/1.7 lens?
03 REMOVE CHROMATIC ABERRATION
Wikipedia defines chromatic aberration as: "A type of distortion in which there is a failure of a lens to focus all colours to the same convergence point… Chromatic aberration manifests itself as ‘fringes’ of colour along boundaries that separate dark and bright parts of the image, because each colour in the optical spectrum cannot be focused at a single common point."
In practise, that means if you zoom in on any high-contrast edges, particularly near the corners of an image, you will probably find these small patches of irregular colour.
If you zoom in on the steel beam in the upper-left corner of the project image you can see red and green fringes around the edges of the oval-shaped openings. In this instance, we can fix the problem very easily. In the Lens Corrections section click the Color tab and tick the Remove Chromatic Aberrations checkbox.
Note: While apochromatic lenses with low-dispersion glass are better than cheaper achromatic lenses, the image in this tutorial shows that even pro-grade lenses like the Canon EF 16-35mm f2.8 L USM are susceptible to the problem.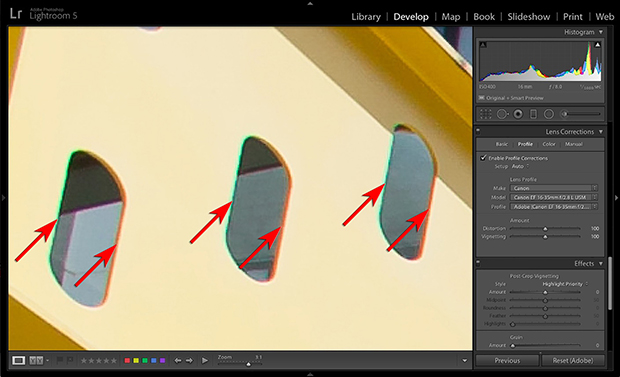
Chromatic aberration is commonly found in areas of high contrast and appears as ‘fringes’ of bright colour, in this case orange and green.
Removing chromatic aberration is a one-click action in the 'Lens Corrections' panel.
04 CREATING A NEW DEFAULT
You can set Lightroom to automatically apply these lens corrections whenever an image taken with this camera is imported to the Lightroom catalog. Simply hold down the Alt (PC) or Option (Mac) key as you click the Set Default button, then click Update to Current Settings.
Note that Lightroom will warn you that 'these changes are not undoable'. That sounds worse than it is. If you reset an image to its default settings the lens corrections will not be removed. However, you do have the option of cancelling any automated lens corrections later by holding down the Alt/Option key a second time and selecting Restore Adobe Default Settings.
A trick for new players – every change you have applied to the image so far will be included in your new default setting. Because of this, it’s a good idea to avoid making changes to exposure, contrast, colour, etc before creating your new default. Otherwise these changes will be applied indiscriminately. Restrict default settings to adjustments you want to make to every image taken with that camera.
In Lightroom’s Preferences (under the Presets tab) you have the option to 'Make defaults specific to camera serial number' and/or 'Make defaults specific to camera ISO setting'. While choosing the ISO option allows you to assign different 'Noise Reduction' settings to different ISO settings, it also means you have to create multiple defaults, otherwise the Lens Corrections and Chromatic Aberration defaults will only be applied at a single ISO setting. This would also remove the option of using Auto ISO as you would have to make dozens of new defaults for every possible ISO the camera may choose. For this reason I suggest you go to Lightroom > Preferences > Presets and turn off ‘Make defaults specific to camera ISO setting’.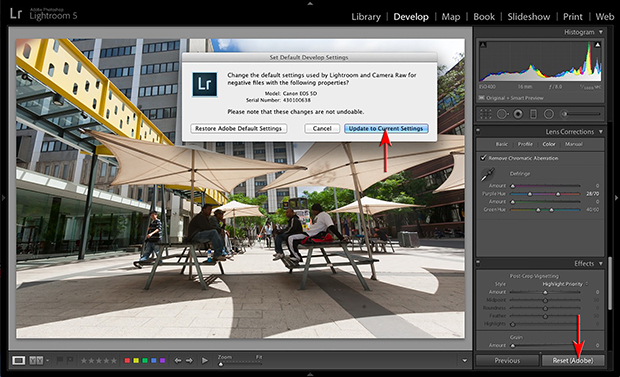
Create a new default to automatically apply automated lens corrections to all images taken with a particular camera-lens combination.
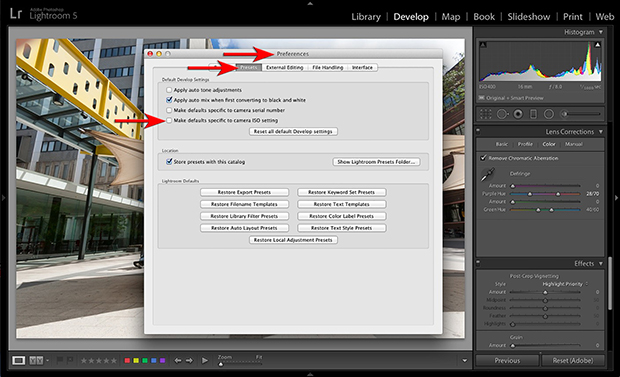
In Lightroom’s Preferences panel, switch off the option to 'Make defaults specific to camera ISO setting'.
05 BLOOMING
Another evil fringe dweller not directly associated with chromatic aberration is the dreaded purple or green fringe. This fringing is more prevalent in images captured with the kind of small overcrowded CCD sensors that are found in cheap compact cameras and smart phones. Purple and green fringes are often found near edges where there is a transition to an overexposed area of the photo. This defect is commonly referred to as blooming. Rather than attempt to realign the wavelengths of the colour spectrum, the ‘fix’ for this phenomenon is to first identify the alien colour and then desaturate it. Older versions of Lightroom and ACR were not great at combating this problem. Lightroom 5 is better though still not perfect.
Defringing in Lightroom involves identifying the problem colour and then clicking on it with the rather large eye dropper in the Color panel.
Manual sliders allow you to adjust the target hue range that will be affected and the amount of desaturation. It’s a good idea to be conservative with these controls as it’s very easy to unintentionally desaturate colours that were never affected by the problem in the first place.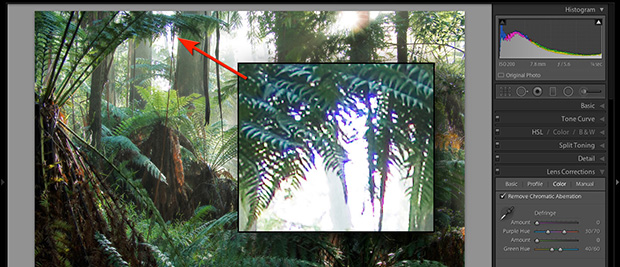
You’re more likely to see purple and green fringing in images shot with cheap compact cameras and smart phones. 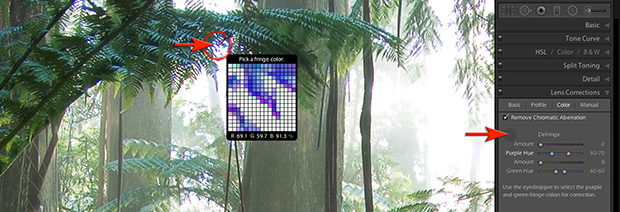
Remove unwanted colour fringes using the 'Eyedropper Tool'.
06 UPRIGHT AND PERSPECTIVE
When you tilt your camera up to photograph a tall object, such as a building, vertical lines in the image converge towards a vanishing point. These converging lines are exaggerated unnaturally when using wide-angle lenses. The process of making these lines parallel is often referred to as ‘keystoning’. In previous versions of Lightroom you could adjust the perspective using sliders in the Manual tab but the process could be fiddly. In Lightroom 5, the new Upright feature (in the Basic panel) offers several one-click options for automatically correcting perspective. If you want a good example of how well it works, open the image of the people sitting under the umbrellas and go to the Develop module. Go to Lens Corrections, choose the Basic tab, click the Constrain Crop check box and then click the Auto button. The image is straightened and the uprights rendered vertical with a single click.
The Auto button seems to be more reliable than clicking on the individual Level, Vertical and Full buttons, though it does depend on the geometry and perspective of the image. Clicking the Constrain Crop box ensures the image is recropped so that the image extends to the edges of the frame after the correction has taken place. The feature is remarkably accurate, though it does occasionally get it wrong when there is an absence of strong lines or the dominant lines in the image are not actually vertical to start with. That’s the case with the second image, a contemporary structure which includes a number of non-vertical lines. To correct the perspective here, go to the Manual tab and use the Vertical and Rotate sliders to square up the main opening. The helpful grid makes it easier to align the verticals and horizontals. Tick the Constrain Crop checkbox to ensure the image extends to the edge of the canvas and the Aspect slider to make the image taller or shorter if you find the perspective correction squashes the image unnaturally.
The original photo with converging verticals, most noticeable in the umbrellas and buildings. 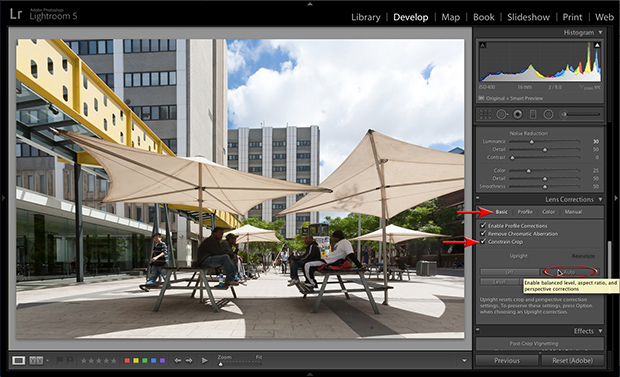
Lightroom’s 'Lens Correction' feature has returned the image to a more upright perspective.
Lightroom’s auto perspective features do occasionally get it wrong. Here, the deliberately oblique lines in the middle distance have tricked the software into trying to correct them. As a result, nothing much is square.
Manually correcting perspective with the 'Vertical' and 'Rotate' sliders.